
• Inserire il codice utente impostato in fabbrica 168 e premere il tasto # quindi
ruotare il pomello in posizione aperta. Se il codice inserito è corretto, la chiusura
emetterà un doppio “bleep” e il LED VERDE si illuminerà.
• Se il codice inserito è incorretto, la chiusura emetterà un “bleep” per 4 volte e il
LED GIALLO si illuminerà.
• Se vengono inseriti codici incorretti per quattro volte consecutive, la chiusura
andrà in blocco per 15 minuti. Durante questo periodo la tastiera non sarà
attiva.
È INDISPENSABILE CAMBIARE IL CODICE FABBRICA CON UN NUOVO CODICE UTENTE
PERSONALE DA 4 - 8 CIFRE. QUESTO PUÓ ESSERE FATTO ESCLUSIVAMENTE CON LO
SPORTELLO IN POSIZIONE APERTA.
Livelli Indicativi di Sicurezza Codice
Codice a 4 Cifre =10,000 variazioni di codice =Alta Sicurezza Grado A
Codice a 6 Cifre =1,000,000 variazioni di codice =Alta Sicurezza Grado AA
Codice a 8 Cifre =100,000,000 variazioni di codice =Alta Sicurezza Grado AAA
INSTRUCCIONES PARA LA SERIE SS0990E
INSTRUCTIONS FOR SS0990E SERIES
INSTRUCTIONS POUR LA SERIE SS0990E
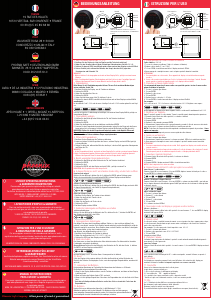
YOU WILL REQUIRE
1) An electric drill.
2) 1 masonry drill bit – 1 x 13mm.
3) Adhesive tape.
4) A pencil
5) A ruler
1) Look for a place that does not restrict access and the swing of the door.
2) Ensure that the floor is level.
3) For best results a concrete floor is preferable.
CHOOSING A PLACE TO INSTALL YOUR SAFE
BASE FIXING INSTRUCTIONS FOR THE
SS0990E CASHIER DEPOSIT SERIES
1) Manoeuvre the safe into the required position. Now with the pencil mark the
floor around the safe. (if the safe is against a wall then just the front and sides
needs to be marked)
2) Open the safe door.
3) Mark the positions on the floor for drilling. Use the pencil through the base fixing
holes in the base of the safe.
4) Now move the safe to one side, giving you access to the markings on the floor.
5) Before using the 13mm drill bit. With the ruler measure 95mm from the tip of the
bit and put a piece of adhesive tape around the bit to ensure you do not drill too
deep.
6) Drill the 13mm holes in the floor until you reach your 95mm marker.
7) Place the safe back into position and insert the complete bolts through the base
of the safe into the drilled holes and tighten.
Your safe is now base fixed.
DRILLING & BOLTING
USER CODE FACTORY SETTING
Used batteries should not be disposed of with normal domestic waste.
These should be disposed of at approved collection points.
You may also return used batteries to your Retailer at their expense
(where applicable)
BATTERIES
NECESITARÁ
1) Un taladro eléctrico.
2) Una broca para mampostería de 13 mm.
3) Cinta adhesiva.
4) Un lápiz
5) Una regla
1) Busque un sitio que no restrinja el acceso ni la apertura de la puerta.
2) Compruebe que el piso está nivelado.
3) Para obtener los mejores resultados, es preferible un piso de hormigón.
ELECCIÓN DEL LUGAR PARA INSTALAR LA CAJA DE SEGURIDAD
INSTRUCCIONES DE FIJACIÓN DE LA BASE
PARA LA SERIE SS0990E CASHIER DEPOSIT
1) Coloque la caja de seguridad en la posición deseada. Ahora, marque el suelo
alrededor de la caja con el lápiz. (si la caja se encuentra contra una pared,
marque sólo la parte delantera y los laterales).
2) Abra la puerta de la caja.
3) Marque las posiciones en el suelo para hacer los taladros. Introduzca el lápiz a
través de los orificios de fijación de la base.
4) Ahora, retire la caja para tener acceso a las marcas dibujadas en el suelo.
5) Antes de usar la broca de 13 mm: mida con la regla 95 mm desde la punta de la
broca y ponga un trozo de cinta adhesiva alrededor de la misma para no hacer un
taladro demasiado profundo.
6) Taladre los orificios de 13 mm en el suelo hasta que llegue a la marca de 95 mm.
7) Vuelva a colocar la caja en su posición e inserte los pernos completos en los
orificios taladrados, a través de la base, y apriételos.
Su caja de seguridad ya está fijada al suelo
TALADRADO Y COLOCACIÓN DE LOS PERNOS
Deposite siempre las pilas usadas en los puntos indicados para recogida
de las mismas. Nunca tire las pilas usadas a la basura convencional.
En algunos países existen tiendas o cadenas de grandes superficies que
aceptan recibir las pilas usadas, cubriendo ellos los gastos de envío.
BATTERIES
MODE D’EMPLOI DE LA SERRURE DIGITALE
PREMIERE OUVERTURE DE LA PORTE
• Entrez le code usine 168 et appuyez sur le bouton #, puis tournez le bouton
poignée sur la position ouverte.
• Si un code incorrect est saisi, la serrure émettra 4 signaux sonores et le LED
jaune s’allumera.
• Si des codes incorrects sont entrés consécutivement quatre fois, la serrure se
bloquera pendant 15 minutes. Durant cette période le clavier sera inactif.
IL EST IMPERATIF DE CHANGER LE CODE USINE PAR UN NOUVEAU CODE
PERSONNEL DE 4 à 8 CHIFFRES CECI DOIT ETRE FAIT AVEC LA PORTE OUVERTE
Niveaux de sécurité indicatifs des codes
Code de 4 chiffres = 10,000 variations de code = Haute Sécurité Classe A
Code de 6 chiffres = 1,000,000 variations de code = Haute Sécurité Classe AA
Code de 8 chiffres = 100,000,000 variations de code = Haute Sécurité Classe AAA
COMMENT CHANGER LES PILES
• Lorsque les piles sont épuisées, le LED rouge s’allumera
• Enlevez le couvercle des piles, situé sous le boîtier du clavier
• Remplacez les piles par des piles 9 V PP3
• Remettez le couvercle des piles
COMMENT CHANGER LE CODE
• La porte ouverte, repérez le bouton de réinitialisation, qui se trouve dessous un
capuchon noir et rond à l’arrière de la porte.
• Appuyez sur le bouton de réinitialisation une fois, la serrure émettra deux
signaux sonores et le LED jaune s’allumera pour confirmer que la serrure est
prête à accepter le nouveau code.
• Entrez votre nouveau code personnel de 4 à 8 chiffres puis appuyez sur le
bouton *
• Testez le nouveau code personnel avec la porte ouverte: en tournant le bouton
poignée vers la position fermée et en entrant le nouveau code. Lorsque le
nouveau code correct est entré, la serrure émettra deux signaux sonores et le
LED vert s’allumera pour confirmer que le nouveau code a été accepté.
WARNING: If you lose the user code, and you cannot open the safe an engineer
may be required. Please contact any Phoenix Service Dept with the serial number
of the safe on one of the following numbers
• UK and Ireland +44 151 944 6447
• Germany +49 202 695 1925
• France, Spain, Italy +33 545 89 68 80
IL VOUS FAUT :
1) Une perceuse électrique.
2) 1 mèche de maçonnerie – 1 x 13 mm.
3) Du ruban adhésif.
4) Un crayon.
5) Une règle.
1) Choisissez un emplacement qui ne gênera pas l'accès, ni l'ouverture de la porte.
2) Vérifiez que le sol est bien plat.
3) Pour obtenir de meilleurs résultats, il est conseillé de choisir un sol en béton.
CHOISISSEZ L'EMPLACEMENT DE VOTRE COFFRE-FORT
INSTRUCTIONS POUR LA FIXATION AU SOL DE LA
SÉRIE CAISSE DE DÉPÔT D'ARGENT SS0990E
1) Posez le coffre-fort dans la position voulue. Tracez ensuite un repère au crayon,
sur le sol, autour du coffre-fort. (si le coffre-fort est fixé contre un mur, seuls
l'avant et les côtés doivent être tracés.)
2) Ouvrez la porte du coffre-fort.
3) Tracez des repères sur le sol pour le perçage. Utilisez le crayon à travers les
trous de fixation au sol se trouvant dans le fond du coffre-fort.
4) Mettez ensuite le coffre-fort de côté, afin d'avoir accès aux repères tracés sur le
sol.
5) Avant d'utiliser la mèche de 13 mm : avec la règle, mesurez 95 mm à partir de la
pointe de la mèche et posez un morceau de ruban adhésif autour de la mèche
pour être sûr de ne pas percer trop profond.
6) Percez les trous de 13 mm dans le sol jusqu'à atteindre votre repère de 95 mm.
7) Remettez le coffre-fort à sa place et introduisez les boulons entiers par le fond
du coffre-fort, dans les trous percés, et serrez-les.
Votre coffre-fort est à présent fixé.
PERÇAGE ET BOULONNAGE
• Le réglage usine du code est 168
RÉGLAGE USINE DU CODE
Les piles usagées ne doivent pas être jetés avec les ordures ménagères.
Celles-ci doivent être emmenées dans des points de collecte agréé.
Vous pouvez également retourner les piles usagées à votre détaillant à
ses frais (le cas échéant).
BATTERIES
Version 2/PB/AUG 15
• The factory setting for the user code is 168
OPERATING INSTRUCTIONS FOR
THE DIGITAL LOCK
OPENING THE DOOR FOR THE FIRST TIME
• Enter the factory set code 168 and press the # button then turn the knob to open
position. When a correct code is entered, the lock will bleep twice and the
GREEN LED will be illuminated.
• When an incorrect code is entered, the lock will bleep 4 times and the YELLOW
LED will be illuminated.
• If incorrect codes are entered consecutively four times, the lock will go into
hibernation for 15 minutes. During this time the keypad will not respond.
IT IS IMPERATIVE TO CHANGE THE FACTORY CODE TO A NEW 4 - 8 DIGIT PERSONAL
USER CODE. THIS CAN ONLY BE DONE WITH THE DOOR IN THE OPEN POSITION
Indicative Code Security Levels
4 Digit code = 10,000 code variations = High Security Grade A
6 Digit code =1,000,000 code variations = High Security Grade AA
8 Digit code =100,000,000 code variations = High Security Grade AAA
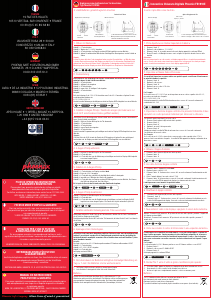
HOW TO CHANGE THE BATTERIES
• When the battery power is low the RED LED will be illuminated
• Remove the battery cover, located under the key pad housing
• Replace the battery using a 9 V PP3 battery
• Replace the battery cover
HOW TO CHANGE THE USER CODE
• With the door in the open position, locate the re-set button, which is beneath a
black circular cap on the back of the door lock case.
• Press the re-set button once, the lock will bleep twice and the YELLOW LED will
be illuminated to confirm that the lock is ready to accept a new code.
• Enter your new personal code (4~8) digits then press the * button.
• Test the new personal code with the door in the open position, by turning the
knob to the locked position and entering the new code. When the correct new
code is entered, the lock will bleep twice and the GREEN LED will be illuminated
to confirm that the new code has been accepted.
WARNING: If you lose the user code, and you cannot open the safe an engineer
may be required. Please contact any Phoenix Service Dept with the serial number
of the safe on one of the following numbers
• UK and Ireland +44 151 944 6447
• Germany +49 202 695 1925
• France, Spain, Italy +33 545 89 68 80
• El código de fábrica de usuario es el 168
INSTRUCCIONES DE FUNCIONAMIENTO DE
LA CERRADURA DIGITAL
APERTURA POR PRIMERA VEZ
• Introduzca el código de fábrica 168 y presione la tecla #, gire la maneta hasta la
posición de apertura. Al introducir el código correcto, la cerradura emite dos
pitidos y la luz LED VERDE se ilumina.
• Si se introduce un código incorrecto cuatro veces consecutivas, la cerradura
queda bloqueada durante 15 minutos y el teclado quedará inoperativo.
ES OBLIGATORIO CAMBIAR EL CÓDIGO DE FÁBRICA POR UN NUEVO CÓDIGO
PERSONAL DE 4-8 DÍGITOS. ESTA OPERACIÓN SOLO PUEDE LLEVARSE A CABO CON
LA PUERTA ABIERTA.
Indicadores del nivel de seguridad de los códigos
Código de 4 dígitos = 10.000 posibles combinaciones = Nivel de Seguridad Grado A
Código de 6 dígitos = 1.000.000 posibles combinaciones = Nivel de Seguridad
Grado AA
Código de 8 dígitos = 100.000.000 posibles combinaciones = Nivel de Seguridad
Grado AAA
CÓMO CAMBIAR LA PILA
• Cuando la carga de la pila esté baja la luz LED ROJA se iluminará.
• Retire la tapa del compartimento de la pila, localizado debajo del teclado.
• Reemplace la pila por otra de 9 V PP3
• Vuelva a colocar la tapa.
CÓMO CAMBIAR EL CÓDIGO DE SEGURIDAD
• Con la puerta abierta, presione una vez la tecla de reinicio (situada en la parte
de atrás de la puerta). La cerradura emitirá dos pitidos y la luz LED AMARILLA
se iluminará confirmando que se puede introducir el nuevo código.
• Introduzca el nuevo código (4-8) dígitos y presione la tecla*.
• Confirme el nuevo código con la puerta abierta, girando la maneta hasta la
posición de cierre y volviendo a introducir este nuevo código. Si el nuevo código
es correcto, la cerradura emitirá dos pitidos y la luz LED VERDE se iluminará
confirmando que ha sido aceptado.
ADVERTENCIA: En caso de ser imposible la apertura de la caja fuerte por pérdida o
extravío del código de usuario, será necesaria la asistencia técnica. En este caso,
le rogamos contacte con el Departamento de Atención al Cliente de Phoenix en
cualquiera de los siguientes teléfonos, facilitando el número de serie de la caja
fuerte.
• España: Tel. +34 91 673 6411
• Alemania: Tel. +49 202 695 1925
• Francia e Italia: Tel. +33 545 896 880
• Reino Unido e Irlanda: Tel. +44 151 944 6447
Tapa del compartimento de la pila
battery housing cover
Piles situées sous le clavier


Diskutieren Sie über dieses Produkt mit
Hier können Sie uns Ihre Meinung zu Phoenix SS0997ED Safe mitteilen. Wenn Sie eine Frage haben, lesen Sie zunächst das Bedienungsanleitung sorgfältig durch. Die Anforderung eines Bedienungsanleitung kann über unser Kontaktformular erfolgen.