MH10 V2
• Powered by a 21700 Battery
• USB-C Rechargeable
• Innovative Power Indicator
Next Generation 21700
Dual Fuel EDC Flashlight
(English) MH10 V2 (Español) MH10 V2 (Deutsch) MH10 V2
(Francais)
MH10 V2
Warranty Service
All NITECORE
®
products are warranted for quality. Any DOA /
defective product can be exchanged for a replacement through a local
distributor/dealer within 15 days of purchase. After that, all defective
/ malfunctioning NITECORE
®
products can be repaired free of charge
within 60 months from the date of purchase. Beyond 60 months, a
limited warranty applies, covering the cost of labor and maintenance,
but not the cost of accessories or replacement parts.
The warranty will be nullied if
1. the product(s) is/are broken down, reconstructed and/or modied by
unauthorized parties;
2. the product(s) is/are damaged due to improper use; (e.g. reversed
polarity installation)
3. the product(s) is/are damaged due to battery leakage.
For the latest information on NITECORE
®
products and services, please
contact a local NITECORE
®
distributor or send an email to service@
nitecore.com
※ All images, text and statements specied herein this user manual are
for reference purpose only. Should any discrepancy occur between
this manual and information specied on www.nitecore.com, Sysmax
Innovations Co., Ltd. reserves the rights to interpret and amend the
content of this document at any time without prior notice.
SYSMAX Innovations Co., Ltd.
TEL: +86-20-83862000
FAX: +86-20-83882723
Web: www.nitecore.com
Address:Unit6355,5/F,
No.1021GaopuRoad,
TianheDistrict,Guangzhou,
510653,Guangdong,China
Please find us on facebook : NITECORE Flashlight
Thanks for purchasing NITECORE!
MH11051022
Made in China
Features
• Utilizes a CREE XP-L2 V6 LED with a max output of 1,200 lumens
• Maximum peak beam intensity of 10,200cd and maximum throw of 202
meters
• An optical system combined with crystal coating and “Precision Digital
Optics Technology” (PDOT)
• Powered by a 21700 high capacity Li-ion battery while compatible with
18650 and CR123 batteries, to provide a runtime up to 1,500 hours
• A metal side switch controls 4 brightness levels and 3 special modes
• STROBE Mode uses randomly changing frequencies for stronger dizzying
eects
• A power indicator beneath the side switch indicates the remaining battery
power
• The power indicator can display the battery voltage (±0.1V)
• Intelligent Li-ion battery charging circuit with a USB-C port
• NITECORE 21700 Li-ion battery included (NL2140 4,000mAh)
• Highly ecient constant circuit provides a stable output
• Incorporated Advanced Temperature Regulation (ATR) module
(Patent No. ZL201510534543.6)
• Electronic reverse polarity protection
• Optical lenses with double-sided scratch resistant coating
• Constructed from aero grade aluminum alloy
• HA III military grade hard-anodized nish
• Rating in accordance with IP68 (2 meters submersible)
• Impact resistant to 1 meter
• Tail stand capability
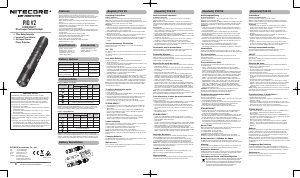
Specications
Accessories
Length: 147mm (5.79”)
Head Diameter: 25.4mm (1”)
Tube Diameter: 25.4mm (1”)
Tail Diameter: 27.2mm (1.07”)
Weight: 77.5g (2.73oz)
NITECORE 21700 Rechargeable
Li-ion Battery (NL2140 4,000mAh),
USB-C Charging Cable, Clip, Lanyard,
Spare O-ring, 18650/CR123 Battery
Magazine, Tactical Holster NTH10
Battery Options
Type Nominal Voltage Compatibility
21700 Rechargeable
Li-ion Battery
21700 3.6V/3.7V Y (Recommended)
18650 Rechargeable
Li-ion Battery
18650 3.6V/3.7V Y (Compatible)
Primary Lithium Battery* CR123 3V Y (Compatible)
Rechargeable
Li-ion Battery*
RCR123 3.6V/3.7V Y (Compatible)
Note: DO NOT attempt to use the MH10 V2 to charge CR123/RCR123 batteries.
Technical Data
FL1 STANDARD
HIGH MID LOW ULTRALOW STROBE BEACON SOS
1,200
Lumens
300
Lumens
55
Lumens
1
Lumen
1,200
Lumens
1,200
Lumens
1,200
Lumens
3h 45min 8h 46h 1,500h ─ ─ ─
202m 102m 42m 6m ─ ─ ─
10,200cd 2,600cd 450cd 8cd ─ ─ ─
1m (Impact Resistance)
IP68, 2m (Waterproof and Submersible)
Note: The stated data is measured in accordance with the international
ashlight testing standards ANSI/PLATO FL 1-2019, using 1 x 21700 Li-ion
battery (5,000mAh) under laboratory conditions. The data may vary in real
world use due to dierent battery usage or environmental conditions.
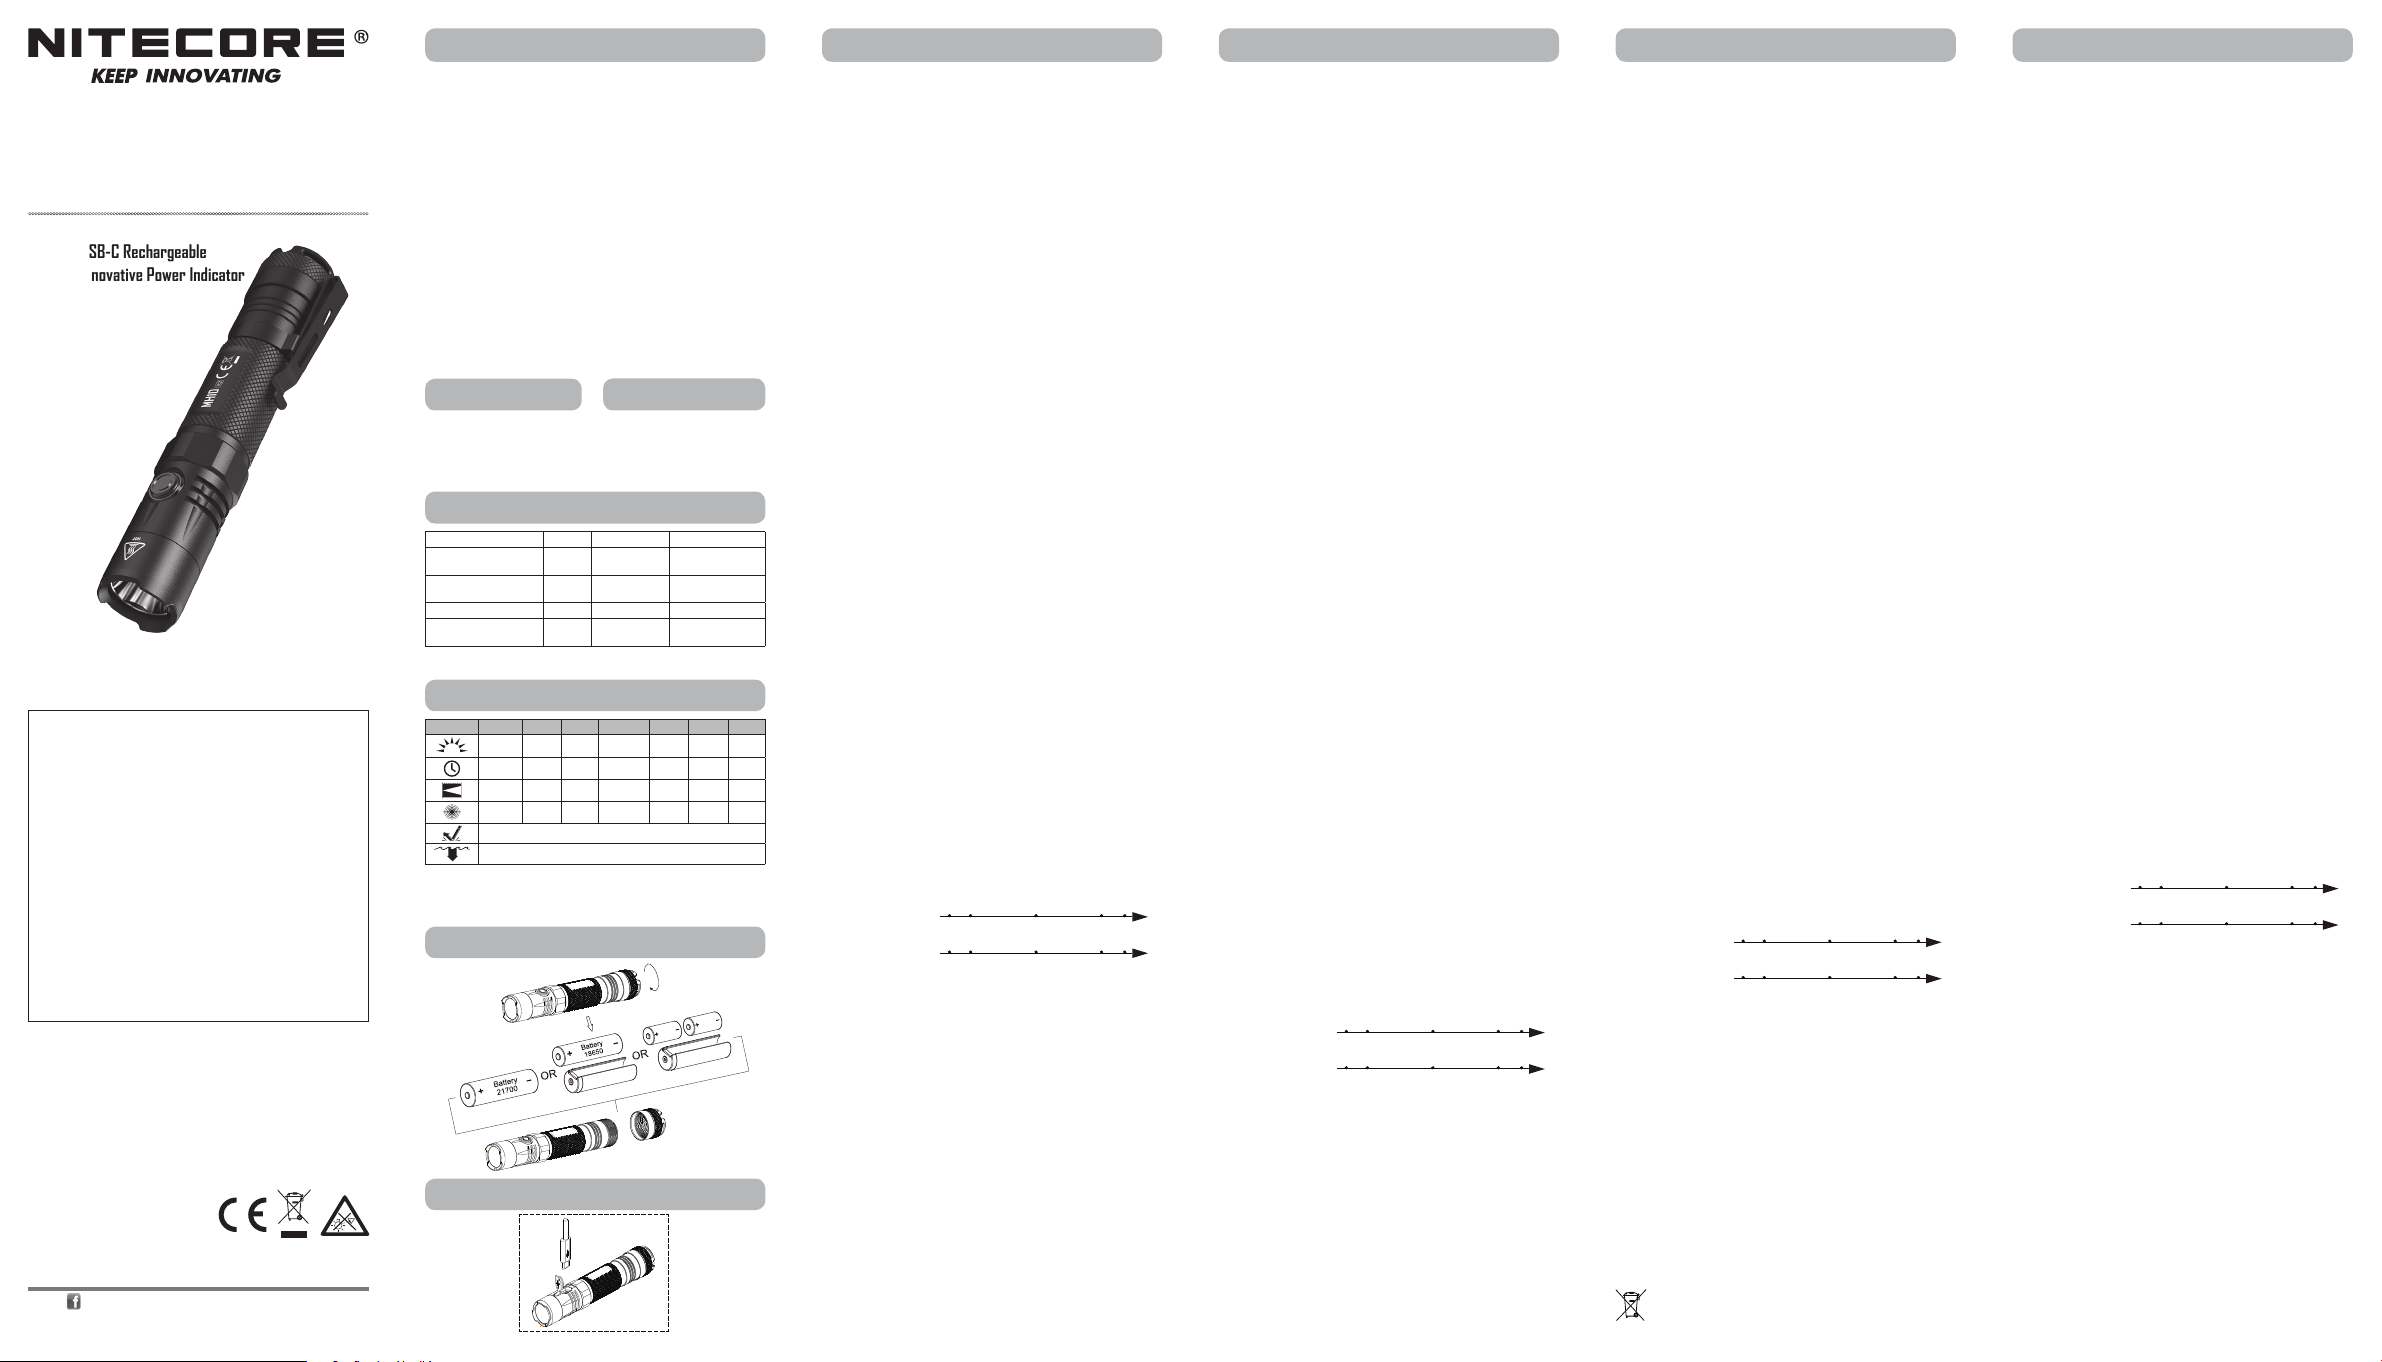
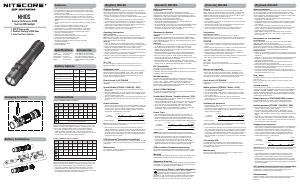
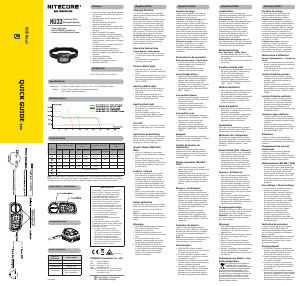
Battery Installation
Charging Function
Charging Function
The MH10 V2 is equipped with an intelligent charging system. As illustrated,
after inserting the battery and tightening the tail cap, use the USB cable to
connect an external power supply (e.g. a USB adapter or other USB charging
devices) to the charging port to begin the charging process.
• During the charging process, the power indicator will ash slowly to inform
the user.
• When the battery is fully charged, the MH10 V2 will cease the charging
process and the power indicator will become steadily turned on to inform
the user.
• When the charging status is abnormal (e.g. the battery is broken/inserted
incorrectly), the MH10 V2 will cease the charging process and the power
indicator will ash quickly to inform the user.
• The charging time for a 21700 Li-ion battery (5,000mAh) is approx. 4
hours. (Charged via the 5V/2A adapter)
Operating Instructions
Battery Installation
Insert the battery(s) as illustrated and screw to tighten the tail cap.
Note: After battery insertion, the power indicator beneath the switch will
ash to indicate the battery voltage. Please refer to the “Power Indication”
section of this manual for more details.
Warnings:
1. Ensure the battery(s) is/are inserted with the positive end towards the
head. The product will not work if the battery(s) is/are incorrectly inserted.
2. Please use the battery magazine when using 1 x 18650 / 2 x CR123
batteries to avoid battery rattling and to ensure a stable contact.
3. CAUTION! Possible dangerous radiation! Don't look into the light! Maybe
dangerous for your eyes.
4. When the power level is low, please stop using the product and replace or
recharge the battery to prevent damage to the battery.
5. When the product is kept in a backpack or left unused for prolonged time,
please remove all batteries to prevent accidental activation or battery
leakage.
On / O
On: When the light is o, short press the Power Button to turn it on.
O: When the light is on, short press the Power Button to turn it o.
Brightness Levels
When the light is on, press and hold the Power Button to cycle through the
following brightness levels: ULTRALOW – LOW – MID – HIGH. Release to
select the desired brightness level. (This access has memory function. When
reactivated, the ashlight will automatically access the previous memorized
brightness level.)
Direct Access to ULTRALOW
When the light is o, long press the Power Button to directly access
ULTRALOW.
Special Modes (STROBE / BEACON / SOS)
• When the light is on/o, double press the Power Button to access the
STROBE Mode.
• When the STROBE Mode is on, press and hold the Power Button to cycle
through the following special modes: BEACON – SOS – STROBE. Release
to select the desired special mode.
• When one of the special modes is on, short press the Power Button to exit
special modes and turn o the light. (This access does not have memory
function.)
Power Indication
• When the battery is inserted, the power indicator beneath the switch will
ash to show the battery voltage (±0.1V). For example, when the battery
voltage is at 4.2V, the power indicator will ash 4 times followed by a
1.5-second pause and 2 more ashes. Dierent voltages represent the
corresponding remaining battery power levels:
1×18650/
21700 battery
2×CR123 batteries
Note: When using two CR123/RCR123 in series, the indicator will show the
average voltage between the two batteries.
• When the light is on and the power level is close to 50%, the power
indicator will ash every 2 seconds to inform the user. When the light is on
and the power is close to depleted, the power indicator will ash quickly
and continuously to inform the user. The batteries should be replaced or
recharged when the output appears to be dim or the ashlight becomes
unresponsive due to low power.
ATR (Advanced Temperature Regulation)
The integrated ATR technology regulates the output of the MH10 V2
according to the working condition and ambient environment to maintain the
optimal performance.
Maintenance
Every 6 months, threads should be wiped with a clean cloth followed by a
thin coating of silicon-based lubricant.
3.5V 3.7V 3.9V 4.2V
Low power Full power
Función de carga
La MH10 V2 está equipada con un sistema de carga inteligente. Como
se muestra en la imagen, después de insertar la batería y apretar la tapa
trasera, utilice el cable USB para conectar a una fuente de alimentación
externa (por ejemplo, un adaptador USB u otro dispositivo de carga USB) al
puerto de carga para iniciar el proceso de carga.
• Durante el proceso de carga, el indicador de batería parpadeará
lentamente para informar al usuario.
• Cuando la batería está completamente cargada, la MH10 V2 detendrá el
proceso de carga y el indicador de batería permanecerá encendido para
informar al usuario.
• Cuando el estado de carga es anormal (Por ejemplo, la batería está
dañada/insertada incorrectamente), la MH10 V2 detendrá el proceso de
carga y el indicador de batería parpadeará rápidamente para informar al
usuario.
• El tiempo de carga para una batería Li-ion 21700 (5,000mAh) es de aprox.
4 horas. (Cargada vía un adaptador 5V/2A)
Instrucciones de operación
Instalación de las baterías
Inserte la(s) batería(s) como se muestra en la imagen y atornille para
apretar la tapa trasera.
Nota: Después de insertar las baterías, el indicador debajo del botón
parpadeará para indicar el voltaje de la(s) batería(s). Por favor consulte la
sección “Indicador de batería” de este manual para mayores detalles.
Precauciones:
1. Asegúrese que la(s) batería(s) está(n) insertada(s) con el polo positivo
hacia la cabeza de la linterna. El producto no funcionará si la(s) batería(s)
está(n) insertada(s) incorrectamente.
2. Cuando utilice 1 batería 18650 o 2 baterías CR123, por favor utilice el
adaptador de baterías para evitar traqueteo y asegurar un contacto
estable.
3. ¡PRECAUCIÓN! Posible radiación peligrosa, NO mire directo a la luz, puede
ser peligroso para sus ojos.
4. Cuando el nivel de batería es bajo, por favor deje de usar el producto y
reemplace o recargue la batería para prevenir daño a la batería.
5. Cuando deje el producto en una mochila o no se utilice por periodos
prolongados de tiempo, por favor remueva todas las baterías para prevenir
activación accidental o fugas en las baterías
Encendido / Apagado
Encendido: Cuando la luz está apagada, presione ligeramente el botón de
encendido para encender.
Apagado: Cuando la luz está encendida, presione ligeramente el botón de
encendido para apagar.
Niveles de intensidad
Cuando la luz está encendida, presione y mantenga presionado el botón
de encendido para cambiar entre los siguientes niveles de intensidad:
ULTRABAJO – BAJO – MEDIO – ALTO. Suelte para seleccionar el nivel de
intensidad deseado. (Este acceso tiene función de memoria. Cuando es
reactivada, la linterna automáticamente accederá al nivel de intensidad
previamente memorizado.
Acceso directo a ULTRABAJO
Cuando la luz está apagada, mantenga presionado el botón de encendido
para accesar directamente a ULTRBAJO.
Modos especiales (ESTROBO / BALIZA / SOS)
• Cuando la luz está encendida/apagada, presione rápidamente dos veces el
botón de encendido para accesar al modo ESTROBO.
• Cuando el modo ESTROBO está encendido, presione y mantenga
presionado el botón de encendido para cambiar entre los siguientes
modos especiales: BALIZA-SOS-ESTROBO. Suelte para seleccionar el modo
especial deseado.
• Cuando uno de los modos especiales está encendido, presione ligeramente
el botón de encendido para salir de los modos especiales y apagar la luz.
(Este acceso no tiene modo de memoria.)
Indicador de batería
• Cuando la batería es insertada, el indicador de batería debajo del botón
parpadeará para mostrar el voltaje de la batería (±0.1V). Por ejemplo,
cuando el voltaje de la batería es de 4.2V, el indicador de batería
parpadeará 4 veces seguido de una pausa de 1.5 segundos y parpadeará
2 veces más. Los diferentes voltajes correspondientes al nivel de batería
restante se representan de la siguiente manera:
1×18650/
21700 battery
2×CR123 batteries
Nota: Cuando utilice dos baterías CR123/RCR123 en serie, el indicador
mostrará el voltaje promedio entre las dos baterías.
• Cuando la luz está encendida y el nivel de carga es cercano al 50%,
el indicador de batería parpadeará cada 2 segundos para informar al
usuario. Cuando la luz está encendida y la carga está cerca a terminarse,
el indicador parpadeará rápida y continuamente para informar al usuario.
Las baterías deberán ser reemplazadas o recargadas cuando la intensidad
parezca débil o la linterna no responda debido a la baja potencia de la(s)
batería(s).
ATR (Regulación Avanzada de Temperatura)
La tecnología ATR integrada regula la potencia de la MH10 V2 de acuerdo a
las condiciones de trabajo y medio ambiente para mantener un rendimiento
óptimo.
Mantenimiento
Cada 6 meses se deberán limpiar las juntas con un paño limpio, seguido a
esto, debe aplicarse una na capa de lubricante a base de silicón.
3.5V 3.7V 3.9V 4.2V
Low power Full power
Ladefunktion
Die MH10 V2 ist mit einem intelligenten Ladesystem ausgestattet.
Legen Sie die Akkus/die Batterie ein - wie dargestellt - und ziehen Sie die
Heckklappe fest. Verbinden Sie eine externe Stromversorgung (z.B. einen
USB-Adapter oder andere USB-Ladegeräte) mittels des USB-Kabels mit dem
Ladeanschluss, um den Ladevorgang zu starten.
• Während des Ladevorgangs blinkt die LED langsam.
• Wenn der Akku vollständig aufgeladen ist, beendet die MH10 V2 den
Ladevorgang und die LED leuchten stetig.
•
Wenn der Ladestatus unnormal ist (z.B. weil der Akku ist defekt/falsch eingelegt
ist), beendet die MH10 V2 den Ladevorgang und die LED blinkt schnell.
• Die Ladezeit für einen 21700 Lithium-Ionen-Akku (5000mAh) beträgt ca. 4
Stunden (aufgeladen über einen 5V/2A-Adapter).
Bedienungsanleitung
Einsetzen der Batterie
Legen Sie einen 18650-Akku oder zwei CR123-Batterien ein –wie dargestellt:
HINWEIS: Vor dem Einlegen der Batterien bitte den Silikat-Beutel
entnehmen! Nach dem Einlegen der Batterien beginnt die LED neben dem
Schalter zu blinken, um die Batteriespannung anzeigen. Für weitere Details
lesen Sie die "Power-Tipps" in diesem Handbuch.
WARNUNG:
1. Legen Sie die Batterien mit dem positiven (+) Ende in Richtung des Lampenkopfes
ein. Die MH10 V2 wird mit falsch eingelegten Batterien nicht funktionieren.
2. Bitte verwenden Sie bei Nutzung von 1 x 18650 Akku / 2 x CR123
Batterien das Batteriemagazin, um ein Klappern zu vermeiden und einen
stabilen Kontakt zu gewährleisten.
3. ACHTUNG! Möglicherweise gefährliche optische Strahlung! Bei Betrieb
nicht direkt in das Licht blicken. Dies kann für die Augen gefährlich sein.
4. Wenn die Leistung zu gering ist, stellen Sie bitte die Benutzung des
Produkts ein und tauschen Sie die Batterie aus oder laden Sie sie den Akku
auf, um Schäden an der Batterie zu vermeiden.
5.
Wenn das Produkt in einem Rucksack aufbewahrt oder längere Zeit nicht
benutzt wird, entfernen Sie bitte alle Batterien/Akkus, um eine versehentliche
Aktivierung oder ein Auslaufen der Batterie7der Akkus zu vermeiden.
Ein-/Ausschalten
Einschalten: Wenn das Licht aus ist, drücken Sie kurz auf den Ein/Aus-
Schalter, um es einzuschalten.
Ausschalten: Wenn das Licht eingeschaltet ist, drücken Sie kurz auf den Ein/
Aus-Schalter, um es auszuschalten.
Helligkeitsstufen
Wenn das Licht eingeschaltet ist, drücken und halten Sie den Ein/Aus-Schalter,
um die folgenden Helligkeitsstufen zu durchlaufen: "ULTRALOW" - "LOW" -
"MID" - "HIGH". Lassen Sie den Schalter los, um die gewünschte Helligkeitsstufe
zu wählen. (Dieser Zugri hat eine Speicherfunktion. Wenn die MH10 V2 wieder
aktiviert wird, wird automatisch die zuvor gespeicherte Helligkeitsstufe aktiviert.)
Sofort ULTRALOW-Mode
Wenn das Licht ausgeschaltet ist, drücken Sie lange auf den Einschaltknopf,
um direkt auf "ULTRALOW" zuzugreifen.
Sonder-Modi (Strobe / Location-Beacon / SOS)
• Wenn das Licht an/aus ist, drücken Sie zweimal auf den An/Aus-Schalter,
um den STROBE-Mode aufzurufen.
•
Wenn der STROBE-Mode eingeschaltet ist, halten Sie den Ein-/Aus-Schalter gedrückt,
um die folgenden Sonder-Modi zu durchlaufen: „BEACON“ – „SOS“ – „STROBE“.
Lassen Sie die Taste los, um den gewünschten Sonder-Mode auszuwählen.
• Wenn einer der Sonder-Modi eingeschaltet ist, drücken Sie kurz auf
den Ein/Aus-Schalter, um den Sonder-Mode zu verlassen und das Licht
auszuschalten. (Dieser Zugri hat keine Speicherfunktion.)
Power-Tipps
•
Nach dem Einlegen der Batterien beginnt die LED unter dem Schalter zu blinken,
um die Batteriespannung anzuzeigen (auf 0,1V genau). Wenn z.B. die
Batteriespannung 4.2V beträgt, blinkt die blaue Betriebsanzeige 4-mal, gefolgt
von 1 Sekunde Pause und weiterem 2-maligen Blinken. Verschiedene Spannungen
zeigen die entsprechenden verbleibenden Batterieleistungsstufen an:
1×18650/
21700 battery
2×CR123 batteries
HINWEIS: Wenn zwei CR123-Batterien/RCR123-Akkus in Reihe geschaltet werden,
zeigt die Anzeige die durchschnittliche Spannung zwischen den beiden Batterien an.
• Wenn das Licht eingeschaltet ist und der Leistungspegel nahe bei
50% liegt, blinkt die Leistungsanzeige alle 2 Sekunden. Wenn das
Licht eingeschaltet und die Leistung fast erschöpft ist, blinkt die
Leistungsanzeige schnell. Die Batterien sollten ersetzt oder die Akkus
aufgeladen werden, wenn die Leistung zu schwach erscheint oder die
Taschenlampe aufgrund von geringer Leistung nicht mehr reagiert.
ATR (erweiterte Temperaturregulierung)
Die integrierte ATR-Technologie reguliert die Leistung der MH10 V2 je nach
Arbeits- und Umgebungsbedingung, um die optimale Leistung zu erhalten.
Wartung
Alle 6 Monate sollte das Gewinde mit einem sauberen Tuch abgewischt und
anschließend mit einer dünnen Schicht Silikonfett geschmiert werden.
Allgemeine Hinweise
Altbatterien gehören nicht in den Hausmüll. Sie können gebrauchte Batterien
unentgeltlich an unser Versandlager zurückgeben. Als Verbraucher sind Sie
zur Rückgabe von Altbatterien gesetzlich verpichtet.
Entsorgung von Elektro- und Elektronikgeräten
Die durchgestrichene Mülltonne bedeutet, dass Sie gesetzlich
verpichtet sind, diese Geräte einer vom unsortierten Siedlungsabfall
getrennten Erfassung zuzuführen. Die Entsorgung über die
Restmülltonne oder die gelbe Tonne ist untersagt. Enthalten die
Produkte Batterien oder Akkus, die nicht fest verbaut sind, müssen diese vor
der Entsorgung entnommen und getrennt als Batterie entsorgt werden.
3.5V 3.7V 3.9V 4.2V
Low power Full power
Charging Function
La lampe MH10 V2 est équipée d’un circuit de charge intelligent. Comme
illustré, après avoir inséré la batterie et serré le capuchon, utiliser le câble
USB pour connecter une source d'alimentation externe (par exemple, un
adaptateur USB ou d'autres périphériques de chargement USB) au port de
charge pour commencer le processus de charge.
• Pendant la charge, l’indicateur va clignoter lentement pour informer
l’utilisateur.
• Quand la batterie est chargée, la charge s’arrête et l’indicateur reste xe
pour informer l’utilisateur.
• Quand la charge s’arrête en cas de disfonctionnement (batterie cassée,
mal insérée) et l’indicateur clignote rapidement.
• La durée de charge pour une batterie Li-ion 21700 (5,000mAh) est
d’environ 4 heures. (charge avec adaptateur 5V/2A)
Instructions
Installation des batteries
Insérez la batterie comme sur l’illustration et serrer le capuchon.
Note: Après mise en place des batteries, l’indicateur lumineux clignote pour
indiquer le voltage. Voir la section « Batterie » de ce mode d’emploi pour
plus de détails.
ATTENTION
1. Assurez-vous que la batterie soit correctement insérée. Pole positif vers
la tête de lampe. Le produit ne fonctionnera pas si la batterie est mal
insérée.
2. Utiliser le support de batterie pour 1 x 18650 / 2 x CR123 an d’éviter des
mouvements de batterie et assurer un contact correct.
3. Attention : Forte luminosité ! Evitez le contact direct avec les yeux.
4. Quand la batterie est faible, arrêter d’utiliser le produit, remplacer ou
recharger la batterie pour éviter de l’endommager.
5. Retirer les batteries si la lampe reste inutilisée pendant une longue période
pour éviter toute activation accidentelle ou fuite de batteries.
On / O
Pour allumer : Pressez l’interrupteur ON/OFF
Pour éteindre : Pressez une nouvelle fois l’interrupteur ON/OFF pour
éteindre.
Niveaux de luminosité
Lorsque la lampe est allumée, maintenez enfoncé l’interrupteur pour naviguer
entre les niveaux de luminosité suivants: ULTRALOW – LOW – MID – HIGH.
Relâcher une fois le niveau souhaité obtenu. (Cet accès a une fonction
mémoire. Lorsqu'elle est réactivée, la lampe accède automatiquement au
niveau de luminosité mémorisé précédent.)
Accès direct à ULTRALOW
Quand la lampe est éteinte, rester appuyé sur l’interrupteur pour accéder à
ULTRALOW.
Modes spéciaux (STROBE / Balise / SOS)
• A n’importe quel moment, appuyer 2 fois rapidement sur l’interrupteur
pour accéder au mode STROBE.
• Dans le mode STROBE, rester appuyé sur l’interrupteur pour naviguer
entre les modes spéciaux : Balise– SOS – STROBE. Relâcher une fois le
mode souhaité obtenu
• Dans n’importe quel mode special actif, appuyer rapidement sur
l’interrupteur pour sortir des modes spéciaux et éteindre la lampe. (Pas de
function mémoire ici.)
Indicateur de puissance
• Quand la lampe est allumée, l’indicateur va clignoter pour indiquer le
voltage de la batterie. (±0.1V). Par exemple, quand la puissance est à 4.2V,
la lampe clignotera 4 fois de suite suivi de 2 ashes. Diérentes tensions
représentent les niveaux de charge restants de la batterie:
1×18650/
21700 battery
2×CR123 batteries
Note: Lorsque vous utilisez 2 piles CR123 ou batteries CR123 en série,
l’indicateur indique la puissance moyenne entre les 2 batteries
• Lorsque la lampe est allumée et que le niveau de puissance est proche de
50%, l’interrupteur clignote toutes les 2 secondes pour informer l'utilisateur.
Lorsque la lumière est allumée et que l'alimentation est presque épuisée,
l’interrupteur clignote rapidement et en continu pour informer l'utilisateur.
Les piles /batteries doivent être remplacées ou rechargées lorsque la
sortie semble faible ou que la lampe ne répond plus en raison d'une faible
puissance.
Technologie ATR
Le système avancé de régulation de la température (ATR) permet à la
lampe d’ajuster de façon dynamique son niveau d’éclairage en fonction
de sa température. Cela permet d’éviter toute surchaue de la lampe et
d’augmenter sa durée de vie.
Maintenance
Tous les six mois, le letage doit être essuyé avec un chion propre et
recouvert d’un lubriant à base de silicone.
3.5V 3.7V 3.9V 4.2V
Low power Full power
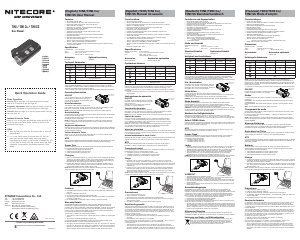
Battery
CR123A
Battery
CR123A

Diskutieren Sie über dieses Produkt mit
Hier können Sie uns Ihre Meinung zu Nitecore MH10 V2 Taschenlampe mitteilen. Wenn Sie eine Frage haben, lesen Sie zunächst das Bedienungsanleitung sorgfältig durch. Die Anforderung eines Bedienungsanleitung kann über unser Kontaktformular erfolgen.