
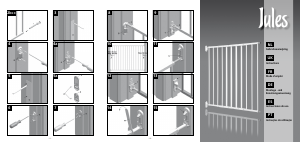
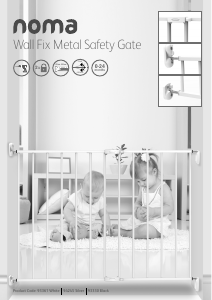
IMPORTANT. KEEP FOR FUTURE REFERENCE
UK
- 3 -- 6 -
IMPORTANTE. CONSÉRVESE PARA FUTURAS CONSULTAS
ES
Tómese unos minutos para leer detalladamente las instrucciones. Lo
contrario puede resultar en daños para la barrera o en el peor de los
casos para su hijo/a. Al desempacar la barrera, compruebe que todas las
piezas estén incluidas. No utilize la barrera si faltaran piezas o si éstas
estuvieran dañadas. Observe que esta barrera no está diseñada
para ser utilizada en ventanas. Ajustada según las instrucciones,
entre dos supercies bien denidas y estructuralmente sólidas, esta
barrera cumple con: EN 1930:2000 ASTMF1004-98 (US)
Barrera básica:
Se ajusta a aberturas de 61-109 cm No utilizar sin los platillos de pared.
La barrera debe ajustarse en una abertura estructuralmente sólida libre
de grasa y suciedad. Conserve las instrucciones y la llave de tuercas para
futuras consultas.
Manual de Montaje
1. Al ensamblar la barrera es importante ajustar los dos paneles de
forma que no haya vacíos entre las barras. Puede traslaparse un
máximo de 5 barras. Inserte los tornillos (j) y los encajes de tornillo
(i) en los raíles superior e inferior de los paneles. No apriete los
tornillos totalmente.
2. Inserte el husillo (e) – ver g. 2.
2a. Introduzca el husillo (d) en la pare inferior del mismo lado – ver
ilustración 2a.
2b. Introduzca los husillos (l) en los raíles superior e inferior del lado
opuesto de la
2c. barrera. El ajuste nal de los husillos se hará más tarde.
3. Recorte las plantillas (a) y (b) por la línea de puntos en todos los
bordes. Sostenga la plantilla (a) contra la supercie a la que la bar-
rera vaya a ajustarse (por el lado de la bisagra). Asegúrese de que
la plantilla está vertical, totalmente extendida y que el extremo
marca do con "" esté sobre el suelo. Marque la posición de los
agujeros para los tornillos.
4. Ajuste las dos bisagras (c) y (g) conforme a las marcas con el agujero
y el poste mirando hacia arriba. Nota: Los tornillos adjuntos sólo
son apropiados para supercies de madera. Para jaciones a
supercies de otro tipo de material utilice tornillos y tacos apropia-
dos (diámetro = 4 mm).
5. Sostenga la plantilla (b) contra la supercie a la que la barrera
vaya a ajustarse (el lado del pestillo).
• Asegúrese de que la plantilla está vertical, totalmente extendida
y que el extremo marcado con "" está sobre el suelo. Marque la
posición de los agujeros para los tornillos.
5a. Inserte los topes (p) en uno de los agujeros de los pestillos (k) y
(n) – ver g. 7a. La barrera no podrá abrirse por el lado en el que
los topes hayan sido insertados. Importante: Si la barrera es
instalada en una escalera, los topes (p) deben jarse de manera
que la barrera no pueda abrirse sobre las escaleras.
6. Ajuste el platillo para el pestillo (k) a la pared/marco donde estén
las marcas utilizando 2 tornillos (o).
7. Ajuste la pieza inferior del lado del pestillo (n) utilizando 2 tornillos
(o).
8.+9. Coloque la barrera en las piezas de la bisagra.
10. Coloque la barrera en la abertura de forma que la distancia A (lado
de la bisagra) sea de 35 mm como mínimo y 62 mm como máximo.
La distancia B (lado del picaporte) no debe sobrepasar los 63 mm.
Puede conseguir la anchura correcta para la jación de la barrera
ajustando las secciones (g. 2) y los husillos.
11. Compruebe que los husillos para pestillo no encuentren otra
resistencia que la que se produce cuando el husillo superior pasa el
platillo del pestillo con pestillo (k) (ver echa).
12. Coloque un muelle (f) en el poste de bisagra de la pieza de bisagra
inferior.
13. Coloque la pieza superior (h) en la bisagra inferior (c).
• Apriete todos los encajes y los tornillos de los paneles de barre-
ra.
• Apriete las tuercas de seguridad de cada uno de los husillos
de esquina con la llave de tuercas adjunta (m). Cuando la pieza
superior haya sido ajustada es importante que el dispositivo de
cierre (ver echa) asegure que la pieza superior no pueda ser
levantada. Nota: Por razones de seguridad la pieza superior DEBE
ser reajustada si la barrera fuera retirada.
14. Vuelva a encajar y ajuste el husillo correctamente. Apriételo con la
llave de tuercas (m).
15. Para abrir la barrera presione el pestillo hacia abajo con el dedo
pulgar y levante la barrera hacia un lado y fuera del platillo. Al
cerrar la barrera, asegúrese de que ambos husillos estén dentro de
los platillos y que el pestillo superior se haya colocado en un lugar
seguro.
Cuidado del producto
• Ninguna pieza de esta barrera requiere lubricación
• Limpie la barrera utilizando agua caliente y un detergente suave
• Nunca utilize disolventes, sustancias químicas, limpiadores en polvo
o herramientas aladas para limpiar la barrera.
ADVERTENCIA!
Un montaje o ajuste incorrecto de esta barrera de seguridad puede ser
peligroso.
No utilice la barrera de seguridad si faltan piezas o si están dañadas.
La barrera de seguridad no debe instalarse en ventanas.
Deje de utilizar la barrera si el niño puede subirse a ella.
ADVERTENCIA:
La posición de la barrera de seguridad en relación a las escaleras puede
tener un efecto adverso en la seguridad del niño.
Rogamos observe lo siguiente:
- Si la barrera de seguridad se utiliza en lo alto de la escalera para evitar
que el niño se caiga por las escaleras, no debe ser colocada en ningún
escalón bajo el nivel del escalón nal.
- Si la barrera de seguridad se utiliza al pie de las escaleras para evitar
que el niño suba las escaleras, deberá colocarse en el escalón más bajo.
• Si coloca la barrera en ladrillo, escayola u otras supercies no
uniformes, puede ser necesario montar en la pared una supercie
homogénea como p.ej. un listón de madera.
• Si la barrera ha sido expuesta a algún accidente, no deberá utilizarse
de nuevo.
• Esta barrera está diseñada para niños de hasta 24 meses. No
obstante, esta directriz orientativa deberá controlarse constantemente
conforme al desarrollo del niño, ya que las aptitudes de cada niño se
desarrollan a distintas edades.
• Rogamos observe que este producto no impide necesariamente que se
produzcan accidentes. Nunca deje a su hijo solo.
• Una vez haya instalado la barrera, vuelva a leer las instrucciones y
comprue be que la barrera esté jada correctamente y que sea segura.
• Si la barrera resulta dañada, no debe utilizarse de nuevo.
• No cuelgue o ate juguetes en ninguna parte de esta barrera.
• Nunca permita que sus hijos se columpien en la barrera.
• Utilice exclusivamente recambios originales Indowoods para este
producto.
• Nunca pase por encima de la barrera, utilice siempre la puerta.
• Mantenga siempre la barrera cerrada y con el seguro puesto.
• Procure comprobar periódicamente la seguridad de la jación y la
condición general de las partes. Ajústela si fuera necesario consult
ando esta Guía del Usuario.
• Compruebe periódicamente la libertad de movimientos de los disposi-
tivos de cierre.
• No permita que niños mayores salten por encima de la barrera, ya que
puede resultar peligroso.
Please take a few minutes to read the instructions thoroughly. Failure
to do so may result in damage to the gate or in worst case to your child.
When unpacking the gate, carefully check all parts. Do not use this gate
if parts are broken or missing. Please note that this gate is not de-
signed to use across window openings. When tted as instructed,
between two clean structurally solid surfaces, this gate conforms to the
following standards: EN 1930:2000 ASTMF 1004-98 (US)
Information
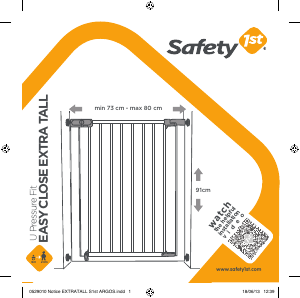
Basic gate: Fits openings from: 61-109 cm (24”-42.9”) The gate must
be tted in a structurally solid opening free of dirt and grease Keep the
instructions, and the spanner for future reference.
Preparation for use
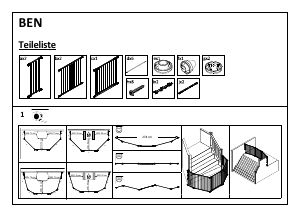
1. It is important to x the 2 panels so that there is no gap between
the bars. Maximum overlap is 5 bars. Insert the screws (j) and
screw sockets (i) into the top and bottom rails of the panels. Do
not fully tighten yet.
2. Insert spindle (e) - see. illustration 2.
2a. Insert spindle (d) at the bottom in the same side - see illustration
2a.
2b. Insert spindles (l) into the top and bottom rails of the opposite side
of the gate.
2c. Final adjustment of spindles will be made later.
3. Cut out template (a) and (b) according to the dotted line on all four
edges. Hold template (a) against the surface to which the gate is to
be tted (hinge side).
• Ensure that the template is vertical, completely outstretched,
and that the end marked "" is on the oor. Mark the screw hole
positions.
4. Fix the two hinges (c) + (g) according to the markings with the
hole and the post pointing upwards. Note: The screws provided
are only intended for xing into wood. If xing to other material,
use appropriate screws and wallplugs (diameter = 4 mm).
5. Hold template (b) against the surface to which the gate is to be
tted (latch side).
• Ensure that the template is vertical, completely outstretched,
and that the end marked "" is on the oor. Mark the screw hole
positions.
5a. Insert the stop pins (p) into one of the holes of the latches (k) and
(n) - see 5a. The gate cannot be opened to the side in which the
stop pins are inserted. Important: If the gate is installed on a
stairway, the stop pins (p) must be tted so that the gate cannot
open out over the stairs.
6. Remove the template and x the latch cup (k) to the wall/frame
where the marks are using 2 screws (o).
7. Fix the lower cup (n) in the latch side using 2 screws (o).
8.+9. Place the gate onto the hinge parts.
10. Place the gate in the opening so that the distance A (hinge side)
are min. 35 mm and max. 62 mm. The distance B (handle side)
must not exceed 62 mm. The correct width setting of the gate
can be achieved by adjusting the sections (illustration 2.) and the
spindles.
11. Check that the latch spindles do not meet other resistance than
when the upper spindle goes past the latch cup with the latch (k)
(see arrow).
12. Place a spring (f) on the hinge post of the lower hinge part.
13. Place the top part (h) on the lower hinge (c).
• Tighten all the sockets and screws on the gate panels.
• Using the spanner (m) supplied, tighten the lock nuts on each
of the corner spindles. When the top part has been tted, it is
important that the locking device (see arrow) ensures that the top
part cannot be pushed up. Note: For safety reasons, the top part
MUST be re-tted if the gate is removed.
14. Re-t and adjust the spindle correctly. Tighten with the spanner
(m).
15. To open the gate, press the latch downwards with your thumb
and lift the gate sidewards out of the cup. When closing the gate,
be sure that both spindles are in the cups and the upper latch is
securely located.
Care of Your Product
• No part of the gate requires lubrication.
• Clean gate using warm water and a mild detergent.
• Never use solvents, chemicals scouring powders or sharp tools in
connection with cleaning the gate.
WARNING!
Incorrect tting or positioning of this safety barrier can be dangerous.
Do not use the safety barrier if any components are damaged or missing.
The safety barrier must not be tted across windows.
Stop using the barrier if the child is capable of climbing it.
The position of the safety barrier in relation to the stairs may have an
adverse effect on your childs safety.
WARNING:
The position of the safety barrier in relation to the stairs may have an
adverse effect on your childs safety.
Please note the following:
- If the safety barrier is used at the top of the stairs to prevent the child
from falling down the stairs, it must not be placed on any stair below the
level of the top stair (A).
- If the safety barrier is used at the bottom of the stairs to prevent the
child from climbing the stairs it must be placed on the lowest stair (B).
• If mounting onto brick, drywall or other dissimilar surfaces, it may be
necessary to mount a smooth surface such as a wooden batten on to
the wall.
• If the gate has been exposed to an accident it must not be used again.
• This gate is designed for children up to 24 months. However, this
guidance should be constantly monitored against your child’s own de-
velopment, as individual children’s skills do develop at different ages.
• Please note that this product not necessarily prevents accidents to
happen.
Never leave your child unattended.
• Once the gate is installed, read the instructions again and check the
gate is correctly tted and secure.
• If the gate is damaged, eventually, it must not be taken into use again.
• Do not hang or tie toys to any part of this gate.
• Never allow your children to swing on the gate.
• Do only use original Indowoods spare parts for this product.
• Never climb over the gate, always open the gate door.
• Always keep the gate in a closed and locked position.
• Periodically check the security of the xings and general condition of
the parts. Adjust as necessary, referring to these instructions.
• Periodically check the freedom of movement of locking devices.
• Do not allow older children to climb over this gate as this may pose a
danger.


Diskutieren Sie über dieses Produkt mit
Hier können Sie uns Ihre Meinung zu JéWé Jules Kinderschutzgitter mitteilen. Wenn Sie eine Frage haben, lesen Sie zunächst das Bedienungsanleitung sorgfältig durch. Die Anforderung eines Bedienungsanleitung kann über unser Kontaktformular erfolgen.