EN
PROJECTION ALARM CLOCK
CP300T / CP301T / CP302T
POWER SUPPLY
Plug the power cable into a mains socket.
BACK-UP SYSTEM
The back-up system ensures that the clock continues to function even
in the event of a power cut.
• Open the battery compartment on the back of the unit.
• Insert 2 LR6-type (AA) 1.5V batteries and ensure that the polarity
is as indicated.
• Close the battery compartment.
SETTING THE CLOCK AND THE DATE
The radio must be switched-off.
• Hold down the TIME SET button for 2 seconds: the display
ashes the hours.
• Press TUNING/ADJUST w and s to set the hour.
• Press TIME SET to conrm: the display ashes the minutes.
• Press TUNING/ADJUST w and s to set the minutes.
• Press TIME SET to conrm: the display ashes the year. Set the
year.
• Press TIME SET to conrm: the display ashes the month. Set
the month.
• Press TIME SET to conrm: the display ashes the date. Set the
date.
• Press TIME SET to conrm: the screen shows the normal display
again.
Note: the short form for the day is set automatically above the date.
MO: MONDAY/TU: TUESDAY/WE: WEDNESDAY/TH: THURSDAY/FR:
FRIDAY/SA: SATURDAY/SU: SUNDAY
Note: The date must be set correctly for AL3 to function properly.
ALARM
The unit functions with 3 alarms in the WEEK END mode.
AL 1: 1
st
alarm active on all days of the week
AL 2: 2
nd
alarm active on all days of the week
AL 3: WEEK END mode alarm: alarm active during the week and
inactive at weekends.
SETTING THE ALARM AND CHOICE OF ALARM MODE: RADIO/
BUZZER
• Press AL. SELECT/SOURCE: AL1 ashes.
• Hold down the ALARM SET/AL.MODE button for 2 seconds: the
display ashes.
• Press TUNING/ADJUST w and s to set and then ALARM SET/
AL.MODE to conrm the following settings:
Hour/minutes/alarm mode BUZ (alarm bell) or TUN (radio)/sound
level from 7 to 20.
• Press ALARM SET/AL.MODE to conrm and return to the normal
display.
• Then go to the AL2 and AL3 settings (same procedure as AL1).
• Press ALARM SET/AL.MODE to conrm and return to the normal
display.
Reminder of the alarm time:
• Press AL repeatedly. SELECT/SOURCE: the screen displays the
set alarm time for 5 seconds and returns to the normal display.
ACTIVATION/DEACTIVATION OF THE ALARM
• Press the AL button repeatedly. SELECT/SOURCE: every
time the display ashesAL1 /AL2 /AL3, briey press ALARM
SET/AL.MODE to activate or deactivate the alarm. Repeat the
procedure for each alarm.
Note: the screen displays the indicator AL1, AL2 or AL3 depending on
the mode selected.
ALARM REPEAT (SNOOZE)
• Press SNOOZE to temporarily interrupt the alarm; it will set off
automatically after 9 minutes. The indicator SNOOZE is displayed
on the screen.
SWITCHING OFF THE ALARM
• The alarm is programmed to function for 60 minutes.
• Press AL. SELECT/SOURCE or q RADIO to stop the alarm; it will
reactivate the next day (after 24 hours).
USING THE RADIO
• Press q RADIO: the radio turns on and the LCD screen displays
the frequency.
• Press TUNING/ADJUST w and s to search the frequency.
• Hold down for 2 seconds to start an automatic search. The
search will stop automatically when a radio station is correctly
found.
• Turn the VOL - / + button to adjust the sound volume.
• Press q RADIO to switch-off the radio.
NOTE: To improve the reception, use the wire aerial.
MEMORY (up to 20 radio stations)
When the radio is switched-on:
• Manual selection: Select a radio frequency.
• Press MEMORY: the P01 display ashes. Press MEMORY again
to ensure that the radio frequency has been set.
• By repeating this procedure you can set up to 20 stations.
ACCESSING THE MEMORISED STATIONS
• Switch on the radio.
• Press PRESET: the radio will play the most recently saved
station. Press the PRESET button repeatedly to go from one
saved station to another (P01 to P20).
SLEEP FUNCTION
• Switch on the radio.
• Press SLEEP: the screen displays SLEEP.
• Press SLEEP repeatedly to set the duration: 90, 80, 70, 60, 50,
40, 30, 20, 10 minutes.
• The radio switches-off automatically at the end of this duration.
Press q RADIO to cancel the function.
TIME PROJECTOR SETTINGS
The projector displays the time, on any plane surface in the room.
For optimum display, there must be sufcient distance between the
projection surface and the unit.
• Press PROJECTOR to switch on the projector and project the
clock on a surface in the room (wall, ceiling).
• Turn the projector to change the direction.
• Turn ADJUST till you get the best projection angle.
• Press REVERSE PROJECTION to reverse the clock display.
AUXILIARY FUNCTION
• Press q RADIO to switch on the radio: the screen will display the
radio frequency.
• Press AL. SELECT/SOURCE: the screen displays AUX.
• Plug the headphone socket of a peripheral device (Mp3 player,
smartphone, etc.) into the connection plug on the back of the unit
using a 3.5 mm double jack cable (not provided).
• Directly use the controls of the peripheral device.
TEMPERATURE
The room temperature is displayed in °C below the time display.
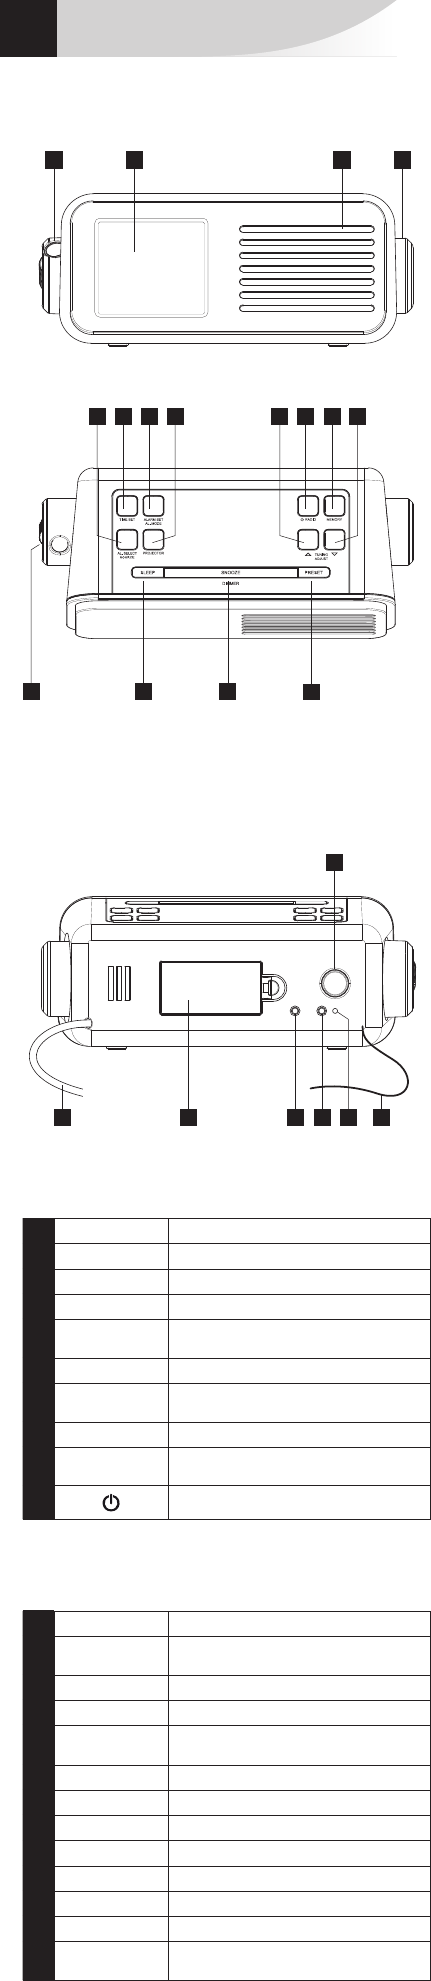
1
1413 15
16
3
6 107 118 125 9
42
1 LCD Screen
2 Speaker
3 Projector
4
VOLUME
Volume settings -/+
5
AL. SELECT /
SOURCE
Selecting the alarm mode/FM/AUX
6
TIME SET
Clock settings
7
ALARM SET /
AL.MODE
Alarm time settings
8
PROJECTOR
Projector On/Off
9
TUNING /
ADJUST w
Radio frequency/clock settings +
10
Radio On/Off
11
MEMORY
Setting the stations manually
12
TUNING /
ADJUST s
Radio frequency/clock settings -
13
ADJUST
Rotating the projection
14
SLEEP
Sleep
15
SNOOZE /
DIMMER
Repeat alarm/Reducing the screen
brightness
16
PRESET
Select saved radio stations
17 Mains power cable
18 Battery compartment
19
PHONES
Headphone socket
20
AUX IN
Connection plug for auxiliary device
21 Temperature sensor
22 Wire aerial
23
REVERSE
PROJECTION
Reversing the projection
1817 19 20 21 22
23
HEADPHONE SOCKET
Headphones (not provided), tted with a Ø 3.5mm jack and not
exceeding 100dB can be connected to the appliance.
• Connect the headphones to the socket.
Note: When the headphones are connected, the loud speakers are
automatically inactive.
Use the appliance at a comfortable volume to preserve user health.


Diskutieren Sie über dieses Produkt mit
Hier können Sie uns Ihre Meinung zu Thomson CP300T Uhrenradio mitteilen. Wenn Sie eine Frage haben, lesen Sie zunächst das Bedienungsanleitung sorgfältig durch. Die Anforderung eines Bedienungsanleitung kann über unser Kontaktformular erfolgen.
Antworten | Das war hilfreich (2) (Übersetzt von Google)