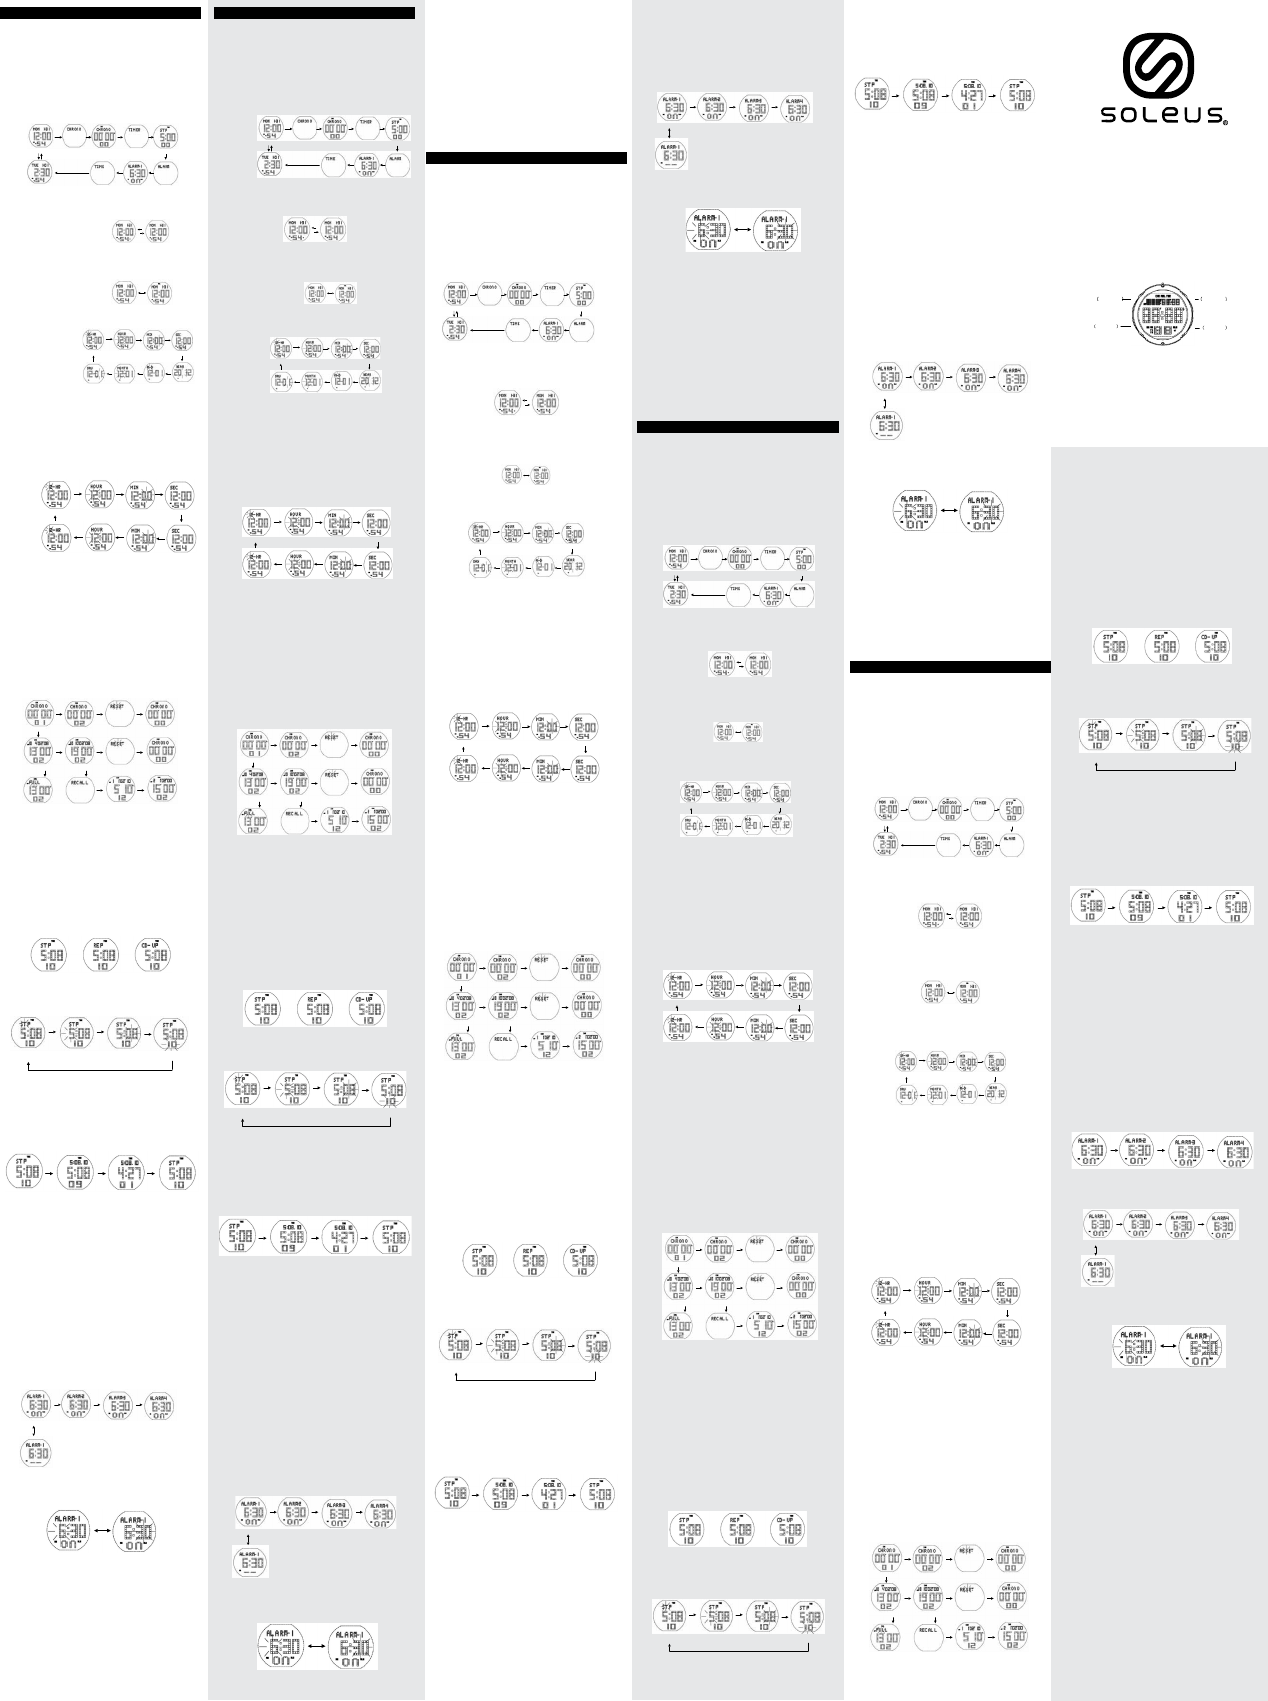
Features:
• 13 digit LCD Screen Displays the hour, minute, second, year (from 2000 to 2099),
month, date, day of the week
• 12-hour/24-hour format selectable. Auto-calendar
• Dual time
• 1/100 second stopwatch (the display range of the stopwatch is 23 hours/59 minutes/59.99
seconds)
• Four groups of alarm. Hourly time signal
• Countdown timer (the maximum display range of countdown time is 23 hours, 59
minutes, 59 seconds)
• Button tone and hourly time signal (on/o synchronized)
•EL backlight (can use “start” button or any other buttons to illuminate the backlight)
Functions
1. In any mode, press A to illuminate EL backlight for 3 seconds
2. In normal time-keeping mode, press C for a short time to turn on/o the hourly time
signal and button tone synchronously, hourly time signal indicator “ “ will appear on
the screen when it is turned on.
In normal timekeeping mode, hold down C for 2 seconds to turn on/o the function
that is the single button with EL backlight or any button with EL backlight. “AEL” indica-
tor will display on the screen when any button with backlight is turned on, in this case,
pressing any button can illuminate the EL backlight.
3. Time 1 Setting
• In Time 1 Mode, “12-hour/24-hour” starts to ash by holding down A for 2 seconds, which
indicates Time 1 setting screen, press B to select the items in sequence as shown below:
• Press D or C to select format between 12-hour and 24-hour format
• Press D to increase the value, hold down D to increase fast
• Press C to decrease the value, hold down C to decrease fast
• Seconds reset to zero by pressing D or C button. At the same time, the time of Time 2
also resets to zero
• Press A button to conrm, and exit from setting, then return to normal timekeeping mode
• In setting mode, the watch will automatically exit setting and then return to Time 1
Mode if you do not perform any button operation within 30 seconds
4. Time 2 Setting
• In Time 2 Mode, “12-hour/2-hour” starts to ash by holding down A for 2 seconds, which
indicates Time 1 setting screen, press B to select the items in sequence as shown below:
• Press D or C to select format between 12-hour and 24-hour
• Press D to decrease the value, hold down D to decrease fast
• Press C to increase the value, hold down C to increase fast
• Seconds reset to zero by pressing D or C. At the same time, the time of Time 1 also
resets to zero.
• Press A to conrm, and exit from setting, then return to normal timekeeping mode
• In setting mode, the watch will automatically exit setting and then return to Time 2
Mode if you do not perform any button operation within 30 seconds
5. Stopwatch Mode
• The display range of the stopwatch is from zero to 23 hours/59 minutes/59.99 seconds
• The stopwatch will restart counting from zero when it reaches its maximum limited
time (23 hours, 59 minutes, 59 seconds)
• Ten groups of LAP time can be recorded
To measure times with the stopwatch
• When entering the stopwatch mode, press D to start/stop counting. Seconds reset to
zero by holding down C for 2 seconds
• Press C to enter LAP timing when stopwatch is running, the screen will display next
LAP time after the previous LAP time for 8 seconds. When 10 groups of LAP times are
recorded fully, the screen icon will appear “FULL” if you continue to press C button. The
previous LAP time will be replaced by the last group of LAP times
• When LAP time is running, press D to stop counting, and press A to enter LAP Recall
Mode. In LAP Recall Mode, press D to view each group of LAP times. Press C to exit LAP
Recall Mode, then return to Stopwatch Mode
• In LAP Recall Mode or when stopwatch is stopped, hold down C for 2 seconds to clear
all previous records
• When stopwatch is running, press B to enter other modes, the stopwatch measure-
ment option is continuous even if you exit the Stopwatch Mode
• When stopwatch is stopped, the watch will automatically return to Time Mode if you
do not perform any button operation within 30 seconds
6. Countdown Mode
• The display range of countdown time is from zero to 23 hours, 59 minutes, 59 seconds
• Three methods of countdown can be selected as shown below:
Countdown Time Setting
• When countdown time is stopped, icon of “STP/ERP” or “CD-UP” starts to ash by
pressing A for 2 seconds, which indicates countdown time setting screen, then press B
to select items in sequence as shown below:
• By pressing D or C you can select any one method among three countdown time
methods: STP, ERP, CD-UP
• Press D to increase the value, hold D down to increase faster
• Press C to decrease the value, hold C down to decrease faster
• Press A to conrm, and exit from setting, then return to countdown time mode
• In setting mode, the watch will automatically exit setting and then return to Time
Mode if you do not perform any button operation within 30 seconds
To measure times with countdown timer
• In countdown mode, press D to start/stop counting. When it’s stopped, press C to
return to the original value
• Countdown time is running when icon “TMR” ashes on the screen. When “TMR” icon
stops ashing, it means countdown has been stopped
• When stopwatch is running, press B to enter other modes, the stopwatch measure-
ment operation is continuous even if you exit the Stopwatch Mode
• With One-time Countdown (STP Mode): the countdown time returns to original value
after it reaches zero. At the same time, alarm tone sounds with “BB-BB” for 30 seconds
then automatically returns to Time Mode. Pressing any button can stop the alarm tone
after it starts to sound. The watch will automatically return to Time Mode if you do not
perform any button operation within 30 seconds
• Repeated Stopwatch (REP Mode): the watch repeats countdown automatically after
the countdown is complete. The maximum range of Auto-Repeated Countdown is 100
times. If the countdown value is set from 1 to 59 seconds, alarm tone will sound with
“BB” when repeated countdown reaches to zero. If Repeated Countdown reaches to
100, the alarm tone will sound with “BB-BB” for 30 seconds, then automatically return
to Timekeeping Mode. If the countdown value is set more than 1 minute, alarm tone
will sound with “BB-BB” for 10 seconds when countdown time reaches zero. Pressing
any button can stop the alarm tone after it starts to sound. The watch will automatically
return to Time Mode if you do not perform any button operation within 30 seconds
• Counting Up (CD-UP Mode): The watch will count up automatically after countdown
time reaches zero, meanwhile, alarm tone will sound with “BB-BB” for 30 seconds, then
automatically return to Time Mode. You can press any button to stop the alarm tone
after it starts to sound. The watch will automatically return to Time Mode if you do not
perform any button operation within 30 seconds
7. Alarm Mode
• In Alarm Mode, press D to view the alarm time among 4 groups. In each group of
alarm mode, press C to turn on/o alarm. Shown below:
Alarm Setting
• In Alarm 1 Mode, hold down A for 2 seconds, “Hour” starts to ash, which indicates
alarm setting screen, then press B button to select item in sequence as shown below:
• Press D to increase the value, hold D down to increase faster
• Press C to decrease the value, hold C down to decrease faster
• Press A to conrm, and exit from setting, then return to Alarm Mode
• In setting mode, the watch will automatically exit setting and then return to Time
Mode if you do not perform any button operation within 30 seconds
• In Alarm Mode, the watch will automatically exit from Alarm Mode, then return to
Time Mode if you do not perform any button operation in 30 seconds
• The setting method for all alarm groups are similar
• When alarm set time is reached, the alarm tone will automatically stop after it sounds
for 30 seconds
Note: Alarm 1 thru 4 will sound only when the current time of Time 1 or Time 2 is
reached. For example, if the current time you chose is in Time 2 Mode, and you do not
change the current time to Time 1 Mode before the alarm tone sounds, the alarm tone
will only sound according to the time of Time 2 Mode
If Time 1 chosen: alarm will ego o in chosen Time Zone you have set the watch in
Caractéristiques:
• L’écran LCD à 13 chires ache l’heure, les minutes, les secondes, l’année (de 2000 à
2099), le mois, la date, le jour de la semaine
• formats 12 heures/24 heures sélectionnables. Calendrier automatique
• Double fuseau horaire
• chronomètre de 1/100 secondes (la plage d’achage du chronomètre est de 23
heures/59 minutes/59.99 secondes)
• Quatre groupes d’alarmes. Signal des heures
• Compte à rebours (la plage d’achage maximale du compte à rebours est de 23
heures, 59 minutes, 59 secondes)
• Tonalité et signal des heures (synchronisés activés/désactivés)
• Rétroéclairage EL (appuyer sur la touche “start” ou une autre touche pour allumer le
rétroéclairage)
Fonctions
1. Dans tout mode, appuyer sur A pour allumer le rétroéclairage EL pendant 3 secondes
2. En mode chronométrage normal, appuyer sur C pendant quelques secondes pour
activer/désactiver le signal des heures et la tonalité synchronisés, l’indicateur de
signal des heures “ “ apparaîtra à l’écran lorsqu’il sera activé.
En mode chronométrage normal, appuyer sur C pendant 2 secondes pour activer/
désactiver la fonction de touche unique de rétroéclairage EL ou toute touche avec le
rétroéclairage EL. L’indicateur “AEL” s’achera à l’écran lorsque la touche de rétroéclai-
rage est activée, et dans ce cas, le rétroéclairage pourra être allumé en appuyant sur
n’importe quelle touche.
3. Réglage du temps 1
• En mode temps 1, appuyer sur A pendant 2 secondes pour faire clignoter “12
heures/24 heures”, qui indique l’écran de réglage du temps 1, appuyer sur B pour
sélectionner les items séquentiels tel qu’illustré ci-dessous:
• Appuyer sur D ou C pour sélectionner le format 12 heures ou 24 heures
• Appuyer sur D pour augmenter la valeur, maintenir D pour augmenter rapidement
• Appuyer sur C pour diminuer la valeur, maintenir C pour diminuer rapidement
• Pour réinitialiser les secondes à zéro, appuyer sur les touches D ou C. Au même mo-
ment, le temps du temps 2 se réinitialise également à zéro
• Appuyer sur la touche A pour conrmer et sortir des réglages, puis revenir en mode
normal de chronomètre
• En mode réglage, la montre sortira automatiquement des réglages et reviendra au
mode temps 1 si vous n’appuyez sur aucune touche pendant 30 secondes
4. Réglage du temps 2
• En mode temps 2, appuyer sur A pendant 2 secondes pour faire clignoter “12
heures/24 heures”, qui indique l’écran de réglage du temps 1, appuyer sur B pour
sélectionner les items séquentiels tel qu’illustré ci-dessous:
• Appuyer sur D ou C pour sélectionner le format 12 heures ou 24 heures
• Appuyer sur D pour diminuer la valeur, maintenir D pour diminuer rapidement
• Appuyer sur C pour augmenter la valeur, maintenir C pour augmenter rapidement
• Pour réinitialiser les secondes à zéro, appuyer sur les touches D ou C. Au même mo-
ment, le temps du temps 1 se réinitialise également à zéro.
• Appuyer sur la touche A pour conrmer et sortir des réglages, puis revenir en mode
normal de chronomètre
• En mode réglage, la montre sortira automatiquement des réglages et reviendra au
mode temps 2 si vous n’appuyez sur aucune touche pendant 30 secondes
5. Mode chronomètre
• La plage d’achage du chronomètre est de 24 heures/59 minutes/59.99 secondes
• Le chronomètre recommencera à compter à partir de zéro lorsqu’il atteindra la limite
maximale (23 heures, 59 minutes, 59 secondes)
• Dix groupes de tours de piste peuvent être enregistrés
Pour mesurer des temps avec le chronomètre
• Lors de l’entrée en mode chronomètre, appuyer sur D pour démarrer/arrêter le chro-
nomètre. Appuyer sur C pendant 2 secondes pour réinitialiser les secondes à zéro
• Appuyer sur C pour le chronométrage de tours de piste lorsque le chronomètre est
en marche, l’écran achera le prochain temps de tour après le tour précédent pen-
dant 8 secondes. Lorsque dix groupes de tours de pistes sont complètement enregis-
trés, l’icône à l’écran achera “COMPLET” si vous continuez d’appuyer sur la touche C.
Le temps de tour précédent sera remplacé par le dernier groupe de dix tours
• Lorsque le temps de tours est en marche, appuyer sur D pour arrêter le chronomètre,
et appuyer sur A pour aller au mode de rappel de tours. En mode de rappel de tour,
appuyer sur D pour voir chaque groupe de temps de tours. Appuyer sur C pour sortir
du mode de rappel de tours, puis revenir au mode chronomètre
• En mode de rappel de tours ou lorsque le chronomètre est arrêté, maintenir le C
pendant 2 secondes pour eacer tous les enregistrements précédents
• Lorsque le chronomètre est en marche, appuyer sur B pour aller aux autres modes;
l’opération de mesure du chronomètre est en continu même si vous sortez du mode
chronomètre
• Lorsque le chronomètre est arrêté, la montre reviendra automatiquement en mode
temps si vous n’appuyez sur aucune touche pendant 30 secondes
6. Temps de compte à rebours
• La plage d’achage du décompte est de 23 heures/59 minutes/59 secondes
• Trois méthodes de décompte peuvent être sélectionnées tel qu’illustré ci-dessous:
Réglage du temps de décompte
• Lorsque le décompte est arrêté, l’icône “STP/ERP” ou “CD-UP” se met à clignoter si vous
appuyez sur A pendant 2 secondes, ce qui ache l’écran de réglage du temps de décompte,
puis appuyez sur B pour sélectionner les items séquentiels tel qu’illustré ci-dessous:
• En appuyant sur D ou C, vous pouvez sélectionner l’une des trois méthodes de
décompte: STP, ERP, CD-UP
• Appuyer sur D pour augmenter la valeur, maintenir D pour augmenter rapidement
• Appuyer sur C pour diminuer la valeur, maintenir C pour diminuer rapidement
• Appuyer sur la touche A pour conrmer et sortir des réglages, puis revenir en mode
normal de compte à rebours
• En mode réglage, la montre sortira automatiquement des réglages et reviendra au
mode temps si vous n’appuyez sur aucune touche pendant 30 secondes
Pour mesurer les temps avec le compte à rebours
• En mode compte à rebours, appuyer sur D pour démarrer/arrêter le décompte.
Lorsqu’il est arrêté, appuyer sur C pour revenir à la valeur d’origine
• Le temps du compte à rebours est en marche lorsque l’icône “TMR” clignote à l’écran.
Lorsque l’icône “TMR” cesse de clignoter, le compte à rebours est arrêté
• Lorsque le chronomètre est en marche, appuyer sur B pour aller aux autres modes;
l’opération de mesure du chronomètre est en continu même si vous sortez du mode
chronomètre
• Avec le décompte en une fois (Mode STP): le temps du compte à rebours revient
à la valeur d’origine lorsqu’il atteint zéro. Au même moment, la tonalité de l’alarme
résonne avec “BB-BB” pendant 30 secondes puis revient automatiquement en mode
temps. Appuyer sur une touche pour arrêter la tonalité de l’alarme après qu’elle se
soit mise à sonner. La montre reviendra automatiquement au mode temps si vous
n’appuyez sur aucune touche pendant 30 secondes
• Chronomètre à répétition (Mode REP): la montre répète automatiquement le dé-
compte après que le compte à rebours soit terminé. La plage maximale du décompte
à répétition automatique est de 100 fois. Si la valeur du décompte est réglée de 1 à
59 secondes, la sonnerie de l’alarme se fera entendre avec “BB” lorsque le décompte
répété atteindra zéro. Si le décompte à répétition atteint 100, la sonnerie de l’alarme
se fera entendre avec “BB-BB” pendant 30 secondes, puis le mode chronomètre
reviendra automatiquement. Si la valeur du décompte est réglée à plus d’une minute,
la sonnerie de l’alarme avec “BB-BB” se fera entendre pendant 10 secondes lorsque le
temps de décompte atteindra zéro. Appuyer sur une touche pour arrêter la sonnerie
de l’alarme après qu’elle se soit mise à sonner. La montre reviendra automatiquement
au mode temps si vous n’appuyez sur aucune touche pendant 30 secondes
• Mode de comptage (Mode CD-UP): La montre se mettra à compter automatique-
ment après que le décompte ait atteint zéro; pendant ce temps, la sonnerie de
l’alarme se fera entendre avec “BB-BB” pendant 30 secondes, puis retournera
automatiquement en mode temps. Appuyer sur une touche pour arrêter la sonnerie
de l’alarme après qu’elle se soit mise à sonner. La montre reviendra automatiquement
au mode temps si vous n’appuyez sur aucune touche pendant 30 secondes
7. Mode alerte
• En mode alarme, appuyer sur D pour acher le temps de l’alarme des 4 groupes.
Dans chaque groupe de mode alarme, appuyer sur C pour activer/désactiver l’alarme.
Voir ci-dessous:
Réglage de l’alarme
• En mode alarme 1, maintenir A pendant 2 secondes, “Heure” se mettra à clignoter à
l’écran, puis appuyer sur la touche B pour sélectionner l’item séquentiel tel qu’illustré
ci-dessous:
Funktionen:
• Das 13-stellige LCD-Display zeigt Stunde, Minute, Sekunde, Jahr (2000 bis 2099),
Monat, Datum und Wochentag an
• 12-Stunden/24-Stunden-Format wählbar. Automatischer Kalender
• Zwei Zeitzonen
• 1/100-Sekunden Stoppuhr (der Anzeigebereich der Stoppuhr beträgt 23 Stun-
den/59 Minuten/59.99 Sekunden)
• Vier Alarmgruppen Stundensignal
• Countdown-Timer (maximale Anzeige für Countdown-Zeit: 23 Stunden, 59
Minuten, 59 Sekunden)
• Tastenton und Stundensignal (an/aus synchronisiert)
• EL-Hintergrundbeleuchtung (kann über die “Start”-Taste oder jede beliebige
andere Tasten aktiviert werden)
Funktionen
1. Sie können die EL-Hintergrundbeleuchtung durch Drücken von A in jedem
Modus für 3 Sekunden einschalten
2. Im normalen Zeitmessung-Modus, drücken Sie für eine kurze Zeit C, um das
Stundensignal und den Tastenton gleichzeitig zu aktivieren/deaktivieren. Die
Stundensignal-Anzeige “ “ erscheint auf dem Display, wenn sie eingeschaltet ist.
Halten Sie im normalen Zeitnehmungsmodus die Taste C für 2 Sekunden gedrückt,
um die Funktion ein-/auszuschalten, dass nur mit einer einzigen Taste oder mit
jeder beliebigen Taste die Hintergrundbeleuchtung eingeschaltet werden kann.
Die Anzeige “AEL” auf dem Display zeigt an, wenn die Hintergrundbeleuchtung mit
jeder beliebigen Taste eingeschaltet werden kann, in diesem Fall können Sie durch
das Drücken einer beliebigen Taste die EL-Hintergrundbeleuchtung einschalten.
3. Einstellung Zeit 1
• Im Modus Zeit 1 beginnt die “12-Stunden/24-Stunden”-Anzeige zu blinken,
wenn Sie A für 2 Sekunden gedrückt halten. Sie benden sich nun im Einstel-
lungsmodus für Zeit 1. Drücken Sie B, um die Einstellung wie nachfolgend gezeigt
vorzunehmen:
• Drücken Sie D oder C, um von der 12-Stunden- zur 24-Stunden-Anzeige zu
wechseln
• Drücken Sie D, um die Zeit vorzustellen; für einen schnelleren Vorlauf halten Sie
D gedrückt
• Drücken Sie C, um die Zeit zurückzustellen; für einen schnelleren Rücklauf halten
Sie C gedrückt
• Die Sekunden werden auf 0 zurückgesetzt, wenn Sie D oder C drücken. Gleichze-
itig wird die Zeit von Zeitanzeige 2 auf Null zurückgesetzt
• Drücken Sie A, um Ihre Eingabe zu bestätigen und die Einstellung zu verlassen,
kehren Sie dann in den Normalzeitnehmungs-Modus zurück
• Im Einstellungsmodus verlässt die Uhr automatisch die Einstellung und kehrt
zum Modus Zeit 1 zurück, wenn Sie innerhalb von 30 Sekunden keine Aktion
durchführen
4. Einstellung Zeitzone 2
• Im Modus “Zeitzone 2” beginnt die “12-Stunden/2-Stunden”-Anzeige zu blinken,
wenn Sie A für 2 Sekunden gedrückt halten. Sie benden sich nun im Einstel-
lungsmodus für Zeitzone 1. Drücken Sie B, um die Einstellung vorzunehmen, wie
nachfolgend gezeigt:
• Drücken Sie D oder C, um zwischen der 12-Stunden und der 24-Stunden-Anzeige
zu wechseln
• Drücken Sie D, um die Zeit zurückzustellen. Für einen schnelleren Rücklauf halten
Sie D gedrückt
• Drücken Sie C, um die Zeit vorzustellen, für einen schnelleren Vorlauf halten Sie
C gedrückt
• Die Sekunden werden auf Null zurückgesetzt, wenn Sie D oder C drücken. Glei-
chzeitig wird die Zeit von Zeitzone 1 auf Null zurückgesetzt.
• Drücken Sie A, um Ihre Eingabe zu bestätigen und die Einstellung zu verlassen,
kehren Sie dann in den Normalzeitnehmungs-Modus zurück
• Im Einstellungsmodus verlässt die Uhr automatisch die Einstellung und kehrt
zum Modus “Zeitzone 2” zurück, wenn Sie innerhalb von 30 Sekunden keine Aktion
durchführen
5. Stoppuhr-Modus
• Die Anzeige der Stoppuhr reicht von 0 bis zu 23 Stunden/59 Minuten/59,99
Sekunden
• Die Stoppuhr beginnt von neuem ab Null zu zählen, sobald sie die maixmale Zählzeit
erreicht hat (23 Stunden, 59 Minuten, 59 Sekunden)
• Es können zehn Gruppen von Rundenzeiten genommen werden
Zeitmessung mit der Stoppuhr
• Im Stoppuhr-Modus drücken Sie D, um das Zählen zu starten/zu stoppen. Die Sekun-
den werden auf Null zurückgesetzt, wenn Sie C für 2 Sekunden gedrückt halten
Funzioni:
• Lo schermo LCD a 13 caratteri visualizza l’ora, i minuti, i secondi, l’anno (dal 2000 al
2099), il mese, la data e il giorno della settimana
• Formato 12/24 ore selezionabile Calendario automatico
• Doppio orario
• Cronometro a 1/100 di secondo (l’intervallo visualizzabile è di 23 ore, 59 minuti e
59,99 secondi)
• Quattro gruppi di sveglie Segnale orario a ogni ora
• Timer del conto alla rovescia (l’intervallo massimo visualizzabile è di 23 ore, 59
minuti e 59 secondi)
• Pulsante tono e segnale orario a ogni ora (on/o sincronizzato)
• Retroilluminazione EL (utilizzare il pulsante “Start” o qualsiasi altro pulsante per
attivare la retroilluminazione)
Funzioni
1. In qualsiasi modalità, premere A per attivare la retroilluminazione EL per 3 secondi
2. In modalità ora normale, premere brevemente C e simultaneamente il pulsante
del tono per attivare/disattivare il segnale orario a ogni ora. L’indicatore del segnale
orario a ogni ora “ “ sarà visualizzato sullo schermo quando il segnale è attivo.
In modalità cronometraggio normale, tenere premuto C per 2 secondi per attivare/
disattivare la funzione cioè il solo pulsante con retroilluminazione EL o qualsiasi pul-
sante con retroilluminazione EL. La scritta “AEL” compare sul display quando qualsiasi
pulsante con retroilluminazione viene premuto. In tal caso, la pressione di qualsiasi
pulsante può attivare la retroilluminazione EL.
3. Impostazione Orario 1
• In modalità Orario 1, se si tiene premuto A per 2 secondi, “12-ore/24-ore” inizia a
lampeggiare indicando la schermata di impostazione Orario 1. Premere B per selezi-
onare gli elementi in successione, come mostrato di seguito:
• Premere D o C per selezionare il formato a 12 o 24 ore
• Premere D per aumentare il valore, tenere premuto D per aumentarlo rapidamente
• Premere C per diminuire il valore, tenere premuto C per diminuirlo rapidamente
• Premere il pulsante D o C per azzerare i secondi. Contemporaneamente, anche il
valore di Orario 2 si azzera
• Premere il pulsante A per confermare e uscire dall’impostazione, quindi tornare alla
modalità normale
• Nella modalità di impostazione, in assenza di operazioni per 30 secondi, l’orologio
esce automaticamente dall’impostazione e torna alla modalità Orario 1.
4. Impostazione Orario 2
• In modalità Orario 2, se si tiene premuto A per 2 secondi, “12-ore/2-ore” inizia a lam-
peggiare, indicando la schermata di impostazione Orario 1. Premere B per selezionare
gli elementi in successione, come mostrato di seguito:
• Premere D o C per selezionare il formato a 12 o 24 ore
• Premere D per diminuire il valore, tenere premuto D per diminuirlo rapidamente
• Premere C per aumentare il valore, tenere premuto C per aumentarlo rapidamente
• I secondi si azzerano premendo D o C. Contemporaneamente, anche l’orario di
Orario 1 si azzera.
• Premere A per confermare e uscire dall’impostazione, quindi tornare alla normale
modalità orario
• In modalità impostazione, in assenza di operazioni per 30 secondi, l’orologio uscirà
automaticamente dall’impostazione e tornerà alla modalità Orario 2
5. Modalità Cronometro
• L’intervallo di visualizzazione del cronometro va da zero a 23 ore, 59 minuti e 59,99
secondi
• Una volta raggiunto il suo limite massimo di tempo (23 ore, 59 minuti e 59 secondi),
il cronometro ricomincia a contare da zero
• Possono essere registrati dieci gruppi di tempi su giro.
Misurare i tempi con il cronometro
• Quando si accede alla modalità Cronometro, premere D per avviare/arrestare il
conteggio. I secondi si azzerano tenendo premuto C per 2 secondi
• Premere C per accedere al tempo di giro mentre il cronometro è in funzione. Lo
schermo mostrerà il tempo di giro successivo dopo quello precedente per 8 secondi.
Quando si raggiunge la registrazione completa di 10 gruppi di tempi di giro, continu-
ando a premere il pulsante C sullo schermo compare l’icona “PIENO”. Il tempo di giro
precedente viene sostituito dall’ultimo gruppo di tempi di giro
• Quando il tempo di giro è in scorrimento, premere D per fermare il conteggio, quindi
premere A per accedere alla modalità Richiamo giro. In modalità Richiamo giro,
premere D per visualizzare ogni gruppo di tempi di giro. Premere C per uscire dalla
modalità Richiamo giro, quindi tornare alla modalità Cronometro
• In modalità Richiamo giro o a cronometro fermo, tenere premuto C per 2 secondi
per cancellare tutte le registrazioni precedenti
• Quando il cronometro è in funzione, premere B per passare ad altre modalità,
l’opzione di misura cronometrica è continua anche se si esce dalla modalità crono-
metro
• Quando il cronometro è fermo, se non si preme alcun pulsante per 30 secondi,
l’orologio tornerà automaticamente in modalità Orario
6. Modalità conto alla rovescia
• L’intervallo visualizzato di conto alla rovescia va da zero a 23 ore, 59 minuti e 59 secondi
• Possono essere selezionati tre metodi di conto alla rovescia, come illustrato di seguito:
Impostazione del conto alla rovescia
• Quando il conto alla rovescia viene fermato, premendo A per due secondi l’icona
“STP/ERP” o “CD-UP” inizia a lampeggiare, indicando la schermata di impostazione
del conto alla rovescia, quindi premere B per selezionare le voci in sequenza, come
illustrato di seguito:
• Premere D o C per selezionare uno qualunque dei tre metodi di conto alla rovescia:
STP, ERP, CD-UP
• Premere D per aumentare il valore, tenere premuto D per aumentarlo più rapidamente
• Premere C per diminuire il valore, tenere premuto C per diminuirlo più rapidamente
Características:
• La pantalla LCD de 13 dígitos muestra la hora, los minutos, los segundos, el año
(de 2000 a 2099), el mes, la fecha y el día de la semana
• Formato seleccionable 12 horas/24 horas Calendario automático
• Hora doble
• Cronómetro 1/100 de segundos (el rango de visualización del cronómetro es de
23 horas/59 minutos/59.99 segundos)
• Cuatro grupos de alarma. Señal horaria
• Temporizador regresivo (el rango de visualización máximo del conteo regresivo
es de 23 horas, 59 minutos, 59 segundos)
• Botón de tono y señal horaria (on/o sincronizados)
• Luz de fondo EL (puede usar el botón “inicio” o cualquier otro botón para iluminar
la luz de fondo)
Funciones
1. En cualquier modo, presione A para prender la luz de fondo EL durante 3
segundos
2. En el modo de cronometraje normal, presione C brevemente para activar/
desactivar la señal horaria y el botón de tono de forma sincronizada. El indicador
de señal horaria “ “ aparecerá en la pantalla cuando esté activado.
En el modo de cronometraje normal, mantenga presionado C por 2 segundos
para activar/desactivar la función que es el botón único con retroiluminación EL o
cualquier botón con iluminación a contraluz EL. El indicador “AEL” se mostrará en
pantalla cuando cualquier botón con iluminación a contraluz sea activado, en este
caso, presionar cualquier botón puede encender la retroiluminación EL.
3. Conguración hora 1
• En el modo hora 1, “12/24 horas” comienza a destellar si se mantiene presionado
A durante 2 segundos, que indica la pantalla de ajuste de hora 1, presione B para
seleccionar los elementos de la secuencia como se muestra a continuación:
• Presione D o C para seleccionar el formato de 12 horas y formato de 24 horas
• Presione D para aumentar el valor, mantenga pulsado el botón D para aumentar
rápido
• Presione C para disminuir el valor, mantenga presionado C para disminuir rápido
• Los segundos se restablece desde cero pulsando el botón D o C. Del mismo
modo, el tiempo de Hora 2, también se restablece a cero
• Presione el botón A para conrmar y salga de ajustes, luego vuelva al modo
normal de la hora
• En el modo ajustes, el reloj saldrá automáticamente de los ajustes y volverá al
Modo Hora 1 si no toca ningún botón dentro de 30 segundos
4. Conguración Hora 2
• En el modo Hora 2, “12/24 horas” comienza a parpadear si se mantiene presio-
nado el botón A durante 2 segundos, que indica la pantalla de ajuste de Hora
1, presione B para seleccionar los elementos de la secuencia como se muestra a
continuación:
• Presione D o C para seleccionar el formato entre 12 horas y 24 horas
• Presione D para disminuir el valor, mantenga pulsado el botón D para disminuir
rápido
• Presione C para aumentar el valor, mantenga pulsado el botón C para aumentar
rápido
• Los segundos vuelven a cero pulsando D o C. Al mismo tiempo, el tiempo de Hora
1 también se restablece a cero
• Presione A para conrmar y salga de ajustes, luego vuelva al modo normal de la hora
• En el modo ajustes, el reloj saldrá automáticamente de los ajustes y volverá al
Modo Hora 2 si no toca ningún botón dentro de 30 segundos
5. Modo cronómetro
• El alcance de visualización del cronómetro es de cero a 23 horas/59 minu-
tos/59,99 segundos
• El cronómetro se reiniciará contando desde cero cuando alcanza su límite de
tiempo máximo (23 horas, 59 minutos, 59 segundos).
• Se pueden registrar diez grupos de tiempos de Vuelta
Para medir tiempos con el cronómetro
• Al entrar en el modo del cronómetro, presione D para iniciar y detener el conteo.
Los segundos se reestablecen a cero manteniendo apretado C durante 2 segundos
• Presione C para ingresar el tiempo de Vuelta cuando el cronómetro esté funciona-
ndo, la pantalla mostrará el tiempo de Vuelta siguiente luego del tiempo de Vuelta
anterior durante 8 segundos. Cuando se completa el registro de 10 grupos, en el
icono de la pantalla aparecerá la palabra “FULL” (“COMPLETO”) si usted continúa
pulsando el botón C. El tiempo de vuelta anterior, será reemplazado por el último
grupo de tiempos de vuelta
• Cuando el tiempo de Vuelta está corriendo, presione D para detener el conteo
y presione A para ingresar al Modo Memoria de Vueltas. En Modo Memoria de
Vueltas, presione el botón D para ver cada uno de los grupos de tiempos de vuelta.
Presione C para salir del modo de memoria de vueltas cronometrada y luego
vuelva al modo cronómetro
• En el Modo Memoria de Vueltas o cuando se detenga el cronómetro, mantenga
presionado el botón C durante 2 segundos para borrar todos los registros
anteriores
• Cuando el cronómetro esté en marcha, pulse B para entrar en otros modos, la
opción de medición del cronómetro es continua, incluso si sale del modo de
cronómetro
• Cuando el cronómetro se detiene, el reloj regresará automáticamente al Modo
Hora si no presiona ningún botón en los siguientes 30 segundos
6. Modo de conteo regresivo
• El rango de visualización del conteo regresivo es de cero a 23 horas, 59 minutos,
59 segundos
• Pueden seleccionarse tres métodos de conteo regresivo como se muestra a
continuación:
Ajuste de horario de cuenta regresiva
• Cuando la cuenta regresiva se detiene, el ícono de “STP/ERP” o “CD-UP” comienza
a parpadear al presionar A durante 2 segundos, lo que el tiempo de conteo
regresivo en la pantalla, luego presione B para seleccionar elementos en secuencia
como se muestra a continuación:
• Al presionar los botones D o C, puede seleccionar cualquiera de los tres métodos
de conteo regresivo: STP, ERP, CD-UP
• Presione D para aumentar el valor, mantenga pulsada la tecla D para aumentar
más rápido
• Presione C para disminuir el valor, mantenga presionado C para disminuir rápido
• Presione el botón A para conrmar y salga de ajustes, luego vuelva al modo de
horario de cuenta regresiva
• En el modo ajustes, el reloj saldrá automáticamente de los ajustes y volverá al
Modo Hora si no presiona ningún botón en 30 segundos
Para medir las horas con el temporizador de cuenta regresiva
• En el modo de cuenta regresiva, presione el botón D para iniciar o detener el
conteo. Cuando está parado, presione C para regresar al valor original
• El horario de conteo regresivo está funcionando cuando el ícono “TMR” parpadea
en la pantalla. Cuando el ícono “TMR” deja de parpadear, signica que la cuenta
regresiva se ha detenido.
• Cuando el cronómetro esté en marcha, presione B para seleccionar otros modos,
la cuenta del cronómetro es continua incluso si usted sale del Modo Cronómetro.
• Con el conteo regresivo de una vez (Modo STP): el tiempo del conteo regresivo
regresa a su valor original después de llegar a cero. Al mismo tiempo, el tono de la
alarma suena con “BB-BB” durante 30 segundos, luego vuelve automáticamente al
Modo Hora. Al pulsar cualquier botón se puede detener el tono de alarma después
que comienza a sonar. El reloj volverá automáticamente al Modo Hora si no toca
ningún botón durante 30 segundos
• Repetida de Cronómetro (REP Mode): el reloj de cuenta regresiva se repite au-
tomáticamente después de nalizar la cuenta. El alcance máximo de Autoconteo
regeresivo es de 100 veces. Si el valor del conteo regresivo es establecido de 1 a
59 segundos, el tono de alarma sonará con “BB” cuando el conteo regresivo en
repetición llegue a cero. Si el Conteo regresivo repetido alcanza los 100, el tono de
la alarma sonará con “BB-BB” durante 30 segundos, luego volverá automática-
mente al Modo Función de hora. Si el valor de la cuenta regresiva se mantiene
más de 1 minuto, el tono de alarma sonará con “BB-BB” por 10 segundos cuando
la cuenta regresiva llegue a cero. Al pulsar cualquier botón se puede detener el
tono de alarma después que comienza a sonar. El reloj volverá al Modo Hora si no
presiona ningún botón en 30 segundos
• Conteo hacia arriba (Modo CD-UP): El reloj contará automáticamente luego de
que la cuenta regresiva haya llegado a cero, mientras el tono de alarma sonará con
BJF063(F12-SWIF) MODULE MANUAL
2012 -3-17 ModelBJF063 Page: 5 / 7 Edition : A
The display range of countdown time is from zero to 23 hours, 59 minutes, 59 seconds.
Three methods of countdown can be selected as shown following:
Countdown Time Setting
When countdown time is stopped, icon of “STP/ERP” or “CD-UP” starts to flash by pressing A for 2
seconds, which indicates countdown time setting screen, then press B to select items in sequence as
show below:
Press D or C can select any one method among three countdown time methods (STP) (ERP)
(CD-UP).
Press D to increase the value, hold down D for some time to increase fast.
Press C to decrease the value, hold down C for some time to decrease fast.
Press A to confirm, and exit from setting, then return to countdown time mode.
In setting mode, the watch will automatically exit setting and then return Time Mode if you do not
perform any button operation in 30 seconds.
To measure times with countdown timer
In countdown mode, press D to start / stop counting. When it stopped, press C to return to the
original value.
Countdown time is running when icon “TMR” flashes on the screen. While icon “TMR” stops flashing,
Counting up after countdown
reaches to zero
B B
B
Countdown time
Hours Minutes
Button B
BJF063(F12-SWIF) MODULE MANUAL
2012 -3-17 ModelBJF063 Page: 5 / 7 Edition : A
The display range of countdown time is from zero to 23 hours, 59 minutes, 59 seconds.
Three methods of countdown can be selected as shown following:
Countdown Time Setting
When countdown time is stopped, icon of “STP/ERP” or “CD-UP” starts to flash by pressing A for 2
seconds, which indicates countdown time setting screen, then press B to select items in sequence as
show below:
Press D or C can select any one method among three countdown time methods (STP) (ERP)
(CD-UP).
Press D to increase the value, hold down D for some time to increase fast.
Press C to decrease the value, hold down C for some time to decrease fast.
Press A to confirm, and exit from setting, then return to countdown time mode.
In setting mode, the watch will automatically exit setting and then return Time Mode if you do not
perform any button operation in 30 seconds.
To measure times with countdown timer
In countdown mode, press D to start / stop counting. When it stopped, press C to return to the
original value.
Countdown time is running when icon “TMR” flashes on the screen. While icon “TMR” stops flashing,
Counting up after countdown
reaches to zero
B B
B
Countdown time
Seconds
Hours Minutes
Button B
BJF063(F12-SWIF) MODULE MANUAL
2012 -3-17 ModelBJF063 Page: 7 / 7 Edition : A
In Alarm 1 Mode, hold down A for 2 seconds, “Hour” starts to flash, which indicates alarm setting
screen, then press B button to select item in sequence as shown below:
Press D to increase the value, hold down D for some time to increase fast.
Press C to decrease the value, hold down C for some time to decrease fast.
Press A to confirm, and exit from setting, then return to Alarm Mode.
In setting mode, the watch will automatically exit setting and then return Time Mode if you do not
perform any button operation in 30 seconds.
In Alarm Mode, the watch will automatically exit from Alarm Mode, then return to Time Mode if
you do not perform any button operation in 30 minutes.
The setting method of 4 groups of alarm are similar.
At the state of alarm is turn on, if the alarm time is reached, the alarm tone will automatically stop
after it sounds for 30 seconds.
Remark: 4 groups of alarm will only sound according to the current time of Time 1 or Time 2 is reached. For
example, if the current time you chosen is Time 2 Mode, and you not change the current time to Time 1
before the alarm tone sounds, in this case, the alarm tone will only sound according to the time of Time
2 Mode.
Hour Minute
Button B
BJF063(F12-SWIF) MODULE MANUAL
2012 -3-17 M odelBJF063 Pag e: 2 / 7 E dition : A
2. In norm al timekeeping m ode, press C for a short time to turn on / off the hourly time signal and button tone
synchronously, hourly time signal indicator
will appear on the screen when it is turned on.
In normal timekeeping mode, hold down C for 2 seconds to turn on / off the function that is the single button with
EL backlight or any button with EL backlight. “AEL” indicator will display on the screen when any button with
backlight is turned on, in this case, pressing any button can illuminate the EL backlight.
3. Time 1 Setting
In Time 1 Mode, “12-hour / 24-hour” starts to flash by holding down A for 2 seconds, which
indicates Time 1 setting screen, press B to select the items in sequence as shown below:
Hourly Time Signal and
Button Tone are turned on
Any button with
EL backlight
Single button w ith
EL backlight
Button C
Hourly Time Signal and
Button Tone are turned off
SR017
ENGLISH FRANÇAIS (FRENCH)
ESPAÑOL (SPANISH)
ITALIANO (ITALIAN)
DEUTSCH (GERMAN)
BJF063(F12-SWIF) MODULE MANUAL
2012 -3-17 ModelBJF063 Page: 1 / 7 Edition : A
A . Features
13 digits LCD Screen displays the hour, minute, second, year (from year 2000 to year 2099), month,
date, day of the week.
12-hour / 24-hour format selectable. Auto-calendar.
Dual time.
1/100 second stopwatch (the display range of the stopwatch is 23 hours 59 minutes 59.99 seconds).
Four groups of alarm. Hourly time signal.
Countdown timer (the maximum display range of countdown time is 23 hours 59 minutes 59
seconds.)
Button tone and hourly time signal.( On / Off synchronized)
EL backlight. (can use “Start” button or any other buttons to illuminate the backlight).
B . Functions
1. In any mode, press A to illuminate EL backlight for 3 seconds.
RESET
START/STOP
LIGHT/SET
Press & Hold D
for 2 seconds
Press & Hold D
for 2 seconds
BJF063(F12-SWIF) MODULE MANUAL
2012 -3-17 ModelBJF063 Page: 1 / 7 Edition : A
A . Features
13 digits LCD Screen displays the hour, minute, second, year (from year 2000 to year 2099), month,
date, day of the week.
12-hour / 24-hour format selectable. Auto-calendar.
Dual time.
1/100 second stopwatch (the display range of the stopwatch is 23 hours 59 minutes 59.99 seconds).
Four groups of alarm. Hourly time signal.
Countdown timer (the maximum display range of countdown time is 23 hours 59 minutes 59
seconds.)
Button tone and hourly time signal.( On / Off synchronized)
EL backlight. (can use “Start” button or any other buttons to illuminate the backlight).
B . Functions
1. In any mode, press A to illuminate EL backlight for 3 seconds.
Alarm Mode
Time 2 Mode
Button B Button B
Countdown Time Mode
Press & Hold D
Button B
Press & Hold D
BJF063(F12-SWIF) MODULE MANUAL
2012 -3-17 ModelBJF063 Page: 1 / 7 Edition : A
A . Features
13 digits LCD Screen displays the hour, minute, second, year (from year 2000 to year 2099), month,
date, day of the week.
12-hour / 24-hour format selectable. Auto-calendar.
Dual time.
1/100 second stopwatch (the display range of the stopwatch is 23 hours 59 minutes 59.99 seconds).
Four groups of alarm. Hourly time signal.
Countdown timer (the maximum display range of countdown time is 23 hours 59 minutes 59
seconds.)
Button tone and hourly time signal.( On / Off synchronized)
EL backlight. (can use “Start” button or any other buttons to illuminate the backlight).
B . Functions
1. In any mode, press A to illuminate EL backlight for 3 seconds.
Time 2 Mode
Press & Hold D
Button B
Press & Hold D
Swift Manual
BJF063(F12-SWIF) MODULE MANUAL
2012 -3-17 M odelBJF063 P age: 2 / 7 Edi tion : A
2. In normal timekeeping mode, press C for a short time to turn on / off the hourly time signal and button tone
synchronously, hourly time signal indicator
will appear on the screen when it is turned on.
In normal timekeeping m ode, hold down C for 2 seconds to turn on / off the function that is the single button with
EL backlight or any button with EL backlight. “AEL” indicator will display on the screen when any button with
backlight is turned on, in this case, pressing any button can illum inate the EL backlight.
3. Time 1 Setting
In Time 1 Mode, “12-hour / 24-hour” starts to flash by holding down A for 2 seconds, which
indicates Time 1 setting screen, press B to select the items in sequence as shown below:
Hourly Time Signal and
Button Tone are turned on
Any button with
EL backlight
Single button w ith
Hourly Time Signal and
Button Tone are turned off
D button for
2 seconds
BJF063(F12-SWIF) MODULE MANUAL
2012 -3-17 M odelBJF063 Page: 2 / 7 Editio n : A
2. In norm al timekeeping mod e, press C for a short time to turn on / off the hourly time signal and button tone
synchronously, ho urly time signal indicator
will appear on t he screen when it is turned on.
In normal tim ekeeping mode, hold down C for 2 seconds to turn on / off the function th at is the single button w ith
EL backl ight or any button with EL backlight. “AEL” indicator will display on the screen when any button with
backlight is turned on, in this case, pressing any butto n can illuminate the EL backlight.
3. Time 1 Setting
In Time 1 Mode, “12-hour / 24-hour” starts to flash by holding down A for 2 seconds, which
indicates Time 1 setting screen, pre ss B to select the i tems in sequence a s shown below:
Hourly Time Sign al and
Button Tone are t urned on
Any button with
EL backlight
Single button with
Hourly Time Sign al and
Button Tone are t urned off
D button for
BJF063(F12-SWIF) MODULE MANUAL
2012 -3-17 M odelBJF063 P age: 2 / 7 E dition : A
2. In normal timekeeping mode, press C for a short time to turn on / off the hourly time signal and button tone
synchronously, hourly time sign al indicator
will appear on the screen when it is turned on.
In normal timekeeping mode, hold down C for 2 seconds to turn on / off the function that is the single button with
EL backlight or any button with EL backlight. “AEL” indicator will display on the screen when any button with
backlight is turned on, in this case, pressing any button can illuminate the EL backlight.
3. Time 1 Setting
In Time 1 Mode, “12-hour / 24-hour” starts to flash by holding down A for 2 seconds, which
indicates Time 1 setting screen, press B to select the items in sequence as shown below:
Hourly Time Signal and
Button Tone are turned on
Any button with
EL backlight
Single button w ith
EL backlight
Hourly Time Signal and
Button Tone are turned off
D button for
BJF063(F12-SWIF) MODULE MANUAL
2012 -3-17 Model BJF063 Page: 2 / 7 Edition : A
2. In normal timekeeping mode, press C for a short time to tur n on / off the hourly time sign al and button tone
synchronously, ho urly time signal indicator
will appear on the screen when it is turned on.
In normal tim ekeeping mode, hold down C for 2 seconds to turn on / off th e function tha t is the single button with
EL back light or any button with EL backligh t. “AEL” indicator will display on th e screen when any button wi th
backlight is turne d on, in this case, pr essing any button can illuminate the EL backlight.
3. Time 1 Setting
In Time 1 Mode, “12-hou r / 24-hour” starts to flash by holding down A for 2 seconds, which
indicates Time 1 setting screen, p ress B to select th e items in sequen ce as shown below :
Hourly Time Sig nal and
Button Tone are turned on
Any button with
EL backlight
Single button wit h
EL backlight
Hourly Time Sig nal and
Button Tone are turned off
BJF063(F12-SWIF) MODULE MANUAL
2012 -3-17 M odelBJF063 P age: 2 / 7 E dition : A
2. In norm al timekeeping mode, press C for a short time to turn on / off the hourly time signal and button tone
synchronously, hourly time signal indicator
will appear on the screen when it is turned on.
In normal timekeeping mode, hold down C for 2 seconds to turn on / off the function that is the single button with
EL backlight or any button with EL backlight. “AEL” indicator will display on the screen when any button with
backlight is turned on, in this case, pressing any button can illuminate the EL backlight.
3. Time 1 Setting
In Time 1 Mode, “12-hour / 24-hour” starts to flash by holding down A for 2 seconds, which
indicates Time 1 setting screen, press B to select the items in sequence as shown below:
Button B
12H/24H Hour Minute Second
Month-Date / Date-Month
Month Date
Hourly Time Signal and
Button Tone are turned on
Any button with
EL backlight
Single button w ith
EL backlight
B
B
B B
Button B
Button B
B
Button B
Button B
Button B
Hourly Time Signal and
Button Tone are turned off
BJF063(F12-SWIF) MODULE MANUAL
2012 -3-17 M odelBJF063 P age: 2 / 7 Ed ition : A
2. In normal timekeeping mode, press C for a short time to turn on / off the hourly time signal and button tone
synchronously, hourly time signal indicator
will appear on the screen when it is turned on.
In normal timekeeping mode, hold down C for 2 seconds to turn on / off the function that is the single button with
EL backlight or any button with EL backlight. “AEL” indicator will display on the screen when any button with
backlight is turned on, in this case, pressing any button can illuminate the EL backlight.
3. Time 1 Setting
In Time 1 Mode, “12-hour / 24-hour” starts to flash by holding down A for 2 seconds, which
indicates Time 1 setting screen, press B to select the items in sequence as shown below:
Button B
12H/24H Hour Minute Second
Year
Hourly Time Signal and
Button Tone are turned on
Any button with
EL backlight
Single button with
EL backlight
B
B
B B
Button B
Button B
B
Button B
Hourly Time Signal and
Button Tone are turned off
Button B
BJF063(F12-SWIF) MODULE MANUAL
2012 -3-17 M odelBJF063 P age: 2 / 7 E dition : A
2. In norm al timekeeping mode, press C for a short time to turn on / off the hourly time signal and button tone
synchronously, hourly time signal indicator
will appear on the screen when it is turned on.
In normal timekeeping mode, hold down C for 2 seconds to turn on / off the function that is the single button with
EL backlight or any button with EL backlight. “AEL” indicator will display on the screen when any button with
backlight is turned on, in this case, pressing any button can illuminate the EL backlight.
3. Time 1 Setting
In Time 1 Mode, “12-hour / 24-hour” starts to flash by holding down A for 2 seconds, which
indicates Time 1 setting screen, press B to select the items in sequence as shown below:
Button B
12H/24H Hour Minute Second
Year
Month Date
Hourly Time Signal and
Button Tone are turned on
Any button with
EL backlight
Single button w ith
EL backlight
B
B
B B
Button B
Button B
Button B
Button B
B
Button B
Button B
Hourly Time Signal and
Button Tone are turned off
Button B
BJF063(F12-SWIF) MODULE MANUAL
2012 -3-17 ModelBJF063 Page: 3 / 7 Edition : A
Press D or C to select format between 12-hour and 24-hour format.
Press D to increase the value, hold down D for some time to increase fast.
Press C to decrease the value, hold down C for some time to decrease fast.
Seconds reset to zero by pressing D or C button. At the same time, the time of Time 2 also resets
zero.
Press A button to confirm, and exit from setting, then return to normal timekeeping mode.
In setting mode, the watch will automatically exit setting and then return Time 1 Mode if you do not
perform any button operation in 30 seconds.
4. Time 2 Setting
In Time 2 Mode, “12-hour / 24-hour” starts to flash by holding down A for 2 seconds, which
indicates Time 1 setting screen, press B to select the items in sequence as shown below:
Press D or C to select format between 12-hour and 24-hour.
Press D to decrease the value, hold down D for some time to decrease fast.
Press C button to increase the value, hold down C for some time to increase fast.
Seconds reset to zero by pressing D or C. At the same time, the time of Time 1 also resets zero.
Press A to confirm, and exit from setting, then return to normal timekeeping mode.
In setting mode, the watch will automatically exit setting and then return Time 2 Mode if you do not
perform any button operation in 30 seconds.
5. Stopwatch Mode
The display range of the stopwatch is from zero to 23 hours 59 minutes 59.99 seconds.
The stopwatch will restart counting from zero when it reaches its maximum limited (23 hours 59
minutes 59 seconds.)
Ten groups of LAP time can be recorded.
To measure times with the stopwatch
Minute
Year
Month-Date / Date-Month
Month Date
Button B
B B
B
Hour
Button B
Button B
BJF063(F12-SWIF) MODULE MANUAL
2012 -3-17 ModelBJF063 Page: 3 / 7 Edition : A
Press D or C to select format between 12-hour and 24-hour format.
Press D to increase the value, hold down D for some time to increase fast.
Press C to decrease the value, hold down C for some time to decrease fast.
Seconds reset to zero by pressing D or C button. At the same time, the time of Time 2 also resets
zero.
Press A button to confirm, and exit from setting, then return to normal timekeeping mode.
In setting mode, the watch will automatically exit setting and then return Time 1 Mode if you do not
perform any button operation in 30 seconds.
4. Time 2 Setting
In Time 2 Mode, “12-hour / 24-hour” starts to flash by holding down A for 2 seconds, which
indicates Time 1 setting screen, press B to select the items in sequence as shown below:
Press D or C to select format between 12-hour and 24-hour.
Press D to decrease the value, hold down D for some time to decrease fast.
Press C button to increase the value, hold down C for some time to increase fast.
Seconds reset to zero by pressing D or C. At the same time, the time of Time 1 also resets zero.
Press A to confirm, and exit from setting, then return to normal timekeeping mode.
In setting mode, the watch will automatically exit setting and then return Time 2 Mode if you do not
perform any button operation in 30 seconds.
5. Stopwatch Mode
The display range of the stopwatch is from zero to 23 hours 59 minutes 59.99 seconds.
The stopwatch will restart counting from zero when it reaches its maximum limited (23 hours 59
minutes 59 seconds.)
Ten groups of LAP time can be recorded.
To measure times with the stopwatch
12H/24H
Minute
Second
Month-Date / Date-Month
Month Date
B B
B
Hour
Button B
Button B
Button B
BJF063(F12-SWIF) MODULE MANUAL
2012 -3-17 ModelBJF063 Page: 3 / 7 Edition : A
Press D or C to select format between 12-hour and 24-hour format.
Press D to increase the value, hold down D for some time to increase fast.
Press C to decrease the value, hold down C for some time to decrease fast.
Seconds reset to zero by pressing D or C button. At the same time, the time of Time 2 also resets
zero.
Press A button to confirm, and exit from setting, then return to normal timekeeping mode.
In setting mode, the watch will automatically exit setting and then return Time 1 Mode if you do not
perform any button operation in 30 seconds.
4. Time 2 Setting
In Time 2 Mode, “12-hour / 24-hour” starts to flash by holding down A for 2 seconds, which
indicates Time 1 setting screen, press B to select the items in sequence as shown below:
Press D or C to select format between 12-hour and 24-hour.
Press D to decrease the value, hold down D for some time to decrease fast.
Press C button to increase the value, hold down C for some time to increase fast.
Seconds reset to zero by pressing D or C. At the same time, the time of Time 1 also resets zero.
Press A to confirm, and exit from setting, then return to normal timekeeping mode.
In setting mode, the watch will automatically exit setting and then return Time 2 Mode if you do not
perform any button operation in 30 seconds.
5. Stopwatch Mode
The display range of the stopwatch is from zero to 23 hours 59 minutes 59.99 seconds.
The stopwatch will restart counting from zero when it reaches its maximum limited (23 hours 59
minutes 59 seconds.)
Ten groups of LAP time can be recorded.
To measure times with the stopwatch
12H/24H
Minute
Second
Year
Month-Date / Date-Month
Button B
B B
B
Hour
Button B
Button B
Button B
BJF063(F12-SWIF) MODULE MANUAL
2012 -3-17 ModelBJF063 Page: 3 / 7 Edition : A
Press D or C to select format between 12-hour and 24-hour format.
Press D to increase the value, hold down D for some time to increase fast.
Press C to decrease the value, hold down C for some time to decrease fast.
Seconds reset to zero by pressing D or C button. At the same time, the time of Time 2 also resets
zero.
Press A button to confirm, and exit from setting, then return to normal timekeeping mode.
In setting mode, the watch will automatically exit setting and then return Time 1 Mode if you do not
perform any button operation in 30 seconds.
4. Time 2 Setting
In Time 2 Mode, “12-hour / 24-hour” starts to flash by holding down A for 2 seconds, which
indicates Time 1 setting screen, press B to select the items in sequence as shown below:
Press D or C to select format between 12-hour and 24-hour.
Press D to decrease the value, hold down D for some time to decrease fast.
Press C button to increase the value, hold down C for some time to increase fast.
Seconds reset to zero by pressing D or C. At the same time, the time of Time 1 also resets zero.
Press A to confirm, and exit from setting, then return to normal timekeeping mode.
In setting mode, the watch will automatically exit setting and then return Time 2 Mode if you do not
perform any button operation in 30 seconds.
5. Stopwatch Mode
The display range of the stopwatch is from zero to 23 hours 59 minutes 59.99 seconds.
The stopwatch will restart counting from zero when it reaches its maximum limited (23 hours 59
minutes 59 seconds.)
Ten groups of LAP time can be recorded.
To measure times with the stopwatch
12H/24H
Minute
Second
Year
Month Date
Button B
B B
B
Hour
Button B
Button B
Button B
Button B
Button B
Button B
BJF063(F12-SWIF) MODULE MANUAL
2012 -3-17 ModelBJF063 Page: 3 / 7 Edition : A
Press D or C to select format between 12-hour and 24-hour format.
Press D to increase the value, hold down D for some time to increase fast.
Press C to decrease the value, hold down C for some time to decrease fast.
Seconds reset to zero by pressing D or C button. At the same time, the time of Time 2 also resets
zero.
Press A button to confirm, and exit from setting, then return to normal timekeeping mode.
In setting mode, the watch will automatically exit setting and then return Time 1 Mode if you do not
perform any button operation in 30 seconds.
4. Time 2 Setting
In Time 2 Mode, “12-hour / 24-hour” starts to flash by holding down A for 2 seconds, which
indicates Time 1 setting screen, press B to select the items in sequence as shown below:
Press D or C to select format between 12-hour and 24-hour.
Press D to decrease the value, hold down D for some time to decrease fast.
Press C button to increase the value, hold down C for some time to increase fast.
Seconds reset to zero by pressing D or C. At the same time, the time of Time 1 also resets zero.
Press A to confirm, and exit from setting, then return to normal timekeeping mode.
In setting mode, the watch will automatically exit setting and then return Time 2 Mode if you do not
perform any button operation in 30 seconds.
5. Stopwatch Mode
The display range of the stopwatch is from zero to 23 hours 59 minutes 59.99 seconds.
The stopwatch will restart counting from zero when it reaches its maximum limited (23 hours 59
minutes 59 seconds.)
Ten groups of LAP time can be recorded.
To measure times with the stopwatch
12H/24H
Second
Year
Month-Date / Date-Month
Month Date
Button B
B B
B
Button B
Button B
Button B
BJF063(F12-SWIF) MODULE MANUAL
2012 -3-17 ModelBJF063 Page: 4 / 7 Edition : A
When entering the stopwatch mode, press D to start / stop counting. Seconds reset to zero by holding
down C for 2 seconds.
Press C to enter LAP timing during stopwatch is running, the screen will display next Lap time after
it displays the previous LAP time for 8 seconds. When 10 groups of LAP time are recorded fully, the
screen will appear icon of “FULL” if you continue to press C button. The previous LAP time will be
covered by the last group of LAP time.
When LAP time is running, press D to stop counting, and press A to enter LAP Recall Mode. In LAP
Recall Mode, press D can view each group of LAP times. Press C to exit LAP Recall Mode, then return to
Stopwatch Mode.
In LAP Recall Mode or at the state of stopwatch is stopped, hold down C for 2 seconds to clear all
previous records.
When stopwatch is running,, press B to enter other modes, the stopwatch measurement operation
continuous even if you exit the Stopwatch Mode.
When stopwatch is stooped, the watch will automatically return Time Mode if you do not perform
any button operation in 30 seconds.
6. Countdown Mode
Start Stop
Stop
Reset reminder
Reset to zero
LAP timing
Full of LAP records
Reset reminder
LAP Recall Mode
To view LAP records Next LAP record
Button D
Button D
Button C
Button A
Button D
Button D
Press & Hold C
Press & Hold C
BJF063(F12-SWIF) MODULE MANUAL
2012 -3-17 ModelBJF063 Page: 4 / 7 Edition : A
When entering the stopwatch mode, press D to start / stop counting. Seconds reset to zero by holding
down C for 2 seconds.
Press C to enter LAP timing during stopwatch is running, the screen will display next Lap time after
it displays the previous LAP time for 8 seconds. When 10 groups of LAP time are recorded fully, the
screen will appear icon of “FULL” if you continue to press C button. The previous LAP time will be
covered by the last group of LAP time.
When LAP time is running, press D to stop counting, and press A to enter LAP Recall Mode. In LAP
Recall Mode, press D can view each group of LAP times. Press C to exit LAP Recall Mode, then return to
Stopwatch Mode.
In LAP Recall Mode or at the state of stopwatch is stopped, hold down C for 2 seconds to clear all
previous records.
When stopwatch is running,, press B to enter other modes, the stopwatch measurement operation
continuous even if you exit the Stopwatch Mode.
When stopwatch is stooped, the watch will automatically return Time Mode if you do not perform
any button operation in 30 seconds.
6. Countdown Mode
Reset to zero
Start Stop
Reset reminder
Full of LAP records
LAP Recall Mode
To view LAP records Next LAP record
Button D
Button C
Button C
Button D
Press & Hold C
Press & Hold C
for 2 seconds
BJF063(F12-SWIF) MODULE MANUAL
2012 -3-17 ModelBJF063 Page: 4 / 7 Edition : A
When entering the stopwatch mode, press D to start / stop counting. Seconds reset to zero by holding
down C for 2 seconds.
Press C to enter LAP timing during stopwatch is running, the screen will display next Lap time after
it displays the previous LAP time for 8 seconds. When 10 groups of LAP time are recorded fully, the
screen will appear icon of “FULL” if you continue to press C button. The previous LAP time will be
covered by the last group of LAP time.
When LAP time is running, press D to stop counting, and press A to enter LAP Recall Mode. In LAP
Recall Mode, press D can view each group of LAP times. Press C to exit LAP Recall Mode, then return to
Stopwatch Mode.
In LAP Recall Mode or at the state of stopwatch is stopped, hold down C for 2 seconds to clear all
previous records.
When stopwatch is running,, press B to enter other modes, the stopwatch measurement operation
continuous even if you exit the Stopwatch Mode.
When stopwatch is stooped, the watch will automatically return Time Mode if you do not perform
any button operation in 30 seconds.
6. Countdown Mode
Start Stop
Stop
Reset reminder
Reset to zero
LAP timing
Full of LAP records
Reset reminder
LAP Recall Mode
To view LAP records Next LAP record
Button D
Button C
Button A
Button D
Button D
Press & Hold C
Press & Hold C
BJF063(F12-SWIF) MODULE MANUAL
2012 -3-17 ModelBJF063 Page: 5 / 7 Edition : A
The display range of countdown time is from zero to 23 hours, 59 minutes, 59 seconds.
Three methods of countdown can be selected as shown following:
Countdown Time Setting
When countdown time is stopped, icon of “STP/ERP” or “CD-UP” starts to flash by pressing A for 2
seconds, which indicates countdown time setting screen, then press B to select items in sequence as
show below:
Press D or C can select any one method among three countdown time methods (STP) (ERP)
(CD-UP).
Press D to increase the value, hold down D for some time to increase fast.
Press C to decrease the value, hold down C for some time to decrease fast.
Press A to confirm, and exit from setting, then return to countdown time mode.
In setting mode, the watch will automatically exit setting and then return Time Mode if you do not
perform any button operation in 30 seconds.
To measure times with countdown timer
In countdown mode, press D to start / stop counting. When it stopped, press C to return to the
original value.
Countdown time is running when icon “TMR” flashes on the screen. While icon “TMR” stops flashing,
Counting up after countdown
reaches to zero
Start Stop Original value
Button D Button D Button D
BJF063(F12-SWIF) MODULE MANUAL
2012 -3-17 ModelBJF063 Page: 5 / 7 Edition : A
The display range of countdown time is from zero to 23 hours, 59 minutes, 59 seconds.
Three methods of countdown can be selected as shown following:
Countdown Time Setting
When countdown time is stopped, icon of “STP/ERP” or “CD-UP” starts to flash by pressing A for 2
seconds, which indicates countdown time setting screen, then press B to select items in sequence as
show below:
Press D or C can select any one method among three countdown time methods (STP) (ERP)
(CD-UP).
Press D to increase the value, hold down D for some time to increase fast.
Press C to decrease the value, hold down C for some time to decrease fast.
Press A to confirm, and exit from setting, then return to countdown time mode.
In setting mode, the watch will automatically exit setting and then return Time Mode if you do not
perform any button operation in 30 seconds.
To measure times with countdown timer
In countdown mode, press D to start / stop counting. When it stopped, press C to return to the
original value.
Countdown time is running when icon “TMR” flashes on the screen. While icon “TMR” stops flashing,
Counting up after countdown
reaches to zero
Stop
Start Stop Original value
Button D Button D Button D
BJF063(F12-SWIF) MODULE MANUAL
2012 -3-17 ModelBJF063 Page: 6 / 7 Edition : A
which means countdown has been stooped running.
When stopwatch is running,, press B to enter other modes, the stopwatch measurement operation
continuous even if you exit the Stopwatch Mode.
With One-time Countdown (STP Mode): the countdown time returns to original value after it reaches
to zero. At the same time, alarm tone sounds with BB-BB for 30 seconds, then automatically return
to Time Mode. Press any button can stop the alarm tone after it starts to sound. The watch will
automatically return Time Mode if you do not perform any button operation in 30 seconds.
With Repeated Stopwatch (REP Mode): the watch repeats countdown automatically after counting
down is completed. The maximum range of Auto-Repeated Countdown is 100 times. If the
countdown value is set from 1 to 59 seconds, alarm tone will sound with BB when repeated
countdown reaches to zero every time. And if Repeated Countdown reaches to 100 times, the alarm
tone will sound with BB-BB for 30 seconds, then automatically return to Timekeeping Mode. If the
countdown value is set more than 1 minutes, alarm tone will sound with BB-BB for 10 seconds when
countdown time reaches to zero every time. Press any button can stop the alarm tone after it starts to
sound. The watch will automatically return Time Mode if you do not perform any button operation in
30 seconds.
With Counting Up (CD-UP Mode): The watch will count up automatically after countdown time
reaches to zero, in the meanwhile, alarm tone will sound with BB-BB for 30 seconds, then
automatically back to Time Mode. You can press any button to stop the alarm tone after it starts to
sound. The watch will automatically return Time Mode if you do not perform any button operation in
30 seconds.
7. Alarm Mode
In Alarm Mode, press D to view the alarm time among 4 groups. In each group of alarm mode, press C to
turn on / off alarm. As shown following:
Alarm Off
Button C
Button D
Button D
Alarm On
BJF063(F12-SWIF) MODULE MANUAL
2012 -3-17 ModelBJF063 Page: 6 / 7 Edition : A
which means countdown has been stooped running.
When stopwatch is running,, press B to enter other modes, the stopwatch measurement operation
continuous even if you exit the Stopwatch Mode.
With One-time Countdown (STP Mode): the countdown time returns to original value after it reaches
to zero. At the same time, alarm tone sounds with BB-BB for 30 seconds, then automatically return
to Time Mode. Press any button can stop the alarm tone after it starts to sound. The watch will
automatically return Time Mode if you do not perform any button operation in 30 seconds.
With Repeated Stopwatch (REP Mode): the watch repeats countdown automatically after counting
down is completed. The maximum range of Auto-Repeated Countdown is 100 times. If the
countdown value is set from 1 to 59 seconds, alarm tone will sound with BB when repeated
countdown reaches to zero every time. And if Repeated Countdown reaches to 100 times, the alarm
tone will sound with BB-BB for 30 seconds, then automatically return to Timekeeping Mode. If the
countdown value is set more than 1 minutes, alarm tone will sound with BB-BB for 10 seconds when
countdown time reaches to zero every time. Press any button can stop the alarm tone after it starts to
sound. The watch will automatically return Time Mode if you do not perform any button operation in
30 seconds.
With Counting Up (CD-UP Mode): The watch will count up automatically after countdown time
reaches to zero, in the meanwhile, alarm tone will sound with BB-BB for 30 seconds, then
automatically back to Time Mode. You can press any button to stop the alarm tone after it starts to
sound. The watch will automatically return Time Mode if you do not perform any button operation in
30 seconds.
7. Alarm Mode
In Alarm Mode, press D to view the alarm time among 4 groups. In each group of alarm mode, press C to
turn on / off alarm. As shown following:
Alarm Off
Button C
Button D
Button D
Button D
Alarm On
BJF063(F12-SWIF) MODULE MANUAL
2012 -3-17 ModelBJF063 Page: 2 / 7 Edition : A
2. In normal timekeeping mode, press C for a short time to turn on / off the hourly time signal and button tone
synchronously, hourly time signal indicator
will appear on the screen when it is turned on.
In normal timekeeping mode, hold down C for 2 seconds to turn on / off the function that is the single button with
EL backlight or any button with EL backlight. “AEL” indicator will display on the screen when any button with
backlight is turned on, in this case, pressing any button can illuminate the EL backlight.
3. Time 1 Setting
In Time 1 Mode, “12-hour / 24-hour” starts to flash by holding down A for 2 seconds, which
indicates Time 1 setting screen, press B to select the items in sequence as shown below:
Hourly Time Signal and
Button Tone are turned on
Any button with
EL backlight
Single button with
EL backlight
Hourly Time Signal and
Button Tone are turned off
BJF063(F12-SWIF) MODULE MANUAL
2012 -3-17 ModelBJF063 Page: 2 / 7 Edition : A
2. In normal timekeeping mode, press C for a short time to turn on / off the hourly time signal and button tone
synchronously, hourly time signal indicator
will appear on the screen when it is turned on.
In normal timekeeping mode, hold down C for 2 seconds to turn on / off the function that is the single button with
EL backlight or any button with EL backlight. “AEL” indicator will display on the screen when any button with
backlight is turned on, in this case, pressing any button can illuminate the EL backlight.
3. Time 1 Setting
In Time 1 Mode, “12-hour / 24-hour” starts to flash by holding down A for 2 seconds, which
indicates Time 1 setting screen, press B to select the items in sequence as shown below:
Hourly Time Signal and
Button Tone are turned on
Any button with
EL backlight
Single button with
EL backlight
Button C
Hourly Time Signal and
Button Tone are turned off
BJF063(F12-SWIF) MODULE MANUAL
2012 -3-17 ModelBJF063 Page: 5 / 7 Edition : A
The display range of countdown time is from zero to 23 hours, 59 minutes, 59 seconds.
Three methods of countdown can be selected as shown following:
Countdown Time Setting
When countdown time is stopped, icon of “STP/ERP” or “CD-UP” starts to flash by pressing A for 2
seconds, which indicates countdown time setting screen, then press B to select items in sequence as
show below:
Press D or C can select any one method among three countdown time methods (STP) (ERP)
(CD-UP).
Press D to increase the value, hold down D for some time to increase fast.
Press C to decrease the value, hold down C for some time to decrease fast.
Press A to confirm, and exit from setting, then return to countdown time mode.
In setting mode, the watch will automatically exit setting and then return Time Mode if you do not
perform any button operation in 30 seconds.
To measure times with countdown timer
In countdown mode, press D to start / stop counting. When it stopped, press C to return to the
original value.
Countdown time is running when icon “TMR” flashes on the screen. While icon “TMR” stops flashing,
Counting up after countdown
reaches to zero
One-time Countdown Time Repeated Countdown Time
BJF063(F12-SWIF) MODULE MANUAL
2012 -3-17 ModelBJF063 Page: 5 / 7 Edition : A
The display range of countdown time is from zero to 23 hours, 59 minutes, 59 seconds.
Three methods of countdown can be selected as shown following:
Countdown Time Setting
When countdown time is stopped, icon of “STP/ERP” or “CD-UP” starts to flash by pressing A for 2
seconds, which indicates countdown time setting screen, then press B to select items in sequence as
show below:
Press D or C can select any one method among three countdown time methods (STP) (ERP)
(CD-UP).
Press D to increase the value, hold down D for some time to increase fast.
Press C to decrease the value, hold down C for some time to decrease fast.
Press A to confirm, and exit from setting, then return to countdown time mode.
In setting mode, the watch will automatically exit setting and then return Time Mode if you do not
perform any button operation in 30 seconds.
To measure times with countdown timer
In countdown mode, press D to start / stop counting. When it stopped, press C to return to the
original value.
Countdown time is running when icon “TMR” flashes on the screen. While icon “TMR” stops flashing,
Counting up after countdown
reaches to zero
B B
B
Countdown time
Seconds
Hours Minutes
Button B
• Appuyer sur D pour augmenter la valeur, maintenir D pour augmenter rapidement
• Appuyer sur C pour diminuer la valeur, maintenir C pour diminuer rapidement
• Appuyer sur la touche A pour conrmer et sortir des réglages, puis revenir en mode alarme
• En mode réglage, la montre sortira automatiquement des réglages et reviendra au
mode temps si vous n’appuyez sur aucune touche pendant 30 secondes
• En mode alarme, la montre sortira automatiquement du mode alarme et reviendra
au mode temps si vous n’appuyez sur aucune touche pendant 30 secondes
• La méthode de réglage pour tous les groupes d’alarme est similaire
• Lorsque le temps de réglage de l’alarme est atteint, la sonnerie de l’alarme s’arrêtera
automatiquement après 30 secondes
À noter: Les alarmes 1 à 4 ne sonneront que lorsque le temps actuel du temps 1 ou du
temps 2 est atteint. Par exemple, si le temps actuel que vous choisissez est en mode
temps 2, et que vous ne changez pas le temps actuel pour le mode temps 1 avant que
la sonnerie de l’alarme ne se fasse entendre, la sonnerie de l’alarme ne sonnera qu’en
fonction du temps du mode de temps 2
Si le temps 1 est sélectionné: l’alarme sonnera dans le fuseau horaire que vous avez
réglé pour la montre
BJF063(F12-SWIF) MODULE MANUAL
2012 -3-17 ModelBJF063 Page: 7 / 7 Edition : A
In Alarm 1 Mode, hold down A for 2 seconds, “Hour” starts to flash, which indicates alarm setting
screen, then press B button to select item in sequence as shown below:
Press D to increase the value, hold down D for some time to increase fast.
Press C to decrease the value, hold down C for some time to decrease fast.
Press A to confirm, and exit from setting, then return to Alarm Mode.
In setting mode, the watch will automatically exit setting and then return Time Mode if you do not
perform any button operation in 30 seconds.
In Alarm Mode, the watch will automatically exit from Alarm Mode, then return to Time Mode if
you do not perform any button operation in 30 minutes.
The setting method of 4 groups of alarm are similar.
At the state of alarm is turn on, if the alarm time is reached, the alarm tone will automatically stop
after it sounds for 30 seconds.
Remark: 4 groups of alarm will only sound according to the current time of Time 1 or Time 2 is reached. For
example, if the current time you chosen is Time 2 Mode, and you not change the current time to Time 1
before the alarm tone sounds, in this case, the alarm tone will only sound according to the time of Time
2 Mode.
Hour Minute
Button B
BJF063(F12-SWIF) MODULE MANUAL
2012 -3-17 ModelBJF063 Page: 1 / 7 Edition : A
A . Features
13 digits LCD Screen displays the hour, minute, second, year (from year 2000 to year 2099), month,
date, day of the week.
12-hour / 24-hour format selectable. Auto-calendar.
Dual time.
1/100 second stopwatch (the display range of the stopwatch is 23 hours 59 minutes 59.99 seconds).
Four groups of alarm. Hourly time signal.
Countdown timer (the maximum display range of countdown time is 23 hours 59 minutes 59
seconds.)
Button tone and hourly time signal.( On / Off synchronized)
EL backlight. (can use “Start” button or any other buttons to illuminate the backlight).
B . Functions
1. In any mode, press A to illuminate EL backlight for 3 seconds.
Alarm Mode
Time 2 Mode
Stopwatch Mode
Countdown Time Mode
Press & Hold D
Press & Hold D
for 2 seconds
BJF063(F12-SWIF) MODULE MANUAL
2012 -3-17 ModelBJF063 Page: 1 / 7 Edition : A
A . Features
13 digits LCD Screen displays the hour, minute, second, year (from year 2000 to year 2099), month,
date, day of the week.
12-hour / 24-hour format selectable. Auto-calendar.
Dual time.
1/100 second stopwatch (the display range of the stopwatch is 23 hours 59 minutes 59.99 seconds).
Four groups of alarm. Hourly time signal.
Countdown timer (the maximum display range of countdown time is 23 hours 59 minutes 59
seconds.)
Button tone and hourly time signal.( On / Off synchronized)
EL backlight. (can use “Start” button or any other buttons to illuminate the backlight).
B . Functions
1. In any mode, press A to illuminate EL backlight for 3 seconds.
Alarm Mode
Time 2 Mode
Button B Button B
Press & Hold D
for 2 seconds
Button B
Press & Hold D
BJF063(F12-SWIF) MODULE MANUAL
2012 -3-17 ModelBJF063 Page: 1 / 7 Edition : A
A . Features
13 digits LCD Screen displays the hour, minute, second, year (from year 2000 to year 2099), month,
date, day of the week.
12-hour / 24-hour format selectable. Auto-calendar.
Dual time.
1/100 second stopwatch (the display range of the stopwatch is 23 hours 59 minutes 59.99 seconds).
Four groups of alarm. Hourly time signal.
Countdown timer (the maximum display range of countdown time is 23 hours 59 minutes 59
seconds.)
Button tone and hourly time signal.( On / Off synchronized)
EL backlight. (can use “Start” button or any other buttons to illuminate the backlight).
B . Functions
1. In any mode, press A to illuminate EL backlight for 3 seconds.
Alarm Mode
Time 2 Mode
Stopwatch Mode
Countdown Time Mode
Press & Hold D
Button B
Press & Hold D
for 2 seconds
“BB-BB” durante 30 segundos; luego automáticamente regresará al Modo Hora. Puede
presionar cualquier botón para detener el tono de alarma después que comienza
a sonar. El reloj saldrá automáticamente del Modo Hora si no toca ningún botón
durante 30 segundos
7. Modo de Alarma
• En el Modo Alarma, presione el botón D para ver la hora de la alarma entre 4 grupos.
En cada grupo de modo de alarma, presione el botón C para activar o desactivar la
alarma. Se muestra a continuación:
Ajuste de la alarma
• En el Modo de Alarma 1, mantenga presionado el botón A durante 2 segundos,
“Hora” comienza a parpadear, señala la pantalla de ajustes de alarma, luego presione
“B” para seleccionar el elemento en secuencia como se muestra a continuación:
• Presione el botón D para aumentar el valor, mantenga presionado el botón D para
aumentar más rápido
• Presione C para disminuir el valor, mantenga presionado C para disminuir más rápido
• Presione el botón A para conrmar y salga de ajustes, luego vuelva al Modo Alarma
• En el modo de conguracion, el reloj saldrá automáticamente de los ajustes y volv-
erá al Modo Hora si no toca ningún botón dentro de 30 segundos
• En Modo Alarma, el reloj saldrá automáticamente del Modo Alarma y a continuación
volverá al Modo Hora si no se realiza ninguna operación durante 30 segundos
• Los métodos de ajuste para todos los grupos de alarma son similares
• Cuando llega la hora de la alarma jada, el tono de alarma se detendrá automática-
mente después de sonar durante 30 segundos.
Nota: La alarma 1 a 4 sonará sólo cuando se alcanza la hora actual del Tiempo 1 o
Tiempo 2. Por ejemplo, si la hora actual elegida está en el Modo de Hora 2, y no
cambia la hora actual al Modo Hora 1 antes de que suene el tono de alarma, el tono
de alarma sólo sonará de acuerdo a la hora del Modo de Hora 2
Si se elige Hora 1: la alarma se activará en la Zona Horaria que se eligió cuando se
conguró el reloj
BJF063(F12-SWIF) MODULE MANUAL
2012 -3-17 ModelBJF063 Page: 7 / 7 Edition : A
In Alarm 1 Mode, hold down A for 2 seconds, “Hour” starts to flash, which indicates alarm setting
screen, then press B button to select item in sequence as shown below:
Press D to increase the value, hold down D for some time to increase fast.
Press C to decrease the value, hold down C for some time to decrease fast.
Press A to confirm, and exit from setting, then return to Alarm Mode.
In setting mode, the watch will automatically exit setting and then return Time Mode if you do not
perform any button operation in 30 seconds.
In Alarm Mode, the watch will automatically exit from Alarm Mode, then return to Time Mode if
you do not perform any button operation in 30 minutes.
The setting method of 4 groups of alarm are similar.
At the state of alarm is turn on, if the alarm time is reached, the alarm tone will automatically stop
after it sounds for 30 seconds.
Remark: 4 groups of alarm will only sound according to the current time of Time 1 or Time 2 is reached. For
example, if the current time you chosen is Time 2 Mode, and you not change the current time to Time 1
before the alarm tone sounds, in this case, the alarm tone will only sound according to the time of Time
2 Mode.
Hour Minute
Button B
BJF063(F12-SWIF) MODULE MANUAL
2012 -3-17 M odelBJF063 P age: 2 / 7 Ed ition : A
2. In norm al timekeeping mode, press C for a short time to turn on / off the hourly time signal and button tone
synchronously, hourly time signal indicator
will appear on the screen when it is turned on.
In normal timekeeping mode, hold down C for 2 seconds to turn on / off the function that is the single button with
EL backlight or any button with EL backlight. “AEL” indicator will display on the screen when any button with
backlight is turned on, in this case, pressing any button can illuminate the EL backlight.
3. Time 1 Setting
In Time 1 Mode, “12-hour / 24-hour” starts to flash by holding down A for 2 seconds, which
indicates Time 1 setting screen, press B to select the items in sequence as shown below:
12H/24H Hour Minute Second
Year
Month-Date / Date-Month
Month Date
Hourly Time Signal and
Button Tone are turned on
Any button with
EL backlight
Single button w ith
EL backlight
B
B
B B
Button B
Button B
Button B
Button B
B
Button B
Hourly Time Signal and
Button Tone are turned off
Button B
BJF063(F12-SWIF) MODULE MANUAL
2012 -3-17 ModelBJF063 Page: 4 / 7 Edition : A
When entering the stopwatch mode, press D to start / stop counting. Seconds reset to zero by holding
down C for 2 seconds.
Press C to enter LAP timing during stopwatch is running, the screen will display next Lap time after
it displays the previous LAP time for 8 seconds. When 10 groups of LAP time are recorded fully, the
screen will appear icon of “FULL” if you continue to press C button. The previous LAP time will be
covered by the last group of LAP time.
When LAP time is running, press D to stop counting, and press A to enter LAP Recall Mode. In LAP
Recall Mode, press D can view each group of LAP times. Press C to exit LAP Recall Mode, then return to
Stopwatch Mode.
In LAP Recall Mode or at the state of stopwatch is stopped, hold down C for 2 seconds to clear all
previous records.
When stopwatch is running,, press B to enter other modes, the stopwatch measurement operation
continuous even if you exit the Stopwatch Mode.
When stopwatch is stooped, the watch will automatically return Time Mode if you do not perform
any button operation in 30 seconds.
6. Countdown Mode
Reset to zero
Stop
Reset to zero
LAP timing
Full of LAP records
LAP Recall Mode
To view LAP records Next LAP record
Button D
Button D
Button C
Button C
Button D
Button D
Press & Hold C
Press & Hold C
for 2 seconds
BJF063(F12-SWIF) MODULE MANUAL
2012 -3-17 ModelBJF063 Page: 4 / 7 Edition : A
When entering the stopwatch mode, press D to start / stop counting. Seconds reset to zero by holding
down C for 2 seconds.
Press C to enter LAP timing during stopwatch is running, the screen will display next Lap time after
it displays the previous LAP time for 8 seconds. When 10 groups of LAP time are recorded fully, the
screen will appear icon of “FULL” if you continue to press C button. The previous LAP time will be
covered by the last group of LAP time.
When LAP time is running, press D to stop counting, and press A to enter LAP Recall Mode. In LAP
Recall Mode, press D can view each group of LAP times. Press C to exit LAP Recall Mode, then return to
Stopwatch Mode.
In LAP Recall Mode or at the state of stopwatch is stopped, hold down C for 2 seconds to clear all
previous records.
When stopwatch is running,, press B to enter other modes, the stopwatch measurement operation
continuous even if you exit the Stopwatch Mode.
When stopwatch is stooped, the watch will automatically return Time Mode if you do not perform
any button operation in 30 seconds.
6. Countdown Mode
Reset to zero
Start Stop
Reset reminder
Full of LAP records
LAP Recall Mode
Button D
Button C
Button C
Button D
Press & Hold C
Press & Hold C
for 2 seconds
• Premere A per confermare e uscire dall’impostazione, quindi ritornare alla modalità
di conto alla rovescia
• Nella modalità di impostazione, l’orologio esce in automatico dall’impostazione e
torna alla modalità Orario se durante 30 secondi non viene premuto alcun pulsante
Misurare i tempi con il timer
• In modalità Conto alla rovescia, premere D per avviare/arrestare il conteggio. Con il
conteggio arrestato, premere C per tornare al valore originale
• Quando l’icona “TMR” lampeggia sullo schermo il conto alla rovescia è in scor-
rimento. Quando l’icona “TMR” smette di lampeggiare, signica che il conto alla
rovescia è stato arrestato.
• Quando il cronometro è in esecuzione, premere B per accedere ad altre modalità. Il
cronometro continua a misurare anche se si esce dalla relativa modalità.
• Con Conto alla rovescia unico (Modalità STP): il tempo del conto alla rovescia ritorna
al valore originario al raggiungimento dello zero. Contemporaneamente, il segnale
acustico suona con “BB-BB” per 30 secondi, poi ritorna automaticamente in modalità
Orario. Per arrestare la suoneria dopo che ha iniziato a suonare premere qualsiasi
pulsante. L’orologio torna automaticamente in modalità Orario se non si preme alcun
tasto entro 30 secondi
• Cronometro ripetuto (Modalità REP): l’orologio ripete automaticamente il conto
alla rovescia dopo che il conto alla rovescia è terminato. Il Conto alla rovescia con
ripetizione automatica può ripetersi al massimo no a 100 volte. Se il valore del conto
alla rovescia è impostato in un intervallo compreso tra 1 e 59 secondi, il segnale
acustico suona con “BB” quando il conto alla rovescia ripetuto raggiunge lo zero.
Se il Conto alla rovescia ripetuto arriva a 100 volte, il segnale acustico suona con
“BB-BB” per 30 secondi, poi torna automaticamente in modalità Indicazione dell’ora.
Se il valore del conto alla rovescia è impostato su una durata superiore a un minuto,
il segnale acustico suona con “BB-BB” per 10 secondi quando il conto alla rovescia
raggiunge lo zero. Per arrestare la suoneria dopo che ha iniziato a suonare premere
qualsiasi pulsante. L’orologio torna automaticamente in modalità Orario se non si
preme alcun pulsante entro 30 secondi
• Conteggio in risalita (Modalità CD-UP): l’orologio eettua il conteggio in risalita au-
tomaticamente dopo che il conto alla rovescia ha raggiunto lo zero. Nel frattempo, la
suoneria emette un “BB-BB” per 30 secondi, poi automaticamente torna alla modalità
Orario. Per arrestare la suoneria dopo che ha iniziato a suonare premere qualsiasi
pulsante. L’orologio tornà automaticamente in modalità Orario se non si preme alcun
pulsante entro 30 secondi
7. Modalità Sveglia
• In modalità Sveglia, premere D per visualizzare l’ora della sveglia tra 4 gruppi.
Per ogni gruppo di modalità Sveglia, premere C per attivare/disattivare la sveglia.
Riportati di seguito:
Impostazione della sveglia
• In modalità Sveglia 1, tenere premuto A per due secondi, “Ora” inizia a lampeggiare
indicando la schermata di impostazione della sveglia, quindi premere il pulsante B per
selezionare gli elementi in successione, come mostrato di seguito:
• Premere D per aumentare il valore, tenere premuto D per aumentarlo più rapidamente
• Premere C per ridurre il valore, tenere premuto C per ridurlo più rapidamente
• Premere A per confermare e uscire dall’impostazione, poi tornare alla modalità
Sveglia
• In modalità di impostazione, l’orologio esce automaticamente da tale modalità e
torna alla modalità Orario se per 30 secondi non si preme alcun pulsante
• In modalità Sveglia, l’orologio use automaticamente da tale modalità e torna alla
modalità Orario se non si preme alcun pulsante per 30 secondi
• Il metodo di impostazione è simile per tutti i gruppi di sveglie
• Quando l’orario di sveglia impostato è raggiunto, la suoneria si arresta automatica-
mente dopo aver suonato per 30 secondi
Nota: le sveglie dalla 1 alla 4 suonano solo al raggiungimento dell’ora impostata per
Orario 1 o Orario 2. Se, ad esempio, l’orario corrente scelto è in modalità Orario 2, e
l’orario corrente non viene modicato in modalità Orario 1 prima che si attivi la suon-
eria, la sveglia suonerà soltanto in base all’orario della modalità Orario 2
Se si sceglie Orario 1: la sveglia suona nella zona di fuso orario prescelta
BJF063(F12-SWIF) MODULE MANUAL
2012 -3-17 ModelBJF063 Page: 6 / 7 Edition : A
which means countdown has been stooped running.
When stopwatch is running,, press B to enter other modes, the stopwatch measurement operation
continuous even if you exit the Stopwatch Mode.
With One-time Countdown (STP Mode): the countdown time returns to original value after it reaches
to zero. At the same time, alarm tone sounds with BB-BB for 30 seconds, then automatically return
to Time Mode. Press any button can stop the alarm tone after it starts to sound. The watch will
automatically return Time Mode if you do not perform any button operation in 30 seconds.
With Repeated Stopwatch (REP Mode): the watch repeats countdown automatically after counting
down is completed. The maximum range of Auto-Repeated Countdown is 100 times. If the
countdown value is set from 1 to 59 seconds, alarm tone will sound with BB when repeated
countdown reaches to zero every time. And if Repeated Countdown reaches to 100 times, the alarm
tone will sound with BB-BB for 30 seconds, then automatically return to Timekeeping Mode. If the
countdown value is set more than 1 minutes, alarm tone will sound with BB-BB for 10 seconds when
countdown time reaches to zero every time. Press any button can stop the alarm tone after it starts to
sound. The watch will automatically return Time Mode if you do not perform any button operation in
30 seconds.
With Counting Up (CD-UP Mode): The watch will count up automatically after countdown time
reaches to zero, in the meanwhile, alarm tone will sound with BB-BB for 30 seconds, then
automatically back to Time Mode. You can press any button to stop the alarm tone after it starts to
sound. The watch will automatically return Time Mode if you do not perform any button operation in
30 seconds.
7. Alarm Mode
In Alarm Mode, press D to view the alarm time among 4 groups. In each group of alarm mode, press C to
turn on / off alarm. As shown following:
Alarm Off
Button C
Button D
Button D
Alarm On
BJF063(F12-SWIF) MODULE MANUAL
2012 -3-17 ModelBJF063 Page: 6 / 7 Edition : A
which means countdown has been stooped running.
When stopwatch is running,, press B to enter other modes, the stopwatch measurement operation
continuous even if you exit the Stopwatch Mode.
With One-time Countdown (STP Mode): the countdown time returns to original value after it reaches
to zero. At the same time, alarm tone sounds with BB-BB for 30 seconds, then automatically return
to Time Mode. Press any button can stop the alarm tone after it starts to sound. The watch will
automatically return Time Mode if you do not perform any button operation in 30 seconds.
With Repeated Stopwatch (REP Mode): the watch repeats countdown automatically after counting
down is completed. The maximum range of Auto-Repeated Countdown is 100 times. If the
countdown value is set from 1 to 59 seconds, alarm tone will sound with BB when repeated
countdown reaches to zero every time. And if Repeated Countdown reaches to 100 times, the alarm
tone will sound with BB-BB for 30 seconds, then automatically return to Timekeeping Mode. If the
countdown value is set more than 1 minutes, alarm tone will sound with BB-BB for 10 seconds when
countdown time reaches to zero every time. Press any button can stop the alarm tone after it starts to
sound. The watch will automatically return Time Mode if you do not perform any button operation in
30 seconds.
With Counting Up (CD-UP Mode): The watch will count up automatically after countdown time
reaches to zero, in the meanwhile, alarm tone will sound with BB-BB for 30 seconds, then
automatically back to Time Mode. You can press any button to stop the alarm tone after it starts to
sound. The watch will automatically return Time Mode if you do not perform any button operation in
30 seconds.
7. Alarm Mode
In Alarm Mode, press D to view the alarm time among 4 groups. In each group of alarm mode, press C to
turn on / off alarm. As shown following:
Button D
Button D
Button D
Alarm On
BJF063(F12-SWIF) MODULE MANUAL
2012 -3-17 ModelBJF063 Page: 5 / 7 Edition : A
The display range of countdown time is from zero to 23 hours, 59 minutes, 59 seconds.
Three methods of countdown can be selected as shown following:
Countdown Time Setting
When countdown time is stopped, icon of “STP/ERP” or “CD-UP” starts to flash by pressing A for 2
seconds, which indicates countdown time setting screen, then press B to select items in sequence as
show below:
Press D or C can select any one method among three countdown time methods (STP) (ERP)
(CD-UP).
Press D to increase the value, hold down D for some time to increase fast.
Press C to decrease the value, hold down C for some time to decrease fast.
Press A to confirm, and exit from setting, then return to countdown time mode.
In setting mode, the watch will automatically exit setting and then return Time Mode if you do not
perform any button operation in 30 seconds.
To measure times with countdown timer
In countdown mode, press D to start / stop counting. When it stopped, press C to return to the
original value.
Countdown time is running when icon “TMR” flashes on the screen. While icon “TMR” stops flashing,
Counting up after countdown
reaches to zero
Stop
Button D Button D Button D
BJF063(F12-SWIF) MODULE MANUAL
2012 -3-17 ModelBJF063 Page: 5 / 7 Edition : A
The display range of countdown time is from zero to 23 hours, 59 minutes, 59 seconds.
Three methods of countdown can be selected as shown following:
Countdown Time Setting
When countdown time is stopped, icon of “STP/ERP” or “CD-UP” starts to flash by pressing A for 2
seconds, which indicates countdown time setting screen, then press B to select items in sequence as
show below:
Press D or C can select any one method among three countdown time methods (STP) (ERP)
(CD-UP).
Press D to increase the value, hold down D for some time to increase fast.
Press C to decrease the value, hold down C for some time to decrease fast.
Press A to confirm, and exit from setting, then return to countdown time mode.
In setting mode, the watch will automatically exit setting and then return Time Mode if you do not
perform any button operation in 30 seconds.
To measure times with countdown timer
In countdown mode, press D to start / stop counting. When it stopped, press C to return to the
original value.
Countdown time is running when icon “TMR” flashes on the screen. While icon “TMR” stops flashing,
Counting up after countdown
reaches to zero
One-time Countdown Time Repeated Countdown Time
BJF063(F12-SWIF) MODULE MANUAL
2012 -3-17 ModelBJF063 Page: 7 / 7 Edition : A
In Alarm 1 Mode, hold down A for 2 seconds, “Hour” starts to flash, which indicates alarm setting
screen, then press B button to select item in sequence as shown below:
Press D to increase the value, hold down D for some time to increase fast.
Press C to decrease the value, hold down C for some time to decrease fast.
Press A to confirm, and exit from setting, then return to Alarm Mode.
In setting mode, the watch will automatically exit setting and then return Time Mode if you do not
perform any button operation in 30 seconds.
In Alarm Mode, the watch will automatically exit from Alarm Mode, then return to Time Mode if
you do not perform any button operation in 30 minutes.
The setting method of 4 groups of alarm are similar.
At the state of alarm is turn on, if the alarm time is reached, the alarm tone will automatically stop
after it sounds for 30 seconds.
Remark: 4 groups of alarm will only sound according to the current time of Time 1 or Time 2 is reached. For
example, if the current time you chosen is Time 2 Mode, and you not change the current time to Time 1
before the alarm tone sounds, in this case, the alarm tone will only sound according to the time of Time
2 Mode.
Button B
BJF063(F12-SWIF) MODULE MANUAL
2012 -3-17 ModelBJF063 Page: 2 / 7 Edition : A
2. In normal timekeeping mode, press C for a short time to turn on / off the hourly time signal and button tone
synchronously, hourly time signal indicator
will appear on the screen when it is turned on.
In normal timekeeping mode, hold down C for 2 seconds to turn on / off the function that is the single button with
EL backlight or any button with EL backlight. “AEL” indicator will display on the screen when any button with
backlight is turned on, in this case, pressing any button can illuminate the EL backlight.
3. Time 1 Setting
In Time 1 Mode, “12-hour / 24-hour” starts to flash by holding down A for 2 seconds, which
indicates Time 1 setting screen, press B to select the items in sequence as shown below:
Hourly Time Signal and
Button Tone are turned on
Any button with
EL backlight
Single button with
EL backlight
Hourly Time Signal and
Button Tone are turned off
BJF063(F12-SWIF) MODULE MANUAL
2012 -3-17 ModelBJF063 Page: 5 / 7 Edition : A
The display range of countdown time is from zero to 23 hours, 59 minutes, 59 seconds.
Three methods of countdown can be selected as shown following:
Countdown Time Setting
When countdown time is stopped, icon of “STP/ERP” or “CD-UP” starts to flash by pressing A for 2
seconds, which indicates countdown time setting screen, then press B to select items in sequence as
show below:
Press D or C can select any one method among three countdown time methods (STP) (ERP)
(CD-UP).
Press D to increase the value, hold down D for some time to increase fast.
Press C to decrease the value, hold down C for some time to decrease fast.
Press A to confirm, and exit from setting, then return to countdown time mode.
In setting mode, the watch will automatically exit setting and then return Time Mode if you do not
perform any button operation in 30 seconds.
To measure times with countdown timer
In countdown mode, press D to start / stop counting. When it stopped, press C to return to the
original value.
Countdown time is running when icon “TMR” flashes on the screen. While icon “TMR” stops flashing,
Counting up after countdown
reaches to zero
B B
B
Countdown time
Hours Minutes
Button B
BJF063(F12-SWIF) MODULE MANUAL
2012 -3-17 ModelBJF063 Page: 5 / 7 Edition : A
The display range of countdown time is from zero to 23 hours, 59 minutes, 59 seconds.
Three methods of countdown can be selected as shown following:
Countdown Time Setting
When countdown time is stopped, icon of “STP/ERP” or “CD-UP” starts to flash by pressing A for 2
seconds, which indicates countdown time setting screen, then press B to select items in sequence as
show below:
Press D or C can select any one method among three countdown time methods (STP) (ERP)
(CD-UP).
Press D to increase the value, hold down D for some time to increase fast.
Press C to decrease the value, hold down C for some time to decrease fast.
Press A to confirm, and exit from setting, then return to countdown time mode.
In setting mode, the watch will automatically exit setting and then return Time Mode if you do not
perform any button operation in 30 seconds.
To measure times with countdown timer
In countdown mode, press D to start / stop counting. When it stopped, press C to return to the
original value.
Countdown time is running when icon “TMR” flashes on the screen. While icon “TMR” stops flashing,
Counting up after countdown
reaches to zero
One-time Countdown Time Repeated Countdown Time
• Drücken Sie C, um bei laufender Stoppuhr die Rundenzeit aufzunehmen; die An-
zeige zeigt dann nach der vorangegangenen Rundenzeit für 8 Sekunden die nächste
Rundenzeit an. Wenn 10 Gruppen von Rundenzeiten aufgezeichnet wurden, wird auf
dem Display das Symbol “FULL” angezeigt, wenn Sie C weiterhin drücken. Die vor-
angegangene Rundenzeit wird jeweils durch die letzte Gruppe Rundenzeiten ersetzt
• Die laufende Rundenzeit (LAP-Time) können Sie mit D anhalten und mit A gelangen
Sie in den LAP-Recall-Modus. Im LAP-Recall-Modus können Sie mit D die verschie-
denen Rundenzeiten-Gruppen einsehen. Mit C verlassen Sie den LAP-Recall-Modus
und kehren in den Stoppuhr-Modus zurück
• Im LAP-Recall-Modus oder bei angehaltener Stoppuhr können Sie durch Drücken
von C für 2 Sekunden alle bis dahin gespeicherten Zeiten löschen
• Bei laufender Stoppuhr drücken Sie B, um in andere Modi zu gelangen, die Zeit-
nahme läuft auch dann weiter, wenn sie den Stoppuhr-Modus verlassen
• Wenn die Stoppuhr angehalten wird, kehrt die Uhr automatisch zum Zeitmodus
zurück, wenn Sie innerhalb von 30 Sekunden keine Aktion durchführen
6. Countdown-Modus
• Die Anzeige der Countdown-Zeit reicht von Null bis zu 23 Stunden, 59 Minuten, 59
Sekunden
• Es kann zwischen den folgenden drei Countdown-Methoden gewählt werden:
Einstellung der Countdown-Zeit
• Bei angehaltener Countdown-Zeit blinkt “STP/ERP” oder “CD-UP”, wenn Sie A für 2
Sekunden gedrückt halten. Sie benden sich dann in der Einstellungsanzeige der
Countdown-Zeit. Drücken Sie dann B, um eine Einstellung wie nachfolgende gezeigt
vorzunehmen:
• Durch Drücken von D oder C können Sie eine der drei Countdown-Zeit-Methoden
STP, ERP und CD-UP auswählen
• Drücken Sie D, um einen höheren Wert einzustellen, für eine schnellere Anzeige
halten Sie D gedrückt
• Drücken Sie C, um einen niedrigeren Wert einzustellen, für eine schnellere Anzeige
halten Sie C gedrückt
• Drücken Sie A, um Ihre Eingabe zu bestätigen und die Einstellung zu verlassen,
kehren Sie dann in den Countdownzeit-Modus zurück
• Im Einstellungsmodus verlässt die Uhr automatisch die Einstellung und kehrt zum
Zeitmodus zurück, wenn Sie innerhalb von 30 Sekunden keine Aktion durchführen
Zeiten mit dem Countdown-Timer stoppen
• Im Countdown-Modus drücken Sie D, um den Countdown zu starten/zu stoppen.
Wenn der Countdown gestoppt ist, drücken Sie C, um zum Ausgangswert zurück-
zukehren
• Die Countdown-Zeit läuft, wenn “TMR” auf der Anzeige blinkt Wenn “TMR” nicht
mehr blinkt, bedeutet dies, dass der Countdown angehalten wurde
• Bei laufender Stoppuhr drücken Sie B, um in andere Modi zu gelangen; die Zeitmes-
sung läuft auch dann weiter, wenn Sie den Stoppuhr-Modus verlassen
• Einmal-Countdown (STP-Modus): Die Countdown-Zeit stellt sich wieder auf den
Ausgangswert ein, nachdem 0 erreicht wurde. Gleichzeitig ertönt der Alarmton mit
“BB-BB” für 30 Sekunden, dann wird automatisch in den Zeit-Modus zurückgekehrt.
Sie können den ausgelösten Alarmton durch Drücken einer beliebigen Taste aus-
schalten. Die Uhr kehrt automatisch zum Zeitmodus zurück, wenn Sie innerhalb von
30 Sekunden keine Aktion durchführen
• Wiederholungs-Stoppuhr (REP-Modus): Die Uhr wiederholt den Countdown
automatisch, nachdem der Countdown abgelaufen ist. Die automatische Wieder-
holung des Countdowns kann bis zu 100 Mal erfolgen. Wenn der Countdown-Wert
zwischen 1 und 59 Sekunden eingestellt wird, ertönt ein Alarmsignal mit “BB”, wenn
der Countdown den Wert Null erreicht hat. Wenn die Wiederholung des Countdown
das 100ste Mal erfolgt ist, ertönt ein Alarmton mit “BB-BB” für 30 Sekunden, danach
kehrt die Uhr automatisch in den Zeitnehmer-Modus zurück. Wenn der Wert für den
Countdown auf mehr als 1 Minute eingestellt wird, ertönt ein Alarmton mit “BB-BB”
für 10 Sekunden, wenn der Countdown den Wert Null erreicht hat. Sie können den
ausgelösten Alarmton durch Drücken einer beliebigen Taste ausschalten. Die Uhr
kehrt automatisch zum Zeitmodus zurück, wenn Sie innerhalb von 30 Sekunden
keine Aktion durchführen
• Hochzählen (CD-UP-Modus): Die Uhr zählt automatisch hoch, nachdem die Count-
down-Zeit Null erreicht hat, in der Zwischenzeit ertönt ein Alarmton mit “BB-BB” für
30 Sekunden, bevor die Uhr automatisch in den Zeit-Modus zurückkehrt. Sie können
den ausgelösten Alarmton durch Drücken einer beliebigen Taste ausschalten. Die
Uhr kehrt automatisch zum Zeitmodus zurück, wenn Sie innerhalb von 30 Sekunden
keine Aktion durchführen
7. Alarm-Modus
• Im Alarm-Modus drücken Sie D, um die Alarmzeit in 4 Gruppen anzeigen zu lassen.
Drücken Sie C in jeder Gruppe des Alarm-Modus, um den jeweiligen Alarm ein-/
auszuschalten. Siehe unten:
Alarmeinstellung
• Halten Sie A im Modus Alarm 1 für 2 Sekunden gedrückt, “Stunde” beginnt zu
blinken; dies zeigt an, dass der Alarm nun eingestellt werden kann; drücken Sie dann
B um die gewünschte Zeit wie unten gezeigt einzustellen:
• Drücken Sie D, um die Zeit vorzuzustellen, für einen schnelleren Vorlauf halten Sie
D gedrückt
• Drücken Sie C, um die Zeit zurückzustellen, für einen schnelleren Rücklauf halten
Sie C gedrückt
• Drücken Sie A, um Ihre Eingabe zu bestätigen und die Einstellung zu verlassen;
kehren Sie dann in den Alarm-Modus zurück
• Im Einstellungsmodus verlässt die Uhr automatisch die Einstellung und kehrt zum
Zeitmodus zurück, wenn Sie innerhalb von 30 Sekunden keine Aktion durchführen
• Im Alarm-Modus verlässt die Uhr automatisch den Alarm-Modus und kehrt zum
Zeitmodus zurück, wenn Sie innerhalb von 30 Sekunden keine Aktion durchführen
• Das Einstellverfahren ist für alle Alarmgruppen gleich
• Wenn die eingestellte Alarmzeit erreicht wird, schaltet sich das Alarmsignal nach 30
Sekunden automatisch ab
Hinweis: Alarm 1 bis 4 ertönt nur, wenn die aktuelle Zeit 1 oder Zeit 2 erreicht wird.
Wenn zum Beispiel die Alarmzeit im Modus Zeit 2 festgelegt wurde und nicht zu
Modus Zeit 1 gewechselt wird, bevor der Alarm ertönt, wird der Alarm entsprechend
der aktuellen Zeit im Modus Zeit 2 ausgelöst.
Wenn Zeit 1 gewählt wird: Der Alarm wird in der Zeitzone ausgelöst, in der Sie die
Uhr gestellt haben.
BJF063(F12-SWIF) MODULE MANUAL
2012 -3-17 ModelBJF063 Page: 5 / 7 Edition : A
The display range of countdown time is from zero to 23 hours, 59 minutes, 59 seconds.
Three methods of countdown can be selected as shown following:
Countdown Time Setting
When countdown time is stopped, icon of “STP/ERP” or “CD-UP” starts to flash by pressing A for 2
seconds, which indicates countdown time setting screen, then press B to select items in sequence as
show below:
Press D or C can select any one method among three countdown time methods (STP) (ERP)
(CD-UP).
Press D to increase the value, hold down D for some time to increase fast.
Press C to decrease the value, hold down C for some time to decrease fast.
Press A to confirm, and exit from setting, then return to countdown time mode.
In setting mode, the watch will automatically exit setting and then return Time Mode if you do not
perform any button operation in 30 seconds.
To measure times with countdown timer
In countdown mode, press D to start / stop counting. When it stopped, press C to return to the
original value.
Countdown time is running when icon “TMR” flashes on the screen. While icon “TMR” stops flashing,
Counting up after countdown
reaches to zero
B B
B
Countdown time
Hours Minutes
Button B
BJF063(F12-SWIF) MODULE MANUAL
2012 -3-17 ModelBJF063 Page: 5 / 7 Edition : A
The display range of countdown time is from zero to 23 hours, 59 minutes, 59 seconds.
Three methods of countdown can be selected as shown following:
Countdown Time Setting
When countdown time is stopped, icon of “STP/ERP” or “CD-UP” starts to flash by pressing A for 2
seconds, which indicates countdown time setting screen, then press B to select items in sequence as
show below:
Press D or C can select any one method among three countdown time methods (STP) (ERP)
(CD-UP).
Press D to increase the value, hold down D for some time to increase fast.
Press C to decrease the value, hold down C for some time to decrease fast.
Press A to confirm, and exit from setting, then return to countdown time mode.
In setting mode, the watch will automatically exit setting and then return Time Mode if you do not
perform any button operation in 30 seconds.
To measure times with countdown timer
In countdown mode, press D to start / stop counting. When it stopped, press C to return to the
original value.
Countdown time is running when icon “TMR” flashes on the screen. While icon “TMR” stops flashing,
Counting up after countdown
One-time Countdown Time Repeated Countdown Time
BJF063(F12-SWIF) MODULE MANUAL
2012 -3-17 ModelBJF063 Page: 5 / 7 Edition : A
The display range of countdown time is from zero to 23 hours, 59 minutes, 59 seconds.
Three methods of countdown can be selected as shown following:
Countdown Time Setting
When countdown time is stopped, icon of “STP/ERP” or “CD-UP” starts to flash by pressing A for 2
seconds, which indicates countdown time setting screen, then press B to select items in sequence as
show below:
Press D or C can select any one method among three countdown time methods (STP) (ERP)
(CD-UP).
Press D to increase the value, hold down D for some time to increase fast.
Press C to decrease the value, hold down C for some time to decrease fast.
Press A to confirm, and exit from setting, then return to countdown time mode.
In setting mode, the watch will automatically exit setting and then return Time Mode if you do not
perform any button operation in 30 seconds.
To measure times with countdown timer
In countdown mode, press D to start / stop counting. When it stopped, press C to return to the
original value.
Countdown time is running when icon “TMR” flashes on the screen. While icon “TMR” stops flashing,
Counting up after countdown
reaches to zero
Stop
Button D Button D Button D
BJF063(F12-SWIF) MODULE MANUAL
2012 -3-17 ModelBJF063 Page: 6 / 7 Edition : A
which means countdown has been stooped running.
When stopwatch is running,, press B to enter other modes, the stopwatch measurement operation
continuous even if you exit the Stopwatch Mode.
With One-time Countdown (STP Mode): the countdown time returns to original value after it reaches
to zero. At the same time, alarm tone sounds with BB-BB for 30 seconds, then automatically return
to Time Mode. Press any button can stop the alarm tone after it starts to sound. The watch will
automatically return Time Mode if you do not perform any button operation in 30 seconds.
With Repeated Stopwatch (REP Mode): the watch repeats countdown automatically after counting
down is completed. The maximum range of Auto-Repeated Countdown is 100 times. If the
countdown value is set from 1 to 59 seconds, alarm tone will sound with BB when repeated
countdown reaches to zero every time. And if Repeated Countdown reaches to 100 times, the alarm
tone will sound with BB-BB for 30 seconds, then automatically return to Timekeeping Mode. If the
countdown value is set more than 1 minutes, alarm tone will sound with BB-BB for 10 seconds when
countdown time reaches to zero every time. Press any button can stop the alarm tone after it starts to
sound. The watch will automatically return Time Mode if you do not perform any button operation in
30 seconds.
With Counting Up (CD-UP Mode): The watch will count up automatically after countdown time
reaches to zero, in the meanwhile, alarm tone will sound with BB-BB for 30 seconds, then
automatically back to Time Mode. You can press any button to stop the alarm tone after it starts to
sound. The watch will automatically return Time Mode if you do not perform any button operation in
30 seconds.
7. Alarm Mode
In Alarm Mode, press D to view the alarm time among 4 groups. In each group of alarm mode, press C to
turn on / off alarm. As shown following:
Alarm Off
Button C
Button D
Button D
Button D
Alarm On
BJF063(F12-SWIF) MODULE MANUAL
2012 -3-17 ModelBJF063 Page: 6 / 7 Edition : A
which means countdown has been stooped running.
When stopwatch is running,, press B to enter other modes, the stopwatch measurement operation
continuous even if you exit the Stopwatch Mode.
With One-time Countdown (STP Mode): the countdown time returns to original value after it reaches
to zero. At the same time, alarm tone sounds with BB-BB for 30 seconds, then automatically return
to Time Mode. Press any button can stop the alarm tone after it starts to sound. The watch will
automatically return Time Mode if you do not perform any button operation in 30 seconds.
With Repeated Stopwatch (REP Mode): the watch repeats countdown automatically after counting
down is completed. The maximum range of Auto-Repeated Countdown is 100 times. If the
countdown value is set from 1 to 59 seconds, alarm tone will sound with BB when repeated
countdown reaches to zero every time. And if Repeated Countdown reaches to 100 times, the alarm
tone will sound with BB-BB for 30 seconds, then automatically return to Timekeeping Mode. If the
countdown value is set more than 1 minutes, alarm tone will sound with BB-BB for 10 seconds when
countdown time reaches to zero every time. Press any button can stop the alarm tone after it starts to
sound. The watch will automatically return Time Mode if you do not perform any button operation in
30 seconds.
With Counting Up (CD-UP Mode): The watch will count up automatically after countdown time
reaches to zero, in the meanwhile, alarm tone will sound with BB-BB for 30 seconds, then
automatically back to Time Mode. You can press any button to stop the alarm tone after it starts to
sound. The watch will automatically return Time Mode if you do not perform any button operation in
30 seconds.
7. Alarm Mode
In Alarm Mode, press D to view the alarm time among 4 groups. In each group of alarm mode, press C to
turn on / off alarm. As shown following:
Button D
Button D
Alarm On
BJF063(F12-SWIF) MODULE MANUAL
2012 -3-17 ModelBJF063 Page: 7 / 7 Edition : A
In Alarm 1 Mode, hold down A for 2 seconds, “Hour” starts to flash, which indicates alarm setting
screen, then press B button to select item in sequence as shown below:
Press D to increase the value, hold down D for some time to increase fast.
Press C to decrease the value, hold down C for some time to decrease fast.
Press A to confirm, and exit from setting, then return to Alarm Mode.
In setting mode, the watch will automatically exit setting and then return Time Mode if you do not
perform any button operation in 30 seconds.
In Alarm Mode, the watch will automatically exit from Alarm Mode, then return to Time Mode if
you do not perform any button operation in 30 minutes.
The setting method of 4 groups of alarm are similar.
At the state of alarm is turn on, if the alarm time is reached, the alarm tone will automatically stop
after it sounds for 30 seconds.
Remark: 4 groups of alarm will only sound according to the current time of Time 1 or Time 2 is reached. For
example, if the current time you chosen is Time 2 Mode, and you not change the current time to Time 1
before the alarm tone sounds, in this case, the alarm tone will only sound according to the time of Time
2 Mode.
Hour Minute

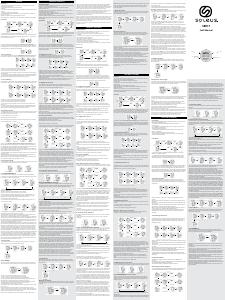


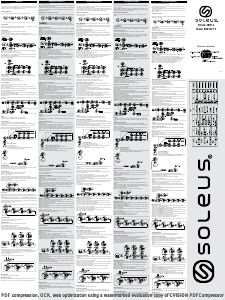


Diskutieren Sie über dieses Produkt mit
Hier können Sie uns Ihre Meinung zu Soleus SR017 Sportuhr mitteilen. Wenn Sie eine Frage haben, lesen Sie zunächst das Bedienungsanleitung sorgfältig durch. Die Anforderung eines Bedienungsanleitung kann über unser Kontaktformular erfolgen.