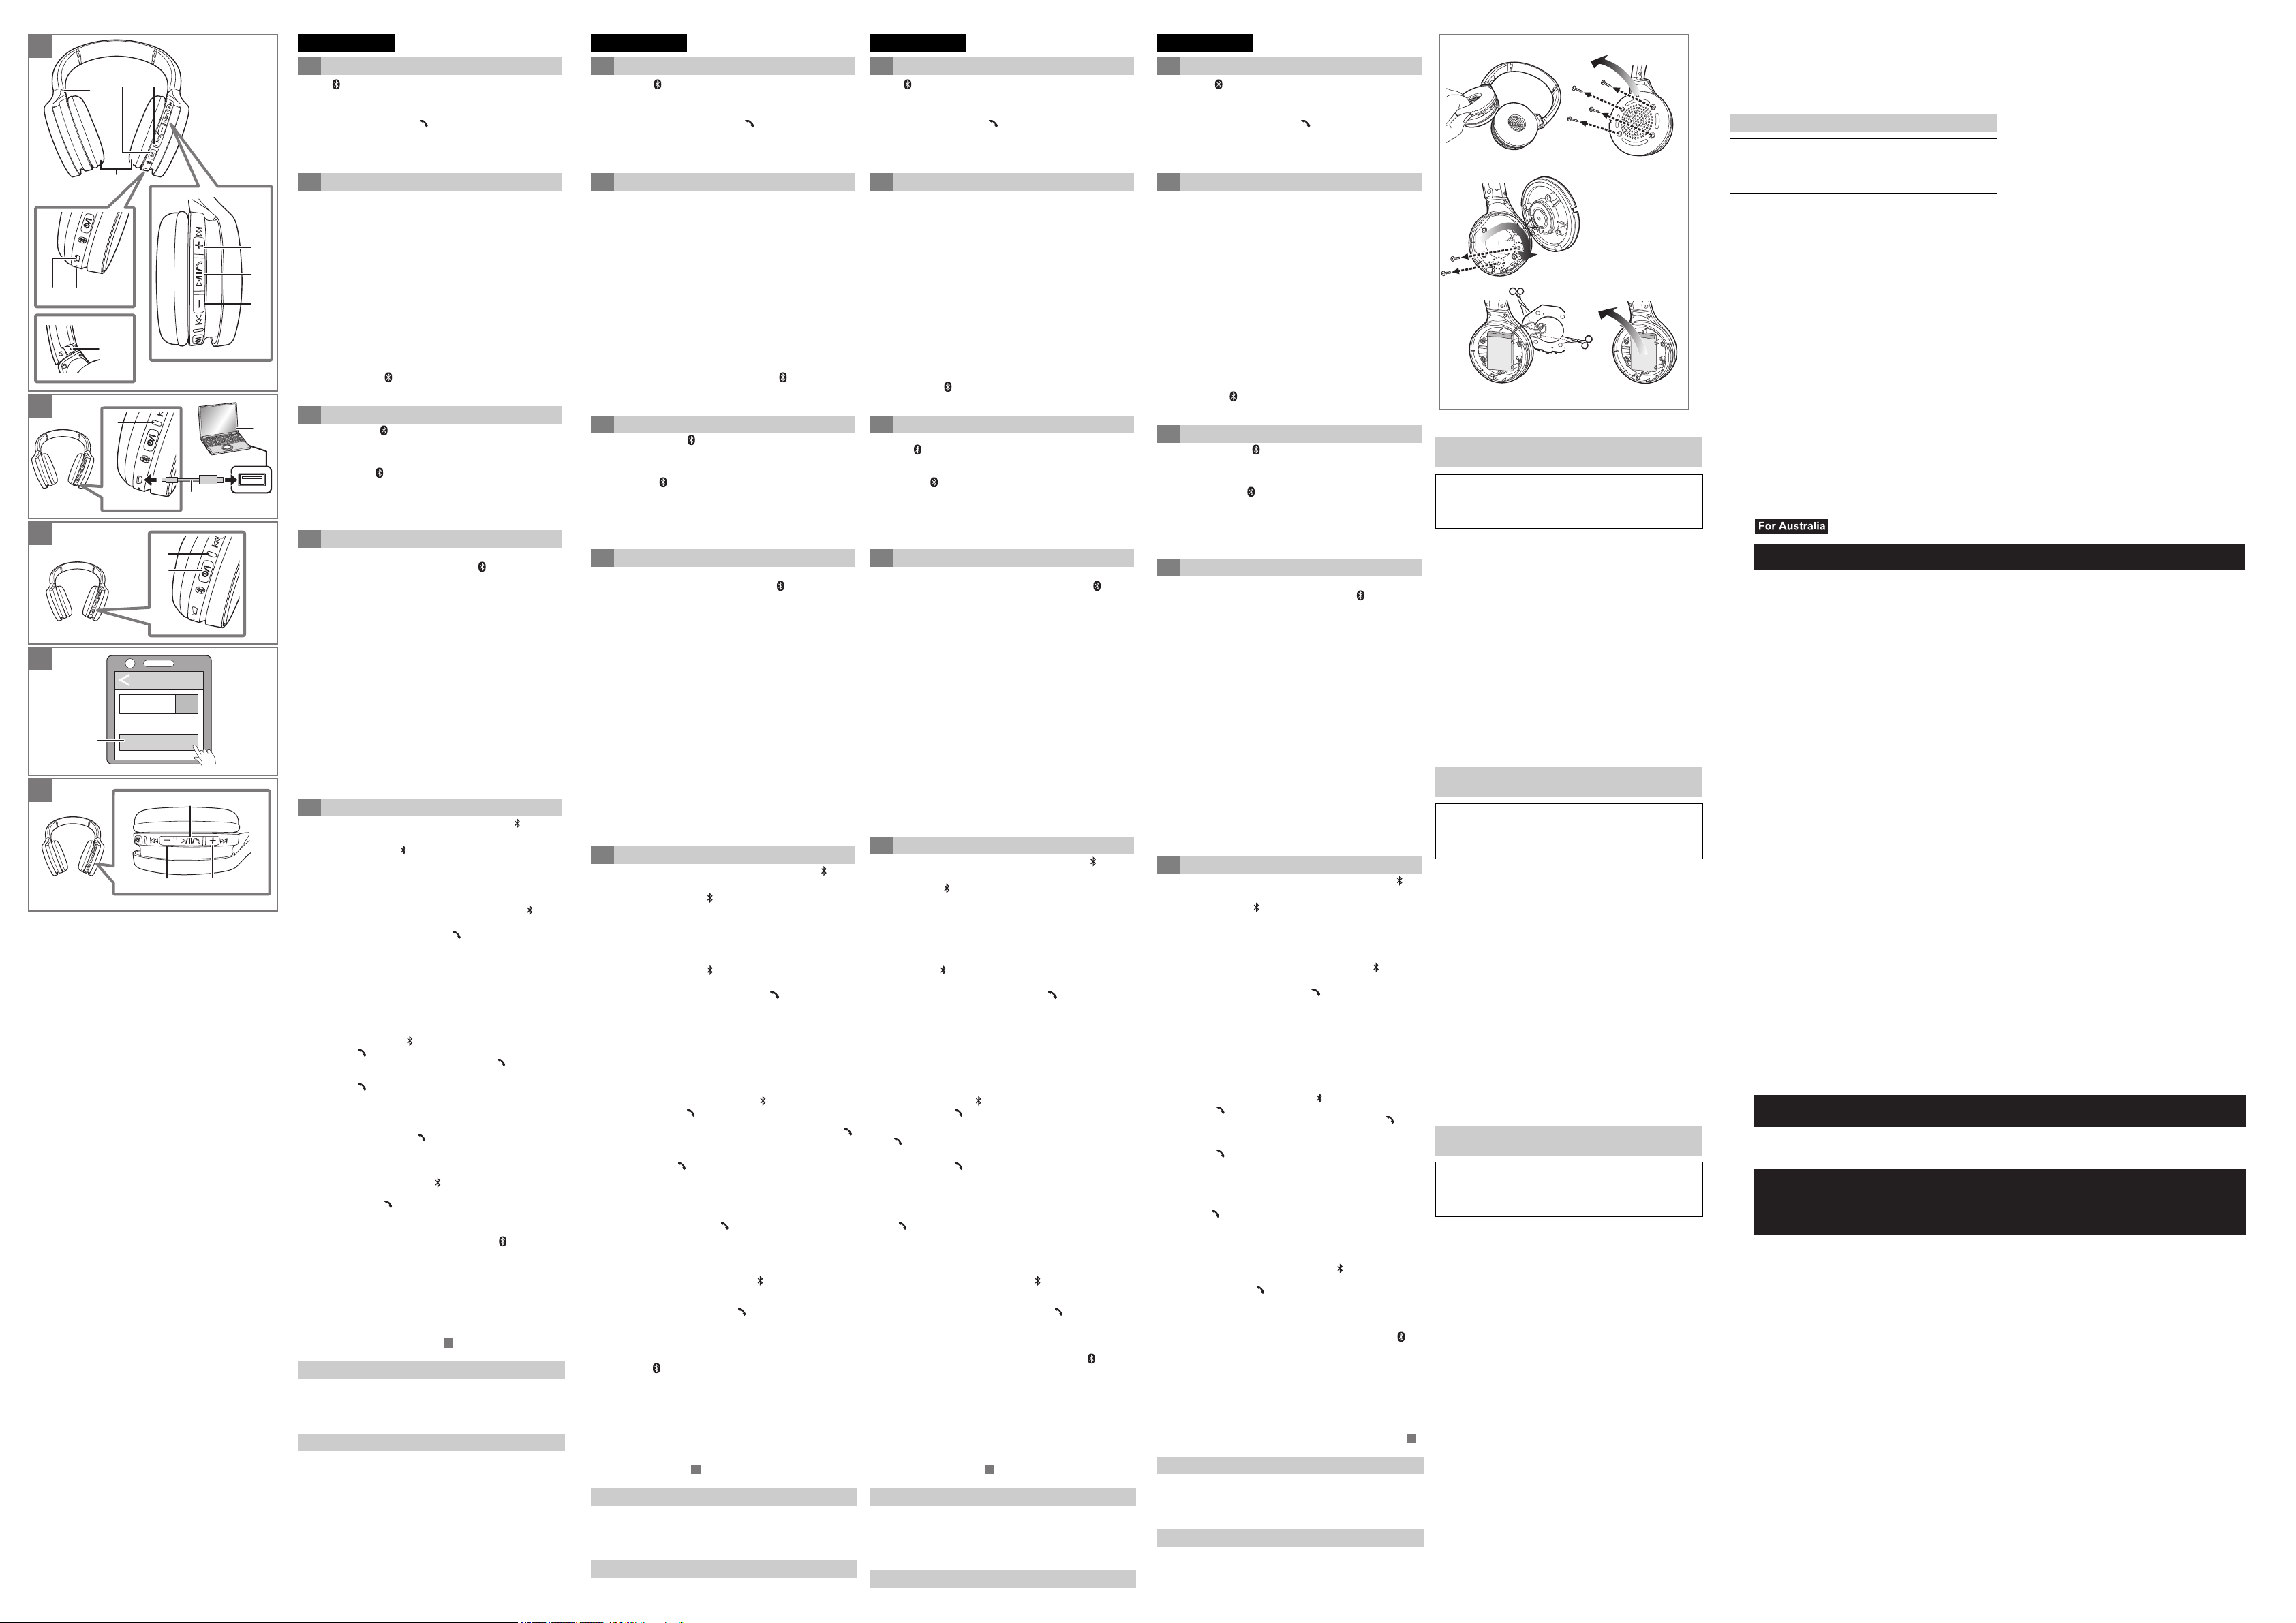
1 [Í/I ( )] button*
1
2 LED indicator light*
2
3 Ear pads
4 Raised dot indicating the left side
5 Charging terminal (DC IN) 6 Microphone
7 [i (9)] button 8 [1/;/ ] button
9 [j (:)] button
*1 Í/I: Standby/ON
*2 Hereafter referred to as “LED”
The rechargeable battery (installed in the unit) is not charged initially.
Charge the battery before using the unit.
Connect this unit to a computer (a) using the USB charging cord
(supplied) (b).
•The LED (c) lights in red when charging is in progress. When charging
is completed, the LED will go out.
• It takes approx. 2.5 hours to charge the battery from empty to full.
• Check the direction of the terminals and plug in/out straight holding onto
the plug. (It may result in malfunction by the deforming of the terminal if
it is plugged in obliquely or in wrong direction.)
• The power cannot be turned on while charging.
• Make sure the computer is turned on and is not on standby or sleep
mode.
• Do not use any other USB charging cords except the supplied one.
• When the battery starts running low during use of the unit, the blinking
LED will turn from blue to red. A beep will sound every 1 minute.* When
the battery runs out, an English guidance message will be heard and the
power will turn off.
* If you press [Í/I ( )] twice quickly, an English guidance message
will be heard and you can check the battery level.
Press and hold [Í/I ( )] (a) of this unit for approx. 3 seconds until
the LED (blue) (b) blinks.
• A beep will sound, and the LED (blue) will blink slowly.
To turn the power off
Press and hold [Í/I ( )] for approximately 3 seconds. An English
guidance message will be heard, and the power will be turned off.
• If the unit is not connected to a Bluetooth
®
device, an English guidance
message will be heard and turn off the unit automatically approximately
5 minutes after you have stopped using it. (Auto power off)
∫ Bluetooth
®
pairing
1 In the power-off state, press and hold [Í/I ( )] of this unit until
the LED blinks.
– When pairing a device for the first time:
approx. 3 seconds
– When pairing a second or subsequent devices:
approx. 5 seconds
• The unit starts to search for the Bluetooth
®
device for connection, and
the LED will blink in blue and red alternately.
2 Turn on the power of the Bluetooth
®
device, and enable the
Bluetooth
®
function.
3 Select “RP-HF410B” (a) from the Bluetooth
®
device’s menu.
• If prompted for a passkey, input the passkey “0000 (four zeros)” of this
unit.
• When the LED (blue) blinks twice every approx. 2 seconds, pairing
(registration) is completed. (Connection established)
• If connection to a device is not established within approximately
5 minutes, the unit will be turned off. Perform pairing again.
∫ Connecting a paired Bluetooth
®
device
1 Turn on this unit.
2 Perform steps 2 and 3 of “Bluetooth
®
pairing”. (l above)
• When the LED (blue) blinks twice every approx. 2 seconds, pairing
(registration) is completed. (Connection established)
When using the functions below that are indicated with the [ ] mark,
connect the Bluetooth
®
device and the unit.
∫ Listening to music [ ]
Select and play the music on the Bluetooth
®
device.
• The unit’s headphones will output the music or the audio of the video
being played back.
∫ Remote controlling (Available only if your Bluetooth
®
device supports “AVRCP” Bluetooth
®
profiles) [ ]
(Operation example)
• The volume can be adjusted in 16 levels. When the maximum or
minimum volume is reached, a beep will sound.
∫ Making a phone call [ ]
1 Press [1/;/] (a) on the unit and answer the incoming call.
• (HFP only) To reject the incoming call, press [1/;/ ] twice quickly.
2Start talking.
3 Press [1/;/ ] to end the phone call.
• (HFP only) It may be difficult to hear phone conversations when the unit
is used in locations with loud ambient noise or in outdoor or other
locations exposed to powerful winds. In that case, change the calling
location or switch the calling device to the Bluetooth
®
enabled phone to
continue the call.(Press [1/;/ ] on the unit twice quickly to switch.)
• You can have the Bluetooth
®
enabled phone make phone calls by using
the microphone of the unit and an app of the Bluetooth
®
enabled phone.
(l below, “Activating voice functions”)
∫ Activating voice functions [ ]
You can activate Siri or other voice functions with a button on the unit.
Press and hold [1/;/] (a) of this unit for approx. 3 seconds.
∫ Restoring to the factory settings
Charge the battery before restoring the unit.
1 While the unit is turned off, press and hold [Í/I ( )] for at least
5 seconds until the LED starts blinking alternately in blue and
red.
2 While the LED is blinking alternately in blue and red, press and
hold [i (9)] (b) and [j (:)] (c) at the same time for at least
5 seconds.
• The default settings will be restored after the LED (blue) blinks fast
and the unit turns off.
• When pairing a device again, delete the registering information (Device:
“RP-HF410B”) from the Bluetooth
®
device’s menu, and register this unit
with the Bluetooth
®
device again. (l )
Clean this unit with a dry and soft cloth.
• Do not use solvents including benzine, thinner, alcohol, kitchen
detergent, a chemical wiper, etc. This might cause the exterior case to
be deformed or the coating to come off.
A
B
C
Bluetooth
Bluetooth ON
RP-HF410B
D
E
English
A Part names
B Charging
C Turning the power on/off
D Connecting a Bluetooth
®
device
E Using the headphones
Play / Pause: Press [1/;/ ] (a).
Increase the volume: Press [i (9)] (b).
Decrease the volume: Press [j (:)] (c).
Forward to the start of
next track: Press and hold [i (9)].
Return to the start of
current track: Press and hold [j (:)].
Maintenance
Troubleshooting (l Front page)
1 Touche [Í/I ( )]*
1
2 Voyant LED*
2
3 Coussinets d’oreille
4 Pointe saillante signalant le côté gauche
5 Borne de charge (DC IN) 6 Microphone
7 Touche [i (9)] 8 Touche [1/;/]
9 Touche [j (:)]
*1 Í/I : Veille/MARCHE
*2 Ci-après dénommé “voyant”
La batterie rechargeable (installée dans l’appareil) n’est pas chargée au
départ. Chargez la batterie avant d’utiliser l’appareil.
Raccordez cet appareil à un ordinateur (a) en utilisant le câble de
recharge USB (fourni) (b).
• Le voyant (c) s’allume en rouge pour indiquer que la charge est en
cours. Une fois la charge terminée, le voyant s’éteint.
• Il faut environ 2,5 heures pour charger la batterie de vide à plein.
• Contrôlez le sens des bornes et insérez-les ou retirez-les en les gardant
droites sur la fiche. (Tout branchement à l’oblique ou dans le mauvais sens
peut entraîner un dysfonctionnement suite à une déformation de la borne.)
• L’appareil ne peut pas être mis sous tension pendant la charge.
• Assurez-vous que l’ordinateur est allumé et n’est pas en mode veille ou
veille prolongée.
• N’utilisez aucun autre câble de recharge USB à l’exception de celui fourni.
• Lorsque la batterie commence à manquer en cours d'utilisation de
l'appareil, le voyant clignotant passera du bleu au rouge. Un signal
sonore retentit chaque 1 minute.* Lorsque la batterie est épuisée, un
message d’aide en anglais est émis et l'appareil s'éteint.
* Si vous appuyez deux fois sur la touche [Í/I ( )] rapidement, un
message d’aide en anglais est émis et vous pouvez vérifier le
niveau de la batterie.
Maintenez enfoncé [Í/I ( )] (a) sur cet appareil pendant environ
3 secondes jusqu’à ce que le voyant (bleu) (b) clignote.
• Un signal sonore retentit et le voyant (bleu) clignotera lentement.
Mise hors tension
Appuyez sur [Í/I ( )] pendant environ 3 secondes. Un message d’aide
en anglais sera émis et l’appareil sera mis hors tension.
• Si l'appareil n'est connecté à aucun dispositif Bluetooth
®
, il émettra un
message d’aide en anglais et se mettra automatiquement hors tension
environ 5 minutes après que vous ayez cessé de l'utiliser. (Mise hors
tension automatique)
∫ Appairage Bluetooth
®
1 Lorsqu’il est éteint, maintenez enfoncé [Í/I ( )] sur cet appareil
jusqu’à ce que le voyant clignote.
– En cas d’appairage d’un dispositif pour la première fois :
environ 3 secondes
– Lors de l’appairage d’un deuxième dispositif ou des dispositifs ultérieurs :
environ 5 secondes
• L’appareil commence à rechercher le dispositif Bluetooth
®
pour la
connexion et le voyant clignote alternativement en bleu et en rouge.
2 Activez le Bluetooth
®
de l’appareil, et activez la fonction
Bluetooth
®
.
3 Sélectionnez “RP-HF410B” (a) à partir du menu du dispositif
Bluetooth
®
.
• Si vous êtes invité à saisir un mot de passe, saisissez le mot de passe
“0000 (quatre zéros)” de cet appareil.
• Lorsque le voyant (bleu) clignote deux fois, environ toutes les 2 secondes,
l’appairage (l’enregistrement) est terminé. (Connexion établie)
• Si la connexion à un appareil n’est pas établie au bout d’environ 5 minutes,
l’appareil se met hors tension. Effectuez à nouveau l’appairage.
∫ Connexion à un dispositif Bluetooth
®
appairé
1 Mettez cet appareil sous tension.
2 Effectuez les étapes 2 et 3 de la section “Appairage Bluetooth
®
”.
(l ci-dessus)
• Lorsque le voyant (bleu) clignote deux fois, environ toutes les
2 secondes, l’appairage (l’enregistrement) est terminé. (Connexion
établie)
Pour utiliser les fonctions ci-dessous indiquées par le symbole [ ],
connectez le dispositif Bluetooth
®
et l’appareil.
∫ Écoute de la musique [ ]
Sélectionnez et lisez la musique sur le dispositif Bluetooth
®
.
• Le casque de l’appareil reproduira la musique ou le son de la vidéo en
cours de lecture.
∫ Contrôle à distance (Disponible uniquement si votre
dispositif Bluetooth
®
prend en charge les profils
Bluetooth
®
“AVRCP”) [ ]
(Exemple d’opération)
• Le volume peut être sur 16 niveaux. Lorsque le volume maximum ou
minimum est atteint, un signal sonore est émis.
∫ Passage d’un appel téléphonique [ ]
1 Appuyez sur la [1/;/] (a) de l’appareil et répondez à l’appel
entrant.
• (HFP seulement) Pour rejeter un appel entrant, appuyez sur [1/;/]
deux fois rapidement.
2 Démarrez la conversion.
3 Appuyez sur [1/;/ ] pour mettre fin à l’appel téléphonique.
• (HFP seulement)) Il pourrait être difficile d’entendre les conversations
téléphoniques lorsque l’appareil est utilisé dans des lieux très bruyants
ou à l’extérieur ou encore dans des endroits où le vent souffle fort. Dans
ce cas, changez la position de l’appel ou basculez le dispositif appelant
sur le téléphone compatible Bluetooth
®
pour continuer l’appel. (Appuyez
deux fois rapidement sur la [1/;/ ] de l’appareil pour changer.)
• Il est possible avec le téléphone compatible Bluetooth
®
d'effectuer des
appels téléphoniques à l’aide du microphone de l’appareil et d’une
application du téléphone compatible Bluetooth
®
.
(
l dessous, “Activation des fonctions vocales”)
∫ Activation des fonctions vocales [ ]
Vous pouvez activer Siri ou d’autres fonctions vocales à l’aide d’une
touche sur l’appareil.
Appuyez et maintenez enfoncé [
1/;/] (a) sur cet appareil
pendant environ 3 secondes.
∫ Retour aux réglages d’usine par défaut
Chargez la batterie avant de restaurer l’appareil.
1 Lorsque l’appareil est éteint, appuyez et maintenez enfoncée la
touche [Í/I ( )] pendant au moins 5 secondes jusqu’à ce que le
voyant se mette à clignoter alternativement en bleu et en rouge.
2 Pendant que le voyant clignote alternativement en bleu et rouge,
appuyez et maintenez enfoncé [i (9)] (b) et [j (:)] (c) en
même temps pendant au moins 5 secondes.
• Les paramètres par défaut seront restaurés une fois que le voyant
(bleu) clignote rapidement et que l’appareil se met hors tension.
• Pour appairer un nouveau dispositif, supprimez les informations
d’enregistrement (Dispositif : “RP-HF410B”) dans le menu du dispositif
Bluetooth
®
, et enregistrez une nouvelle fois cet appareil avec le
dispositif Bluetooth
®
. (l )
Nettoyez cet appareil à l’aide d’un chiffon doux et sec.
• N’utilisez pas de solvants, y compris essence, diluant, alcool, liquide
vaisselle, lingette chimique, etc. Cela peut déformer le boitier externe ou
décoller le revêtement.
1 [Í/I ( )]-Taste*
1
2 LED-Kontrollleuchte*
2
3 Ohrpolster
4 Punktförmige Erhebung kennzeichnet die linke Seite
5 Ladeanschluss (DC IN) 6 Mikrofon
7 [i (9)]-Taste 8 [1/;/]-Taste
9 [j (:)]-Taste
*1 Í/I: Standby/EIN
*2 Im Folgenden als “LED” bezeichnet
Der im Gerät installierte wiederaufladbare Akku ist bei der Auslieferung
nicht geladen. Laden Sie den Akku vor dem Gebrauch des Gerätes auf.
Um dieses Gerät an einen Computer (a) anzuschließen, verwenden
Sie das mitgelieferte USB-Ladekabel (b).
• Während des Ladens leuchtet die LED (c) rot. Nach Abschluss des
Ladevorgangs erlischt die LED.
• Es dauert ca. 2,5 Stunden, den leeren Akku vollständig aufzuladen.
• Kontrollieren Sie die Ausrichtung der Anschlusskontakte und halten Sie
beim Anschließen/Abziehen den Stecker gerade. (Wenn der Stecker
schief oder falsch herum eingesteckt wird, kann es zu einer
Beschädigung der Buchse und zu Funktionsstörungen kommen.)
• Während des Ladevorgangs kann das Gerät nicht eingeschaltet werden.
• Vergewissern Sie sich, dass der Computer eingeschaltet ist und sich
nicht im Standby- oder Sleep-Modus befindet.
• Verwenden Sie ausschließlich das mitgelieferte USB-Ladekabel.
• Wenn sich beim Verwenden des Geräts der Akku erschöpft, wechselt die
Farbe der blinkenden LED von Blau zu Rot. Im Abstand von 1 Minute
ertönt ein Signalton.* Wenn der Akku leer ist, wird eine englische
Hinweismeldung wiedergegeben, und das Gerät wird ausgeschaltet.
* Wenn Sie [
Í
/I ( )] zweimal schnell hintereinander drücken, ertönt eine
englische Hinweismeldung und Sie können den Akkuladestand prüfen.
Halten Sie im ausgeschalteten Zustand ca. 3 Sekunden lang die
Taste [Í/I ( )] (a) gedrückt, bis die LED blau (b) blinkt.
• Ein Signalton ertönt, und die LED (blau) blinkt langsam.
Zum Ausschalten
Halten Sie [Í/I ( )] mindestens 3 Sekunden lang gedrückt. Eine
englische Hinweismeldung ertönt, und das Gerät wird ausgeschaltet.
• Wenn das Gerät nicht mit einem Bluetooth
®
-Gerät verbunden ist, ertönt
ca. 5 Minuten nach der letzten Verwendung eine englische
Hinweismeldung, und das Gerät wird automatisch ausgeschaltet.
(Automatische Abschaltung)
∫ Bluetooth
®
-Kopplung
1 Halten Sie im ausgeschalteten Zustand die Taste [Í/I ( )]
gedrückt, bis die LED blinkt.
– Wenn zum ersten Mal ein Gerät gekoppelt wird:
ca. 3 Sekunden
– Wenn ein zweites Gerät oder weitere Geräte gekoppelt werden:
ca. 5 Sekunden
• Das Gerät sucht nach dem Bluetooth
®
-Gerät, und die LED blinkt
abwechselnd in blau und rot.
2 Schalten Sie das Bluetooth
®
-Gerät aus und aktivieren Sie die
Bluetooth
®
-Funktion.
3 Wählen Sie “RP-HF410B” (
a
) im Menü des Bluetooth
®
-Geräts aus.
• Wenn ein Passcode angefordert wird, geben Sie “0000 (vier Nullen)”
ein; dies ist der Passcode dieses Geräts.
• Wenn die LED ca. alle 2 Sekunden zweimal blau blinkt, ist die
Kopplung (Registrierung) abgeschlossen. (Verbindung hergestellt)
• Wird innerhalb von ca. 5 Minuten keine Verbindung zu einem Gerät
hergestellt, schaltet sich das Gerät aus. Wiederholen Sie in diesem Fall
den Kopplungsvorgang.
∫ Anschluss eines gekoppelten Bluetooth
®
-Geräts
1 Schalten Sie dieses Gerät ein.
2 Führen Sie die Schritte 2 und 3 aus dem Abschnitt
“Bluetooth
®
-Kopplung” aus. (l oben)
• Wenn die LED ca. alle 2 Sekunden zweimal blau blinkt, ist die
Kopplung (Registrierung) abgeschlossen. (Verbindung hergestellt)
Zur Verwendung der Funktionen, die im Folgenden mit dem [ ]-Symbol
markiert sind, verbinden Sie das Bluetooth
®
-Gerät mit diesem Gerät.
∫ Musik hören [ ]
Wählen Sie Musik auf dem Bluetooth
®
-Gerät aus und starten Sie die
Wiedergabe.
• Der Kopfhörer des Geräts gibt die Musik oder den Ton des
wiedergegebenen Videos aus.
∫ Fernbedienung (nur verfügbar, wenn Ihr
Bluetooth
®
-Gerät die Bluetooth
®
-Profile “AVRCP”
unterstützt) [ ]
(Beispielhafte Bedienvorgänge)
• Die Lautstärke kann in 16 Schritten eingestellt werden. Wenn die maximale
oder minimale Lautstärke erreicht ist, wird ein Signalton ausgegeben.
∫ Einen Anruf tätigen [ ]
1 Drücken Sie [1/;/] (a) am Gerät, um den eingehenden Anruf
anzunehmen.
• (Nur HFP) Um den eingehenden Anruf abzuweisen, drücken Sie [1/
;/ ] zweimal schnell hintereinander.
2 Sprechen Sie.
3 Drücken Sie [1/;/ ], um den Anruf zu beenden.
• (Nur HFP) Telefongespräche sind möglicherweise schlecht zu verstehen,
wenn das Gerät in geräuschvoller Umgebung, im Freien oder an anderen
Orten mit starkem Wind betrieben wird. Um das Gespräch in einem solchen
Fall fortsetzen zu können, wechseln Sie den Standort oder übergeben Sie
das Gespräch an das Bluetooth
®
-Telefon. (Zur Übergabe drücken Sie die
[
1
/
;
/ ] am Gerät zweimal schnell hintereinander.)
• Sie können das Bluetooth
®
-fähige Gerät zum Tätigen von
Telefonanrufen verwenden, indem Sie das Mikrofon des Geräts und eine
App des Bluetooth
®
-fähigen Telefons verwenden.
(
l unten, “Aktivieren der Sprachfunktionen”)
∫ Aktivieren der Sprachfunktionen [ ]
Sie können Siri oder andere Sprachfunktionen mit einer Taste am Gerät
aktivieren.
Halten Sie ca. 3 Sekunden lang die Taste [
1/;/] (a) an diesem
Gerät gedrückt.
∫ Rücksetzen auf die Werkseinstellungen
Laden Sie den Akku auf, bevor Sie das Gerät zurücksetzen.
1 Halten Sie bei ausgeschaltetem Gerät die Taste [Í/I ( )]
mindestens 5 Sekunden lang gedrückt, bis die LED abwechselnd
in blau und rot blinkt.
2 Wenn die LED abwechselnd in blau und rot blinkt, halten Sie die
Tasten [i (9)] (b) und [j (:)] (c) gleichzeitig mindestens
5 Sekunden lang gedrückt.
• Nachdem die LED in schneller Folge blau blinkt und das Gerät sich
ausschaltet, werden die Standardeinstellungen wiederhergestellt.
• Soll ein Gerät neu gekoppelt werden, löschen Sie die
Registrierungsinformation (Gerät: “RP-HF410B”) im Menü des
Bluetooth
®
-Geräts, und koppeln Sie dieses Gerät mit dem
Bluetooth
®
-Gerät erneut. (l )
Reinigen Sie dieses Gerät mit einem trockenen, weichen Tuch.
• Verwenden Sie keine Lösungsmittel wie Benzin, Verdünner, Alkohol,
Haushaltsreiniger, einen chemischen Wischer etc. Diese könnten dazu
führen, dass sich das äußere Gehäuse verformt oder die Beschichtung
abblättert.
Français
A Noms de pièces
B Chargement
C Mise sous tension/hors tension
D Connexion à un dispositif Bluetooth
®
E Utilisation du casque
Lecture / Pause : Appuyez sur [1/;/] (a).
Augmentez le volume : Appuyez sur [i (9)] (b).
Diminuez le volume : Appuyez sur [j (:)] (c).
Avance au début de la
piste suivante : Appuyez et maintenez enfoncé [i (9)].
Retourne au début de la
piste suivante : Appuyez et maintenez enfoncé [j (:)].
Entretien
Dépannage (l Recto)
Deutsch
A Teilebezeichnungen
B Wird aufgeladen
C Ein-/Ausschalten
D Verbinden eines Bluetooth
®
-Geräts
E Verwendung von Kopfhörern
Wiedergabe / Pause: Drücken Sie [1/;/ ] (a).
Lautstärke erhöhen: Drücken Sie [i (9)] (b).
Lautstärke verringern: Drücken Sie [j (:)] (c).
Zum Anfang des
nächsten Titels springen:
Halten Sie [i (9)] gedrückt.
Zum Anfang des
aktuellen Titels springen:
Halten Sie [j (:)] gedrückt.
Reinigung
Problembehebung (l Vorderseite)
1 Botón [Í/I ( )]*
1
2 Luz indicadora LED*
2
3 Almohadillas para las orejas
4 Punto elevado indicando el lado izquierdo
5 Terminal de carga (DC IN) 6 Micrófono
7 Botón [i (9)] 8 Botón [1/;/]
9 Botón [j (:)]
*1 Í/I: Modo de espera/Encendido
*2 En lo sucesivo denominada “LED”
La batería recargable (instalada en el aparato) no está cargada
inicialmente. Cargue la batería antes de utilizar este aparato.
Conecte este aparato a un ordenador (a) usando el cable de carga
USB (suministrado) (b).
• El LED (c) se ilumina en rojo cuando la carga está en curso. Cuando se
ha completado la carga, el LED se apaga.
• Cargar la batería de descargada a totalmente cargada tarda aprox.
2,5 horas.
• Compruebe la dirección de los terminales y enchúfelos o desenchúfelos
sujetándolos en posición recta. (Si se enchufan oblicuamente o en la
dirección equivocada, esto podría provocar un mal funcionamiento al
deformar el terminal.)
• No se puede encender mientras se carga.
• Asegúrese de que el ordenador está encendido y que no está en modo
de espera o en modo de suspensión.
• No use ningún otro cable de carga USB que no sea el suministrado.
• Cuando la batería comienza a agotarse mientras se usa el aparato, el
LED parpadeante cambia de azul a rojo. Sonará un pitido cada minuto.*
Cuando la batería se agote, se oirá un mensaje de ayuda en inglés y el
aparato se apagará.
* Si pulsa
[
Í/I
()]
dos veces rápidamente, se oirá un mensaje de
ayuda en inglés y podrá comprobar el nivel de batería.
Mantenga pulsado [Í/I ( )] (a) en este aparato durante aprox.
3 segundos hasta que el LED (azul) (b) parpadee.
• Sonará un pitido y el LED (azul) parpadeará lentamente.
Para apagar el aparato
Mantenga pulsado [Í/I ( )] durante 3 segundos aproximadamente. Se
oirá un mensaje de ayuda en inglés y el aparato se apagará.
• Si el aparato no está conectado a un dispositivo Bluetooth
®
, se oirá un
mensaje de ayuda en inglés y se apagará automáticamente
aproximadamente 5 minutos después de que haya dejado de usarlo.
(Apagado automático)
∫ Sincronización Bluetooth
®
1 Mientras está apagado, mantenga pulsado [Í/I ( )] en este
aparato hasta que el LED parpadee.
– Cuando se empareja un dispositivo por primera vez:
aprox. 3 segundos
– Cuando se empareja un segundo dispositivo u otros más:
aprox. 5 segundos
• El aparato comienza a buscar el dispositivo Bluetooth
®
para su
conexión y el LED parpadeará en azul y rojo alternativamente.
2 Encienda el aparato Bluetooth
®
y habilite la función Bluetooth
®
.
3 Seleccione “RP-HF410B” (a) desde el menú del dispositivo
Bluetooth
®
.
• Si se le solicita una contraseña, introduzca la contraseña “0000
(cuatro ceros)” de este aparato.
• Cuando el LED (azul) parpadee dos veces cada aprox. 2 segundos, el
emparejamiento (registro) se habrá completado. (Conexión
establecida)
• Si no se establece la conexión a un dispositivo en aproximadamente
5 minutos, el aparato se apagará. Realice el emparejamiento de nuevo.
∫ Conexión a un dispositivo Bluetooth
®
emparejado
1 Encienda este aparato.
2 Realice los pasos 2 y 3 de “Sincronización Bluetooth
®
”.
(
l arriba)
• Cuando el LED (azul) parpadee dos veces cada aprox. 2 segundos, el
emparejamiento (registro) se habrá completado. (Conexión
establecida)
Cuando se usen las siguientes funciones indicadas con la marca [ ],
conecte el dispositivo Bluetooth
®
y el aparato.
∫ Escuchar música [ ]
Seleccione y reproduzca la música en el dispositivo Bluetooth
®
.
• Los auriculares del aparato emitirán la música o el audio del vídeo que
se está reproduciendo.
∫
Control remoto (Disponible solo si su dispositivo Bluetooth
®
es compatible con perfiles “AVRCP” Bluetooth
®
)
[ ]
(Ejemplo de funcionamiento)
• El volumen se puede ajustar en 16 niveles. Cuando se alcance el
volumen mínimo o máximo, escuchará un pitido.
∫ Realizar una llamada telefónica [ ]
1 Pulse [1/;/] (a) en el aparato y responda la llamada entrante.
• (Solo HFP) Para rechazar la llamada entrante, pulse [1/;/ ] dos
veces rápidamente.
2 Comience a hablar.
3 Pulse [1/;/ ] para finalizar la llamada telefónica.
• (Solo HFP) Puede que resulte difícil escuchar conversaciones
telefónicas cuando este aparato se usa en lugares con mucho ruido
ambiental o en exteriores u otros lugares expuestos a fuertes vientos.
En ese caso, cambie el lugar de la llamada o cambie el dispositivo de
llamada al teléfono habilitado con Bluetooth
®
para continuar la llamada.
(Pulse
[
1
/
;
/]
en el aparato dos veces rápidamente para cambiar.)
• Puede hacer que el teléfono habilitado con Bluetooth
®
realice llamadas
telefónicas usando el micrófono del aparato y una aplicación del teléfono
habilitado con Bluetooth
®
.
(
l a continuación, “Activación de las funciones por voz”)
∫ Activación de las funciones por voz [ ]
Puede activar Siri u otras funciones por voz con un botón del aparato.
Mantenga pulsado [1/;/] (a) en este aparato durante aprox.
3 segundos.
∫ Restauración de los ajustes de fábrica
Cargue la batería antes de restaurar el aparato.
1 Mientras el aparato está apagado, mantenga pulsado [Í/I ( )]
durante al menos 5 segundos hasta que el LED comience a
parpadear alternativamente en azul y rojo.
2 Mientras el LED está parpadeando alternativamente en azul y rojo,
mantenga pulsados [i (9)] (b) y [j (:)] (c) a la vez durante
al menos 5 segundos.
• Los ajustes por defecto se restaurarán después de que el LED (azul)
parpadee rápido y el aparato se apague.
• Cuando empareje un dispositivo de nuevo, borre la información de
registro (Dispositivo: “RP-HF410B”) del menú del dispositivo Bluetooth
®
y registre este aparato con el dispositivo Bluetooth
®
de nuevo. (l )
Limpie este aparato con un paño suave y seco.
• No use solventes, como por ejemplo, bencina, disolvente, alcohol,
detergente de cocina, limpiador químico, etc. Esto podría provocar que
la caja exterior se deforme o que el revestimiento se caiga.
English
• Disassemble after the battery runs out.
• Keep disassembled parts out of reach of children.
Regarding the handling of used batteries
• Insulate the terminals with adhesive tape or similar material.
• Do not disassemble.
∫ Batteries
• Do not heat or expose to flame.
• Do not leave the battery(ies) in a car exposed to direct sunlight for a long
period of time with doors and windows closed.
• Battery mishandling can cause electrolyte leakage which can damage
items the leaked fluid comes into contact with. If electrolyte leaks from
the battery, consult your dealer. Wash thoroughly with water if electrolyte
comes in contact with any part of your body.
• When disposing of the batteries, please contact your local authorities or
dealer and ask for the correct method of disposal.
1 Remove the right ear pad.
2 Remove the 4 screws and then the plate.
3 Remove the 2 screws and then the board.
4 Cut the cords coming out of the battery one by one.
5 Take out the battery.
Français
• Démontez une fois la batterie épuisée.
• Conservez les pièces démontées hors de portée des enfants.
Collecte des batteries usagées
• Isolez les bornes à l’aide d’un ruban adhésif ou d’un matériau similaire.
• Ne les démontez pas.
∫ Batteries
• Ne les chauffez pas et ne les exposez pas à une flamme.
• Ne laissez pas la (les) batterie(s) dans un véhicule exposé directement
aux rayons du soleil pendant un long moment avec les vitres et portières
fermées.
• Une mauvaise manipulation de la batterie peut provoquer une fuite
d’électrolyte qui peut endommager les éléments avec lesquels le fluide
ayant fui entre en contact. Si de l’électrolyte fuit de la batterie, consultez
votre revendeur. Lavez abondamment à l’eau si de l’électrolyte entre en
contact avec une partie de votre corps.
• Pour jeter les batteries usagées, veuillez contacter l’administration locale
ou votre revendeur afin de connaître la procédure de mise au rebut à
suivre.
1 Retirez le coussinet de l’oreillette droite.
2 Retirer les 4 vis puis la plaque.
3 Retirez les 2 vis, et puis le cache.
4 Coupez les câbles qui sortent de la batterie un par un.
5 Enlevez la batterie.
Deutsch
• Zerlegen Sie das Gerät, nachdem der Akku das Ende seiner
Lebensdauer erreicht hat.
• Bewahren Sie die zerlegten Teile außerhalb der Reichweite von Kindern
auf.
Handhabung von verbrauchten Akkus
• Isolieren Sie die Klemmen mit Klebeband oder ähnlichem Material.
• Zerlegen Sie den Akku nicht.
∫ Batterien
• Setzen Sie die Batterien niemals großer Hitze oder offenem Feuer aus.
• Lassen Sie die Batterien niemals über längere Zeit in einem Auto mit
geschlossenen Türen und Fenstern zurück, das direkter
Sonneneinstrahlung ausgesetzt ist.
• Bei falscher Handhabung von Batterien kann Elektrolyt austreten, und
Gegenstände, die mit der ausgetretenen Flüssigkeit in Berührung
kommen, können beschädigt werden. Wenn Elektrolyt aus der Batterie
austritt, wenden Sie sich bitte an Ihren Händler. Wenn Elektrolyt mit
Körperteilen in Berührung kommt, diese gründlich mit Wasser abspülen.
• Wenden Sie sich zur Entsorgung der Akkus an die lokalen Behörden
oder Ihren Händler und erfragen Sie die richtige Vorgehensweise zur
Entsorgung.
1 Entfernen Sie die rechte Hörmuschel.
2 Entfernen Sie die 4 Schrauben und dann die Platte.
3 Entfernen Sie die 2 Schrauben und dann die Leiterplatte.
4 Schneiden Sie die Drähte, die aus dem Akku führen, einzeln
durch.
5 Entfernen Sie den Akku.
Español
A Nombres de las partes
B Cargándose
C Cómo apagar/encender el aparato
D Conexión de un dispositivo Bluetooth
®
E Usar los auriculares
Reproducir / Pausa: Pulse [1/;/ ] (a).
Aumentar el volumen: Pulse [i (9)] (b).
Reducir el volumen: Pulse [j (:)] (c).
Avanzar al inicio de la
siguiente pista: Mantenga pulsado [i (9)].
Volver al inicio de la
pista actual: Mantenga pulsado [j (:)].
Mantenimiento
Resolución de problemas (l Página delantera)
To remove the battery when disposing of this
unit
The following instructions are not intended for repairing purposes
but for the disposal of this unit. This unit is not restorable once
disassembled.
• When disposing of this unit, take out the battery installed in this
unit and recycle it.
Pour retirer la batterie lors de la mise au rebut
de cet appareil
Les instructions suivantes ne sont pas destinées à des fins de
réparation mais pour la mise au rebut de cet appareil. Cet appareil
n’est pas récupérable une fois désassemblé.
• Lors de la mise au rebut de cet appareil, retirez la batterie
installée dans ce dernier et recyclez-la.
Entfernen des Akkus zur Entsorgung dieses
Geräts
Die folgenden Anweisungen sind nicht für Reparaturzwecke
vorgesehen, sondern für die Entsorgung dieses Geräts. Dieses
Gerät ist nicht wiederherstellbar, sobald es einmal zerlegt wurde.
• Entnehmen Sie für die Entsorgung dieses Geräts den in diesem
Gerät installierten Akku und recyclen Sie ihn.
Español
• Desmóntelo después de que la batería se haya agotado.
• Mantenga las partes desmontadas fuera del alcance de los niños.
Acerca del manejo de baterías usadas
• Aísle los terminales con cinta adhesiva o un material similar.
• No la desarme.
∫ Baterías
• No caliente ni exponga las pilas a las llamas.
• No deje la(s) batería(s) en un automóvil expuesto a la luz solar directa
por un período prolongado de tiempo con las puertas y ventanas
cerradas.
• El manejo incorrecto de las baterías puede causar fugas de electrolito
que pueden dañar los objetos con los que entre en contacto el líquido
derramado. Si se producen fugas de electrolito de la batería, consulte
con su distribuidor. Lávese meticulosamente con agua si el electrolito
entra en contacto con cualquier parte de su cuerpo.
• Al desechar las baterías, comuníquese con sus autoridades locales o
distribuidores y pregunte por el método de eliminación correcto.
1 Retire la almohadilla del auricular derecho.
2 Retire los 4 tornillos y después la placa.
3 Retire los 2 tornillos y después el panel.
4 Corte los cables que salen de la batería uno a uno.
5 Saque la batería.
Para retirar la batería al desechar este aparato
Las siguientes instrucciones no están previstas para la
reparación de este aparato si no para su eliminación. Este aparato
no se puede restituir una vez desmontado.
• Al desechar este aparato, retire la batería instalada en este
aparato para su reciclaje.
Panasonic Warranty
If you require assistance regarding warranty condions or any other enquiries, please visit the Panasonic
Australia website
www.panasonic.com.au or contact by phone on 132 600
If phoning in, please ensure you have your operang instrucons available.
THIS WARRANTY CARD AND THE PURCHASE DOCKET (OR SIMILAR PROOF OF PURCHASE)
SHOULD BE RETAINED BY THE CUSTOMER AT ALL TIMES
Panasonic Australia Pty. Limited
ACN 001 592 187 ABN 83 001 592 187
1 Innovation Road, Macquarie Park NSW 2113
www.panasonic.com.au
PRO-031-F11 Issue: 5.0 23-01-2018
1.
Subject to the condions of this warranty Panasonic or its Authorised Service Centre will perform necessary service on the product,
without charge for parts or labour, if in the opinion of Panasonic the product is found to have a manufacturing defect within one
(1) year or (12 months) (the “warranty period”) from the date of purchase appearing on your purchase receipt.
This warranty only applies to Panasonic products purchased in Australia and sold by Panasonic Australia, it’s Authorised Distributors, or
Dealers, and only where the products are used and serviced within Australia or its territories. Warranty cover only applies to the services
that are carried out by a Panasonic Authorised Service Centre and only if valid proof of purchase is presented when the warranty service is
requested.
This warranty only applies if the product has been installed and/or used in accordance with the manufacturer’s recommendaons (as noted
in the operang instrucons) under normal use and reasonable care (in the opinion of Panasonic). The warranty does not cover damage,
malfuncon or failure resulng from use of incorrect voltages, incorrect installaon, accident, misuse, neglect, build-up of dirt or dust,
abuse, maladjustment of customer controls, mains supply problems, thunderstorm acvity, infestaon by insects or vermin, tampering or
repair by unauthorised persons (including unauthorised alteraons), exposure to abnormally corrosive condions, or any foreign object or
maer having entered the product.
This warranty does not cover the following items unless the fault or defect existed at the me of purchase:
(a) Consumable parts
(b) Cosmec parts
(c) Worn or damaged parts
(d) Informaon stored on Hard Disk Drives, Opcal Discs, USB Devices, SD Cards, Tapes
(e) DTV recepon issues caused by TV Aerial / Cabling / Wall socket(s)
Some products may be supplied with Ethernet connecon hardware. The warranty is limited on such products and will not cover:
(a) Internet and or DLNA connecon / setup related problems
(b) Access fees and or charges incurred for internet connecon
(c) Incompable soware or soware not specifically spulated in the product operaons manual; and
(d) Any indirect or consequenal costs associated with the incorrect use or misuse of the hardware, its connecon to the internet or any
other device.
To claim warranty service, when required, you should:
• Contact Panasonic’s Customer Care Centre on 132 600 for Service Centre informaon.
• Confirm the opening and acceptance mes with the Authorised Service centre that you choose.
• Then send or take the product to a Panasonic Authorised Service Centre together with your proof of purchase receipt.
• Any freight and insurance costs associated with the transport of the product to and/or from your nearest Authorised Service Centre must
be arranged and paid for by you.
The warranes hereby conferred do not extend to, and exclude, any costs associated with the installaon, de-installaon or re-installaon
of a product, including costs related to the mounng, de-mounng or remounng of any screen, (and any other ancillary acvies), delivery,
handling, freighng, transportaon or insurance of the product or any part thereof or replacement of and do not extend to, and exclude,
any damage or loss occurring by reason of, during, associated with, or related to such installaon, de-installaon, re-installaon or transit.
2.
3.
4.
5.
6.
7.
Panasonic Authorised Service Centres are located in major metropolitan areas and most regional centres of Australia, however, coverage will
vary dependant on product. For advice on exact Authorised Service Centre locaons for your product, please telephone our Customer Care
Centre on 132600 or visit our website and use the Service Centre Locator.
In addion to your rights under this warranty, Panasonic products come with consumer guarantees that cannot be excluded under the
Australian Consumer Law. If there is a major failure with the product, you can reject the product and elect to have a refund or to have the
product replaced or if you wish you may elect to keep the goods and be compensated for the drop in value of the goods. You are also entled to
have the product repaired or replaced if the product fails to be of acceptable quality and the failure does not amount to a major failure.
If there is a major failure in regard to the product which cannot be remedied then you must nofy us within a reasonable period by contacng
the Panasonic Customer Care Centre. If the failure in the product is not a major failure then Panasonic may choose to repair or replace the
product and will do so in a reasonable period of me from receiving noce from you.

Diskutieren Sie über dieses Produkt mit
Hier können Sie uns Ihre Meinung zu Panasonic RP-HF410B Kopfhörer mitteilen. Wenn Sie eine Frage haben, lesen Sie zunächst das Bedienungsanleitung sorgfältig durch. Die Anforderung eines Bedienungsanleitung kann über unser Kontaktformular erfolgen.