GB
GBGBGBGBGB
warranty only applies to material or production faults,
not for wear parts or for damage due to incorrect
use. The warranty is void in the case of external in-
tervention. Your legal rights remain unaffected by
this warranty. In the case of a warranty claim, please
contact the service point. This ensures that your de-
vice can be sent to us free of charge.
Availability of spare parts:
3 years from the date of purchase
Service / Manufacturer
Inter-Union Technohandel GmbH
Klaus-von-Klitzing-Str. 2
DE-76829 Landau / Pfalz
GERMANY
www.inter-union.de
IAN 279799
IU Item no.: 97374
Model no.: 220 997 51
Serial no.: 01 / 2017
Status: 08 / 2016
Version: 2.0
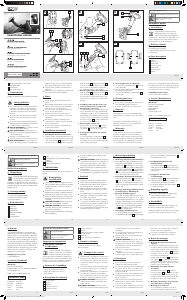
horizontal position, as well as the tilt angle. Then
tighten the little wheel again.
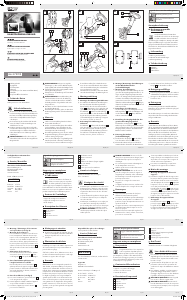
4. Fastening the jaws (see Figure E)
a) To open the jaws, push the button
10
on the left
side of the holder.
b)
Insert the desired appliance and secure into pl
ace
by pushing the jaws together.
c) To release the appliance, push the button
10
to
open the jaws.
Cleaning and care
Do not use any cleaning agents with alcohol or
other flammable liquids / substances.
Clean the product with a dry, lint-free cloth.
Disposal
The packaging consists of environmentally friendly
materials that you can dispose of at local recycling
points.
Please dispose of the product according to the
regulations and laws in your country when it has
reached the end of its useful life.
Warranty
3 years warranty on this product from the date of
purchase, only applies to the first purchaser, not
transferable. Please keep the receipt as proof. The
on the connector plate
6
imprinted “close“ is fac-
ing up and “open“ is facing down (see Figure A).
Grab the holder
1
and push the bracket
7
down so the claws lock all the way into the
4-hole system on the bracket (see Figure B).
You will hear the holder “click“ in place.
b) Removing the holder from the bracket
Grab the holder
1
and push the bracket
7
up so the claws release from the 4-hole system
(see Figure C). You will hear the holder “click“
when it releases and can be removed from the
bracket.
2. Installing / removing the suction cup
from the windscreen (see Figure D)
a) Mounting the suction cup:
T
he ambient temperature should be above 15
°C
for an optimal and secure grip. If the ambient
temperature is not above 15 °C, heat the surface
with a hairdryer. Then firmly press the suction cup
onto the surface in the desired position and flip
the suction cup lever
4
to create a seal betwe
en
the surface and the suction cup.
b) Removing the suction cup:
Flip the suction cup lever back
4
to release
the suction cup from the surface and pull the
vacuum tab
3
to release the vacuum.
3. Setting the ball joint for the desired
tilt angle
Loosen the little wheel on the ball joint
5
be-
hind the holder and set the desired vertical or
RISK OF ACCIDENTS! In case of failure to
observe the safety guidelines, the holder or the
appliance may come loose and be damaged.
Consequential damages cannot be ruled out.
Store the safety guidelines together with the
appliance.
When passing on to third parties, please include
the user manual and safety guidelines.
Notes
Strong sunlight can affect functioning of the
product.
Direct sunlight may damage the suction cup and
adhesion to the windscreen if the temperature
inside the vehicle rises above 70 °C.
The suction cup is only suitable for temporary
use on smooth, clean surfaces.
Routinely remove the suction cup (at least
every 3 months) and reattach to create a new
vacuum seal.
We assume no liability for damages due to
product misuse or failure to observe the safety
notices and instructions.
Do not leave the product in the bracket unat-
tended to prevent theft.
Installation instructions
1. Attaching the bracket to the holder:
a) Insert the 4 claws on the bracket with suction cup
into the 4-hole system of the holder. Be sure the si
de
7
Bracket
8
Retaining jaws (approx. 54–84 mm
adjustable width)
9
Retaining feet
10
Jaw release button
Technical Data
Suitable for appliances with a width of 54–84 mm
Safety Guidelines
Do not install the product within the operating
parameter of an airbag or near the steering
wheel. This can result in accidents and injuries,
particularly in the impact area on the head or
the body.
The positioning of the product must not impair
the driver in any way. The field of vision must
be clear.
Do not use, install or adjust whilst driving. Ins-
talling the product and installing accessories m
ust
not impair the driver whilst driving.
RISK OF ACCIDENTS! Do not reach or search
for fallen objects whilst driving.
RISK OF ACCIDENTS! Lay all feed lines so
that they pose no danger (tripping hazard) and
cannot be damaged.
Improper use can damage leads!
Verify the suction cup is secured before driving.
Manutenzione / Fabbricante
Inter-Union Technohandel GmbH
Klaus-von-Klitzing-Str. 2
DE-76829 Landau / Pfalz
GERMANIA
www.inter-union.de
IAN 279799
IU Oggetto N°: 97374
Modello N°: 220 997 51
Seriale N°: 01 / 2017
Aggiornamento: 08 / 2016
Versione: 2.0
IT/CHIT/CHIT/CHIT/CHIT/CH
Smaltimento
La confezione è composta da materiali ecologici che
si possono smaltire in un centro di riciclaggio locale.
Smaltire il prodotto dopo la sua durata nel rispetto
delle norme e regolamentazioni vigenti nel proprio
paese.
Garanzia
3 anni di garanzia dalla data di acquisto sul presen
te
apparecchio, valida solamente per il primo acqui-
rente, non trasferibile. Conservare lo scontrino come
prova. La garanzia vale solamente per i difetti di
materiale o fabbricazione, ma non per componenti
soggetti a usura o per danni causati da un uso non
appropriato. La garanzia decade in caso di interve
nto
da parte di terzi. I Suoi diritti legali non vengono li-
mitati dalla presente garanzia. Nei casi contemplati
dalla garanzia, rivolgersi al servizio assistenza.
Solo in questo modo è possibile garantire una spe-
dizione gratuita dell’apparecchio.
Disponibilità di pezzi sostitutivi:
3 anni dalla data di acquisto
con un asciugacapelli. Infine premere la ventosa
sulla superficie nella posizione desiderata e pie-
gare la leva della ventosa
4
così da creare
adesione tra la superficie e la ventosa.
b) Smontaggio della ventosa:
Per staccare la ventosa dalla superficie, ribaltare
di nuovo la leva
4
e tirare la linguetta della
ventosa
3
per separarla dalla superficie.
3. Impostare il giunto a sfera nell‘angolo
d‘inclinazione desiderato
Allentare la rotellina sul giunto a sfera
5
dietro
il supporto e impostare la posizione verticale e
orizzontale, così come l’angolo d’inclinazione.
Poi stringere di nuovo la rotellina.
4. Fissare le ganasce (vedi fig. E)
a) Per aprire le ganasce, premere sul lato sinistro
del supporto.
b) Inserire il dispositivo desiderato e fissare l’ap-
parecchio stringendo le ganasce insieme.
c) Per rilasciare l’apparecchio, premere il pulsante
10
per aprire le ganasce.
Pulizia e cura
Non usare alcun detergente con alcol o altri
liquidi / sostanze combustibili.
Pulire il prodotto con un panno asciutto, privo
di lanuggine.
Per evitare furti, non lasciare il dispositivo incu-
stodito nel supporto.
Istruzioni per il montaggio
1. Montaggio del supporto al braccio
di supporto:
a) Inserire i 4 ganci del braccio di supporto a
ventosa nel sistema a 4 fori. Assicurarsi che il
lato della piastra di connessione
6
sia rivolta
con l‘incisione „close“ verso l‘alto e „open“
verso il basso (vedi figura A).
Afferrare il braccio di supporto
1
e spingere
il supporto
7
verso il basso in modo tale che
i perni si incastrino completamente nel sistema
a 4 fori (vedi fig. B). Il supporto è incastrato
correttamente quando fa „click“.
b) Smontaggio del supporto dal braccio
di supporto
Afferrare il braccio di supporto
1
e spingere il
supporto
7
verso l‘alto in modo tale che i perni
si fuoriescano dal sistema a 4 fori (vedi fig. C).
Il supporto è stato smontato e può essere rimosso
dal braccio di supporto quando si sente un „click“.
2. Montaggio / smontaggio della ventosa
dal parabrezza (vedi fig. D)
a) Montaggio della ventosa:
Per una presa ottimale e sicura della ventosa, la
temperatura ambientale dovrebbe superare i
15 °C. Se la temperatura ambientale non do-
vesse superare i 15 °C, riscaldare la superficie
Le linee di alimentazione possono subire danni
se non manipolate correttamente!
Prima di ogni viaggio, verificare che la ventosa
sia fissata saldamente.
RISCHIO DI INCIDENTE! In caso di mancata
osservanza delle linee guide di sicurezza, il sup-
porto o il dispositivo potrebbero allentarsi e dan-
neggiarsi. I danni consequenziali non possono
essere evitati.
Conservare le linee guida insieme con l‘appa-
recchio.
Se si dovesse cedere a terzi il prodotto, si prega
di includere il manuale d‘istruzioni e le linee
guida di sicurezza.
Note
La forte luce solare può influenzare il funziona-
mento del prodotto.
L‘esposizione diretta ai raggi solari può danneg-
giare la ventosa e influire sul suo fissaggio sul
parabrezza se la temperatura interna supera i
70 °C.
Il supporto a ventosa è adatto solo per un fis-
saggio temporaneo su una superficie piana e
pulita.
R
imuovere la ventosa ad intervalli regolari (mini
mo
ogni 3 mesi) e fissarla nuovamente per creare
una nuova adesione.
Non si assumono responsabilità per danni deri-
vanti dall‘uso improprio del prodotto o dovuti
all‘inosservanza delle avvertenze di sicurezza
e degli avvisi.
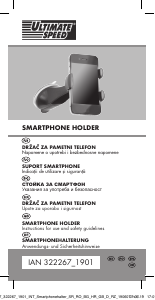
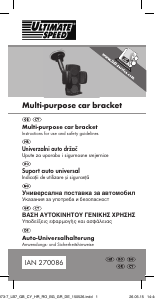
Smartphone holder
Intended use
Congratulations! You have chosen a
high-quality product to purchase. This
product is intended to hold smartphones,
mobile phones or MP3 players in automobiles. The
mount is designed for the inside windscreen pane.
Use the product only for the intended use.
Delivery content
1 mounting support with jaws
1 support bracket with vacuum suction mount
1 user manual
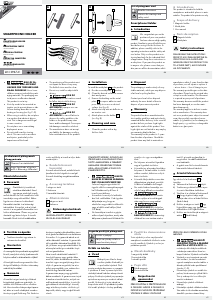
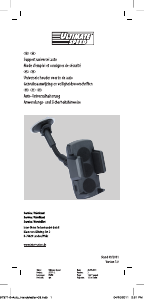
Parts Description
1
Holder
2
Suction cup
3
Vacuum tab
4
Suction cup lever
5
Swivel head
6
Connector plate
List of pictograms used
Please read the operating instructions!
Observe the warnings and
safety notices!
Inter-Union Technohandel GmbH
Klaus-von-Klitzingstr. 2
DE-76829 Landau / Pfalz
DEUTSCHLAND
Model-No.: 220 997 51
Stand der Informationen · Version des
informations · Versione delle informazioni
Last Information Update: 08 / 2016
IU-Art.-No.: 97374-082016-DE / CH
279799_uls_Smartphonehalterung_360 x 592 mm_DE_CH.indd 2 31.08.16 08:49


Diskutieren Sie über dieses Produkt mit
Hier können Sie uns Ihre Meinung zu Ultimate Speed IAN 279799 Handyhalterung mitteilen. Wenn Sie eine Frage haben, lesen Sie zunächst das Bedienungsanleitung sorgfältig durch. Die Anforderung eines Bedienungsanleitung kann über unser Kontaktformular erfolgen.