
KA5070
EN | Instruction manual
NL | Gebruiksaanwijzing
FR | Mode d’emploi
DE | Bedienungsanleitung
ES | Manual de usuario
PT | Manual de utilizador
IT | Manuele utente
SV | Bruksanvisning
PL | Instrukcja obsługi
CS | Návod na použití
SK | Návod na použitie
RU | Руководство по
эксплуатации
PARTS DESCRIPTION / ONDERDELENBESCHRIJVING / DESCRIPTION DES PIÈCES / TEILEBESCHREIBUNG /
DESCRIPCIÓN DE LAS PIEZAS / DESCRIÇÃO DOS COMPONENTES / DESCRIZIONE DELLE PARTI /
BESKRIVNING AV DELAR / OPIS CZĘŚCI / POPIS SOUČÁSTÍ / POPIS SÚČASTÍ / ПИСАНИЕ ЗАПЧАСТИ
1
3
2
Tristar Europe B.V. | Jules Verneweg 87
5015 BH Tilburg | The Netherlands
This product is only suitable for well insulated spaces or occasional use.
Dit product is uitsluitend geschikt voor goed geïsoleerde plaatsen of voor incidenteel gebruik.
Ce produit ne peut être utilisé que dans des locaux bien isolés ou de manière occasionnelle.
Dieses Produkt ist nur für gut isolierte Räume oder für den gelegentlichen Gebrauch geeignet.
Este producto está indicado únicamente en lugares abrigados o para una utilización puntual.
Este produto é adequado apenas para espaços bem isolados espaços ou utilização ocasional.
Il presente prodotto è adatto solo a ambienti correttamente isolati o ad un uso occasionale.
Denna produkt är endast lämpad för välisolerade utrymmen eller sporadisk användning.
Ten produkt jest odpowiedni tylko do sporadycznego użytku lub do stosowania w dobrze
izolowanych pomieszczeniach.
Tento výrobek je vhodný pouze pro dobňe izolované prostory nebo obĀasné používání.
Tento výrobok je určený iba do dobre izolovaných priestorov alebo na príležitostné použitie.
Это товар подходит только для использования в хорошо изолированных помещениях
или для нерегулярного использования.
[WEEE LOGO]
WWW.TRISTAR.EU
ENInstruction manual
SAFETY
• By ignoring the safety instructions the
manufacturer cannot be held responsible for
the damage.
• If the supply cord is damaged, it must be
replaced by the manufacturer, its service
agent or similarly qualified persons in order to
avoid a hazard.
• Never move the appliance by pulling the cord
and make sure the cord cannot become
entangled.
• This appliance is only to be used for
household purposes and only for the purpose
it is made for.
• This appliance shall not be used by children
aged less than 8 years. This appliance can be
used by children aged from 8 years and above
and persons with reduced physical, sensory or
mental capabilities or lack of experience and
knowledge if they have been given
supervision or instruction concerning use of
the appliance in a safe way and understand
the hazards involved. Children shall not play
with the appliance. Keep the appliance and its
cord out of reach of children aged less than 8
years. Cleaning and user maintenance shall
not be made by children unless older than 8
and supervised.
• To protect yourself against an electric shock,
do not immerse the cord, plug or appliance in
the water or any other liquid.
• WARNING: In order to avoid overheating,
do not cover the heater.
• CAUTION: Some parts of this product can
become very hot and cause burns. Particular
attention has to be given where children and
vulnerable people are present.
• Children aged from 3 years and less than 8
years shall only switch on/off the appliance
provided that it has been placed or installed in
its intended normal operating position and
they have been given supervision or
instruction concerning use of the appliance in
a safe way and understand the hazards
involved. Children aged from 3 years and less
than 8 years shall not plug in, regulate and
clean the appliance or perform user
maintenance.
• Children of less than 3 years should be kept
away unless continuously supervised.
• Do not use the appliance with a programmer,
timer, separate remote-control system or any
other device that switches the heater on
automatically, since a fire risk exists if the
heater is covered or positioned incorrectly.
• Do not use this heater in the immediate
surroundings of a bath, a shower or a
swimming pool.
• Joists, beams and rafters shall not be cut or
notched to install the appliance.
• Please do not install the appliance close to
curtains and other combustible materials. This
could cause a fire.
• The appliance shall, under no circumstances,
be covered with insulating material or similar
material.
• The heater must be installed at least 1,8m
above the floor.
• WARNING: This heater is not equipped with a
device to control the room temperature. Do
not use this heater in small rooms when they
are occupied by persons not capable of
leaving the room on their own, unless
constant supervision is provided.
• Do not expose the battery to high
temperatures or direct sunlight. Never throw
batteries into the fire. There is a danger of
explosion!
• Keep batteries away from children. Batteries
are not a toy!
• Do not open the batteries by force.
• Avoid contact with metallic objects.(Rings,
nails, screws et cetera) there is a danger of
short-circuiting!
• As a result of a short-circuit batteries may
heat up consider-ably or even catch fire. this
may result in burns.
• For your safety the battery poles should be
covered with adhesive strips during transport.
• Do not touch a ruptured and/or leaking battery.
If the liquid from the battery gets into your eyes,
rinse your eyes as soon as possible with clean
water, without rubbing your eyes. Immediately
go to the hospital. If it is not treated properly, it
can cause eye problems.
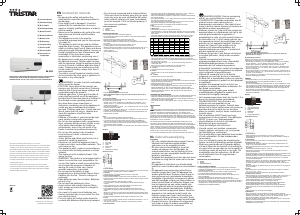
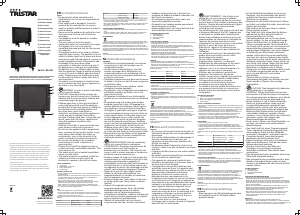
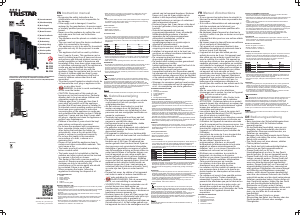
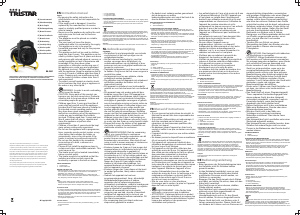
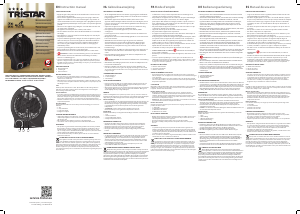
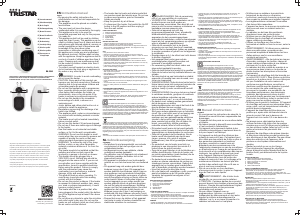
PARTS DESCRIPTION
1. Heater unit
2. Display
3. Remote control
BEFORE THE FIRST USE
• Use plugs and screws to install the appliance.
• Do not install the appliance near curtains or any other material that is
easily inflammable.
• Drill two holes in the wall 2 meters above the floor.
• Make sure the distance between the holes is 315 mm.
• The distance between the product and the ceiling(and the side) should
be ≥ 30cm.
• Keep the tips of the screws out of the wall for 10 mm.
• Fix the appliance to the wall by using the screws.
• When the product is installed, The screw is aligned with the hole "A" on
the product. After hanging, the product must be moved to the "B", in
order to firmly fix.
• See installation picture.
• Plug the power plug into the wall socket.
• Note: maximum weight is 4.1kg, the wall should be able to carry
this weight.
•
Present time setting:
At the first time the heater will start up or after the power has been cut off
the present time has to be set.
• Set day of the week, led display 01 is Monday, 02 is Tuesday .. 07 is
Sunday. Press + or – button to select the present day and confirm by
pushing the OK button.
• Set hours, led display 0H, press + or – to adjust the hour from 0H to 23H,
press OK button to confirm.
• Set minutes, led display 00, press + or – to adjust the minutes from 0min
to 59min, press OK button to confirm.
• If OK button is not pressed within 10 seconds after the adjustment, the
setting will be canceled.
USE
• Turn on the heater by pressing the on/off button.
• The normal way to operate the machine is by using the remote control.
• If you cannot find or use the remote control, there is a possibility to
switch on the heater manually by pressing the small start/stop switch
under the on/off switch. This will only start the heater in high heat mode,
press again to stop the heater.
• The fan continues to operate for 30 seconds when the heater is switched
off.
Display
1. Fan
2. Low heat
3. High heat
4. Timer
5. Week timer
6. Light on
7. Temperature display
Remote control
1. Power button :
• Press this button to turn the heater on or off (it will take up to 30 seconds
before the fan completely turns off after shutdown)
2. Heating:
• Use this button to choose between low heat or high heat.
3. Open window detection
• Open window protection cannot start when the heater is in fan mode.
• Press the open window detection button to start or stop the open window
detection mode.
• Temperature detection will start after 1 minute.
• For 10 minutes in a cycle the temperature will be detected every 5
minutes.
• If the temperature is <8°C than the detection start check point
temperature the appliance will start heating.
• If the temperature is >8°C than the detection start check point
temperature the appliance will stop heating and go into the standby
mode.
• When the 10 minute cycle is finished, the appliance stops heating, alarm
sounds 5 times, the fan operates for 30 seconds and then the heater will
go into standby.
• Press the window detection button again to begin the next cycle.
4. Timer
• Press the timer button several times to set the timer as follows. 1 hour, 2
hour, 3 hour... 8 hour.
• The timer function can’t be used when the week timer is active.
5. Set temperature
• Press this button to set the temperature, Press the + or the – button to
adjust the temperature, the temperature range is 18-45°C.
• If the set temperature is equal to or lower than environment temperature,
the heating will stop.
• If the set temperature is 1-2°C higher than the environment temperature
the appliance will start low heating.
• If the set temperature is higher or equal to +3°C than the environment
temperature the appliance will start high heating.
• Press the OK button to complete the set temperature mode.
6. OK
• Use this button to confirm actions.
7. Week timer
• Press week timer button to activate this function.
• Led will display P1, push the button again will take you to the P2 setting,
again P3 and so on until P6. Pushing the week timer 7 times will cancel
this function.
• When the desired P mode is in display push the OK button to confirm.
• See below table for information about the different P mode settings:
Mode Monday Tuesday Wednesday Thursday Friday Saturday Sunday
P1 8:00-17:00 8:00-17:00 8:00-17:00 8:00-17:00 8:00-17:00 8:00-17:00 8:00-17:00
P2
18:00-7:00
a
18:00-7:00
a
18:00-7:00
a
18:00-7:00
a
18:00-7:00
a
18:00-7:00
a
18:00-7:00
a
P3 8:00-17:00 8:00-17:00 8:00-17:00 8:00-17:00 8:00-17:00 OFF OFF
P4
18:00-7:00
a
18:00-7:00
a
18:00-7:00
a
18:00-7:00
a
18:00-7:00
a
OFF OFF
P5 OFF OFF OFF OFF OFF 00:00-23:59 00:00-23:59
Note
a: P2/P4 Mode, stop time is at the second day
P6: Time set range, 00-24H, start time must before the stop time, otherwise the heater
will give a failure remark.
Free mode Free mode
P6
Free mode Free mode Free mode Free mode Free mode
• P6 free mode, push week timer button until it displays P6 than press OK,
led display 1 as in Monday, push + or – to select the desired day (1-7,
set from Monday to Sunday) and push OK to confirm the correct day.
• Led display 00, push + or – to set the desired start hour (from 0H to 23H)
then press OK to confirm.
• Led display 00 again, push + or – to set the desired stop time and
confirm with OK.
• There only can be set one start and one stop time a day.
• The mode only works in hours and not in minutes.
8. + button
• Use this button to go one step further.
9. Cancel
• Use this button to cancel the temperature settings or the week timer
mode.
10. – button
• Use this button to go one step back.
• To turn the unit off, press the on/off button again.
• The fan keeps on working for about 30 seconds to cool down the heater
inside (when having used heating).
• Maximum temperature is 51°C, the device will shut down automatically if
a temperature of 51°C is detected.
• The heater is protected against overheating. This will switch off the
heater automatically in case of overheating due to total or partial
obstruction of the grids. In this case, unplug the appliance and wait for
about 30 minutes to cool down. After that remove the object that is
obstructing the grids.
CLEANING AND MAINTENANCE
• Always unplug the device and let it cool down completely before cleaning
• Clean the outside with a damp cloth. Never use harsh and abrasive
cleaners, steel wool or a scouring pad as this will damage the device. Do
not immerse in water or other liquid.
• Clean de air inlet and outlet regularly with a vacuum cleaner to remove
dust.
ENVIRONMENT
This appliance should not be put into the domestic garbage at the
end of its durability, but must be offered at a central point for the recycling
of electric and electronic domestic appliances. This symbol on the
appliance, instruction manual and packaging puts your attention to this
important issue. The materials used in this appliance can be recycled. By
recycling of used domestic appliances you contribute an important push to
the protection of our environment. Ask your local authorities for information
regarding the point of recollection.
The European directive for batteries (2006/66/EC) states that it is not
permitted to throw batteries away with the household waste. They may
contain substances which are harmful to the environment. Empty batteries
can be handed over to a local, public collection point or a local recycling
centre. To avoid overheating as a result of a short circuit, lithium batteries
must be removed from the product and the poles must be protected using
insulation tape or some other means against short-circuiting.
You can find all available information and spare parts at www.tristar.eu!
NLGebruiksaanwijzing
VEILIGHEID
• Als u de veiligheidsinstructies negeert, kan de
fabrikant niet verantwoordelijk worden
gehouden voor de mogelijke schade.
• Als het netsnoer beschadigd is, moet het
worden vervangen door de fabrikant, de
onderhoudsmonteur van de fabrikant of door
personen met een soortgelijke kwalificatie om
gevaar te voorkomen.
• Verplaats het apparaat nooit door aan het snoer
te trekken en zorg dat het snoer niet in de war
kan raken.
• Dit apparaat is uitsluitend voor huishoudelijk
gebruik en voor het doel waar het voor bestemd
is.
• Dit apparaat mag niet worden gebruikt door
kinderen jonger dan 8 jaar. Dit apparaat kan
worden gebruikt door kinderen vanaf 8 jaar en
door personen met verminderde lichamelijke,
zintuiglijke of geestelijke vermogens of gebrek
aan de benodigde ervaring en kennis indien ze
onder toezicht staan of instructies krijgen over
hoe het apparaat op een veilige manier kan
worden gebruikt alsook de gevaren begrijpen
die met het gebruik samenhangen. Kinderen
mogen niet met het apparaat spelen. Houd het
apparaat en het netsnoer buiten bereik van
kinderen jonger dan 8 jaar. Laat reiniging en
onderhoud niet door kinderen uitvoeren, tenzij
ze ouder zijn dan 8 jaar en onder toezicht staan.
• Dompel het snoer, de stekker of het apparaat
niet onder in water of andere vloeistoffen om
elektrische schokken te voorkomen.
• WAARSCHUWING: Dek de verwarming
niet af, om oververhitting te voorkomen.
• VOORZICHTIG: Sommige onderdelen van dit
product kunnen zeer heet worden en
brandwonden veroorzaken. Men dient dit met
name in acht te nemen wanneer er kinderen en
kwetsbare mensen aanwezig zijn.
• Kinderen tussen de 3 jaar en 8 jaar mogen het
apparaat alleen in-/uitschakelen mits het in zijn
normale gebruikspositie is geplaatst of
geïnstalleerd en mits zij onder toezicht staan en
na instructies m.b.t. tot het veilige gebruik van
het apparaat de risico's die samengaan met het
gebruik van het apparaat begrijpen. Kinderen
tussen de 3 jaar en 8 jaar mogen niet de
stekker in het stopcontact plaatsen, het
apparaat bedienen en reinigen of onderhoud
aan het apparaat uitvoeren.
• Kinderen jonger dan 3 jaar dienen uit de buurt
te worden gehouden, tenzij onder constante
toezicht.
• Gebruik het apparaat niet met een
programmeringseenheid, timer, afzonderlijk
afstandsbedieningssysteem of andere
apparaten die het verwarmingssysteem
automatisch inschakelen, omdat er brandgevaar
heerst als het verwarmingssysteem op onjuiste
wijze is afgedekt of gepositioneerd.
• Gebruik de verwarmer niet in de directe
omgeving van een bad, douche of zwembad.
• Er dient niet in dwarsbalken, balken en spanten
te worden gesneden of gekerft om het apparaat
te installeren.
• Installeer het apparaat niet in de buurt van
gordijnen en andere brandbare materialen. Dit
kan brand veroorzaken.
• Het apparaat dient onder geen enkele
omstandigheden afgedekt te worden met
isolerend of soortgelijk materiaal.
• Het verwarmingssysteem dient ten minste 1,8 m
boven de vloer te worden geïnstaleerd.
• WAARSCHUWING: Deze kachel is niet
uitgerust met een apparaat om de
kamertemperatuur te regelen. Gebruik deze
kachel niet in kleine kamers waar zich personen
bevinden die niet in staat zijn om de kamer
alleen te verlaten, tenzij zij onder voortdurend
toezicht staan.
• Stel de batterijen NOOIT bloot aan hoge
temperaturen of direct zonlicht. Gooi batterijen
NOOIT in open vuur. Explosiegevaar!
• Houd batterijen uit de buurt van kinderen.
Batterijen zijn geen speelgoed!
• Open de batterijen niet met kracht.
• Vermijd contact met metalen voorwerpen
(ringen, spijkers, schroeven, etc.) om gevaar
van kortsluiting te voorkomen!
• Door kortsluiting kunnen batterijen heet worden
of zelfs ontbranden. Dit kan brandwonden
veroorzaken.
• Voor uw veiligheid moeten de contactpunten
tijdens vervoer met plakstrips worden afgedekt.
• Raak een gescheurde en/of lekkende batterij
niet aan! Spoel als de vloeistof uit de batterij in
uw ogen komt uw ogen dan zo snel mogelijk uit
met schoon water en wrijf niet in uw ogen. Ga
onmiddellijk naar het ziekenhuis. Als dit niet
wordt behandeld, kan dit oogproblemen
veroorzaken.
BESCHRIJVING VAN ONDERDELEN
1. Heater
2. Display
3. Afstandsbediening
VOOR HET EERSTE GEBRUIK
• Gebruik pluggen en schroeven om het apparaat te installeren.
• Installeer het apparaat niet in de buurt van gordijnen of andere licht
ontvlambare materialen.
• Boor twee gaten in de muur op 2meter hoogte vanaf de vloer.
• Zorg dat de afstand tussen de gaten 315mm bedraagt.
• De afstand tussen het product en het plafond (en de zijkant) moet
≥30cm bedragen.
• Houd de uiteinden van de schroeven10 mm uit de muur.
• Bevestig het apparaat aan de wand met behulp van de schroeven.
• Wanneer het product is geïnstalleerd, is de schroef uitgelijnd met gat 'A'
op het product. Na het ophangen moet het product naar de 'B' worden
verplaatst om te zorgen dat het stevig vast zit.
• Raadpleeg de installatieafbeelding.
• Plaats de stekker in het stopcontact.
• Opmerking: Het maximale gewicht is 4,1kg. De muur moet dit
gewicht kunnen dragen.
•
De huidige tijd instellen:
Wanneer u de heater voor het eerst opstart of nadat de stroom
onderbroken is geweest, moet u de huidige tijd instellen.
• Stel de dag van de week in op het led-display: 01 staat voor maandag,
02 voor dinsdag ... 07 voor zondag. Druk op de knop + of – om de
huidige dag te selecteren. Bevestig uw keuze met de knop OK.
• Als op het led-display '0H' verschijnt, stelt u de uren in, variërend van 0
tot 23uur. Druk op + of – om de uren aan te passen. Druk op de knop
OK om te bevestigen.
• Als op het led-display '00' verschijnt, stelt u de minuten, variërend van 0
tot 59minuten. Druk op + of – om de minuten aan te passen. Druk op de
knop OK om te bevestigen.
• Als u niet binnen 10 seconden na een aanpassing op de knop OK drukt,
wordt de instelling geannuleerd.
GEBRUIK
• Schakel de heater in door op de aan/uit-knop te drukken.
• De normale manier om het apparaat te bedienen, is met de
afstandsbediening.
• Als u de afstandsbediening niet kunt vinden of niet kunt gebruiken, is het
ook mogelijk om de heater handmatig in te schakelen met de kleine start/
stop-schakelaar onder de aan/uit-schakelaar. U kunt de heater op deze
manier alleen inschakelen in de hoge warmtestand. Druk nogmaals op
de schakelaar om de heater te stoppen.
• Nadat u de heater hebt uitgeschakeld, blijft de ventilator nog 30
seconden doordraaien.
Display
1. Ventilator
2. Lage warmtestand
3. Hoge warmtestand
4. Timer
5. Weektimer
6. Licht aan
7. Temperatuurdisplay
Afstandsbediening
1. Aan/uit-knop :
• Druk op deze knop om de heater in of uit te schakelen (na het
uitschakelen duurt het tot 30 seconden voordat de ventilator volledig is
uitgeschakeld)
2. Verwarming:
• Gebruik deze knop om te kiezen voor de lage of hoge warmtestand.
3. Detectie open raam
• De detectie van een open raam kan niet worden gestart wanneer de
heater in de ventilatorstand staat.
• Druk op de detectieknop voor een open raam om deze stand te starten
of stoppen.
• De temperatuurdetectie begint na 1 minuut.
• Gedurende 10 minuten in een cyclus wordt de temperatuur om de 5
minuten gedetecteerd.
• Als de temperatuur <8°C is dan de temperatuur van het controlepunt aan
het begin de detectie, begint het apparaat met verwarmen.
• Als de temperatuur >8°C is dan de temperatuur van het controlepunt aan
het begin de detectie, stopt het apparaat met verwarmen en schakelt
over op de stand-bystand.
• Wanneer de cyclus van 10 minuten is verstreken, stopt het apparaat met
verwarmen. Er klinkt 5 keer een alarm, de ventilator blijft nog 30
seconden draaien en vervolgens schakelt de heater over op de stand-
bystand.
• Druk nogmaals op de detectieknop voor een open raam om de volgende
cyclus te starten.
4. Timer
• Druk enkele keren op de timerknop om de timer als volgt in te stellen: 1
uur, 2 uur, 3 uur ... 8 uur.
• U kunt de timerfunctie niet gebruiken als de weektimer actief is.
5. Temperatuur instellen
• Druk op deze knop om de temperatuur in te stellen. Druk op de knop + of
– om de temperatuur aan te passen binnen een bereik van 18-45°C.
• Als de ingestelde temperatuur gelijk aan of lager is dan de
omgevingstemperatuur, stopt het apparaat met verwarmen.
• Als de ingestelde temperatuur 1-2°C hoger is dan de
omgevingstemperatuur, start het apparaat de lage warmtestand.
• Als de ingestelde temperatuur 3°C of meer hoger is de
omgevingstemperatuur, start het apparaat de hoge warmtestand.
• Druk op de knop OK om de instelmodus voor de temperatuur te
voltooien.
6. OK
• Gebruik deze knop om acties te bevestigen.
7. Weektimer
• Druk op de knop voor de weektimer om deze functie te activeren.
• Op het led-display verschijnt 'P1'. Druk nogmaals op de knop om naar de
instelling 'P2' te gaan, nogmaals voor 'P3', en zo door tot 'P6'. Als u 7
keer op de weektimer drukt, annuleert u deze functie.
• Wanneer de gewenste P-stand wordt weergegeven, drukt u op de knop
OK om uw keuze te bevestigen.
• Raadpleeg de onderstaande tabel voor informatie over de verschillende
instellingen voor de P-stand:


Diskutieren Sie über dieses Produkt mit
Hier können Sie uns Ihre Meinung zu Tristar KA-5070 Heizgerät mitteilen. Wenn Sie eine Frage haben, lesen Sie zunächst das Bedienungsanleitung sorgfältig durch. Die Anforderung eines Bedienungsanleitung kann über unser Kontaktformular erfolgen.
Antworten | Das war hilfreich (1) (Übersetzt von Google)
Antworten | Das war hilfreich (0) (Übersetzt von Google)