Bedienungsanleitung Rockford Fosgate P500-4 Autoverstärker

Benötigen Sie ein Bedienungsanleitung für Ihren Rockford Fosgate P500-4 Autoverstärker? Unten können Sie das PDF-Bedienungsanleitung kostenlos auf Deutsch ansehen und herunterladen. Für dieses Produkt gibt es derzeit 0 häufig gestellte Fragen, 0 Kommentare und 0 Stimmen. Wenn dies nicht das von Ihnen gewünschte Bedienungsanleitung ist, kontaktieren Sie uns bitte.

Ist Ihr Produkt defekt und bietet die Bedienungsanleitung keine Lösung? Gehen Sie zu einem Repair Café, wo es gratis repariert wird.

Bedienungsanleitung

Loading…
6
INSTALLATION
Passenger Compartment Mounting
Mounting the amplifier in the passenger compartment will work as long as you provide a sufficient amount
of air for the amplifier to cool itself. If you are going to mount the amplifier under the seat of the vehicle,
you must have at least 1" (2.54cm) of air gap around the amplifier's heatsink.
Mounting the amplifier with less than 1" (2.54cm) of air gap around the amplifier's heatsink in the
passenger compartment will not provide proper cooling and will severely affect the performance of the
amplifier and is strongly not recommended.
BATTERY AND CHARGING
Amplifiers will put an increased load on the vehicle's battery and charging system.We recommend
checking your alternator and battery condition to ensure that the electrical system has enough capacity to
handle the increased load of your stereo system. Stock electrical systems which are in good condition
should be able to handle the extra load of any Punch Series amplifier without problems, although battery
and alternator life can be reduced slightly.To maximize the performance of your amplifier, we suggest the
use of a heavy duty battery and an energy storage capacitor.
WIRING THE SYSTEM
CAUTION:If you do not feel comfortable with wiring your new unit, please see your
local Authorized Rockford Fosgate Dealer for installation.
CAUTION:Before installation, disconnect the battery negative (-) terminal to prevent
damage to the unit, fire and/or possible injury.
CAUTION:Avoid running power wires near the low level input cables, antenna, power
leads, sensitive equipment or harnesses.The power wires carry substantial
current and could induce noise into the audio system.
1. Plan the wire routing. Keep RCA cables close together but isolated from the amplifier's power cables
and any high power auto accessories, especially electric motors.This is done to prevent coupling the
noise from radiated electrical fields into the audio signal.When feeding the wires through the firewall
or any metal barrier, protect them with plastic or rubber grommets to prevent short circuits. Leave
the wires long at this point to adjust for a precise fit at a later time.
NOTE:We recommend a 4 AWG wire for use on the power (B+) and ground (GND) connections.
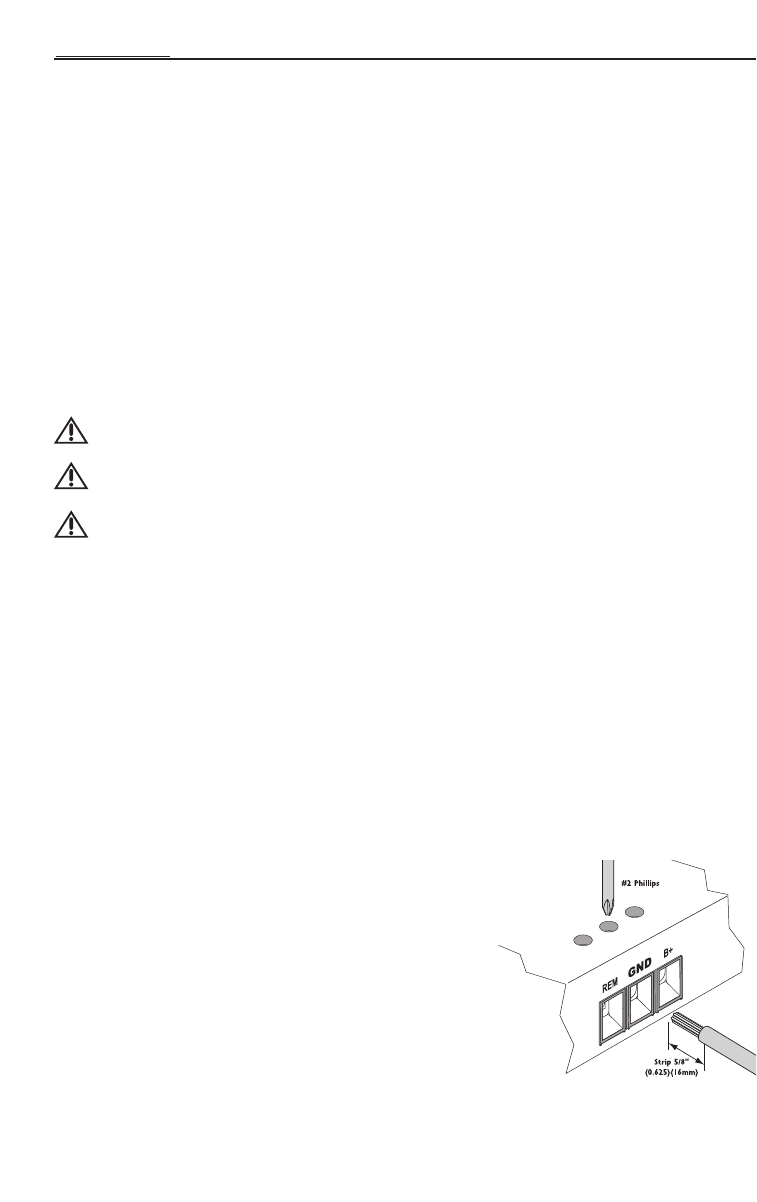
2. Prepare the RED wire (power cable) for attachment to the amplifier by stripping 5/8" of insulation
from the end of the wire. Insert the bared wire into the B+ terminal and tighten the set screw to
secure the cable in place.
NOTE:The B+ cable MUST be fused 18" or less from the vehicle's battery. Install the fuseholder under
the hood and ensure connections are water tight.
3. Trim the RED wire (power cable) within 18" of the battery and splice in a inline fuse holder (not
supplied). See Specifications for the rating of the fuse to be used.
DO NOT install the fuse at
this time.
4. Strip 1/2" from the battery end of the power cable and
crimp a large ring terminal to the cable. Use the ring terminal
to connect to the battery positive terminal.
5. Prepare the BLACK wire (Ground cable) for attachment to
the amplifier by stripping 5/8" of insulation from the end of
the wire. Insert the bare wire into the GROUND terminal
and tighten the set screw to secure the cable in place.
Pr
epar
e the chassis gr
ound b
y scraping any paint from the
metal surface and thor
oughl
y clean the ar
ea of all dir
t and
gr
ease
.
Strip the other end of the wir
e and attach a ring
connector
.
Fasten the cable to the chassis using a
non-anodized scr
e
w and a star washer
.
NOTE:Keep the length of the BLACK wire (Ground) as short as
possible
.
Always less than 30"(76.2cm).
Download Bedienungsanleitung auf Deutsch (PDF, 3.84 MB)
(Denken Sie an die Umwelt und drucken Sie diese Bedienungsanleitung nur aus, wenn es unbedingt nötig ist)

Loading…

Bewertung

Teilen Sie uns mit, was Sie über die Rockford Fosgate P500-4 Autoverstärker denken, indem Sie eine Produktbewertung verfassen. Möchten Sie Ihre Erfahrungen mit diesem Produkt teilen oder eine Frage stellen? Hinterlassen Sie einen Kommentar am Ende dieser Seite!
Sind Sie mit Rockford Fosgate P500-4 Autoverstärker zufrieden?
Ja Nein
Seien Sie die erste Person, die dieses Produkt bewertet
0 Bewertungen

Diskutieren Sie über dieses Produkt mit

Hier können Sie uns Ihre Meinung zu Rockford Fosgate P500-4 Autoverstärker mitteilen. Wenn Sie eine Frage haben, lesen Sie zunächst das Bedienungsanleitung sorgfältig durch. Die Anforderung eines Bedienungsanleitung kann über unser Kontaktformular erfolgen.

Mehr zu diesem Bedienungsanleitung

Wir verstehen, dass es schön ist, ein gedrucktes Bedienungsanleitung für Ihr Rockford Fosgate P500-4 Autoverstärker zu haben. Sie können das Bedienungsanleitung jederzeit von unserer Website herunterladen und selbst ausdrucken. Wenn Sie ein Originalhandbuch wünschen, empfehlen wir Ihnen, Rockford Fosgate zu kontaktieren. Möglicherweise können sie ein Originalhandbuch bereitstellen. Suchen Sie das Bedienungsanleitung Ihres Rockford Fosgate P500-4 Autoverstärker in einer anderen Sprache? Wählen Sie auf unserer Homepage Ihre bevorzugte Sprache und suchen Sie nach der Modellnummer, um zu sehen, ob wir sie verfügbar haben.

Spezifikationen

Marke Rockford Fosgate
Modell P500-4
Kategorie Autoverstärker
Dateityp PDF
Dateigröße 3.84 MB

Alle Anleitungen für Rockford Fosgate Autoverstärker
Weitere Anleitungen von Autoverstärker

Bedienungsanleitung Rockford Fosgate P500-4 Autoverstärker

Verwandte Produkte

Verwandte Kategorien

×
Download