Two terms are essential to understand the tech-
nology of com passes: decli na tion and inclina-
tion. Magnetic lines do not neces sary point to
geographical North. The angle be tween these
two directions is called the decli nation
[
1
]
. It
varies locally and over time between one country
and another. With certain models, the appropriate
correction can be set per manently, with simpler
models, this has to be calculated or taken into
account on the xed declination scale.
Declination correction
[
2
]
The adjusting screw is placed on the reverse
side of the capsule. By turning this screw, the
north markings (magnetic north) can be adjusted
to compensate for declination changes against
the dial scale and true north with the aid of a
special index.
Example: Declination 20° W:
Increase in azimuth of 20°.
Declination 20° E:
Decrease in azimuth of 20°.
Fixed declination scale
[
3
]
When working in terrain, if the declination is
different from zero, instead of being aligned
between the N marks, the needle must point to
the current declination on the xed declination
scale.
The ver tical intensity of the magnetic eld, known
as inclination, is not the same every where and
this inuences the horizontal posi tion of the nee-
dle.
[
4a
]
However, RECTA compasses with the Global
System function at all latitudes wit h out it being
ne cessary to exchange the capsules.
[
4b
]
Direction of travel (azimuth/bearing)
[
5
]
The bearing is the angle between true north and
the line of travel. It can be read off on the index.
Sighting with the mirror
[
5
]
The positioning of the mirror on the RECTA com-
pass offers you the advantage of accurate, un-
complicated sighting of the line of travel while ob-
serving the compass capsule. By turning yourself
with the compass in sighting position the needle
must be made to settle with the red end between
the parallel north markings on the capsule.
For approximate general sighting the com-
pass is held at waist level and the needle ob-
served from above.
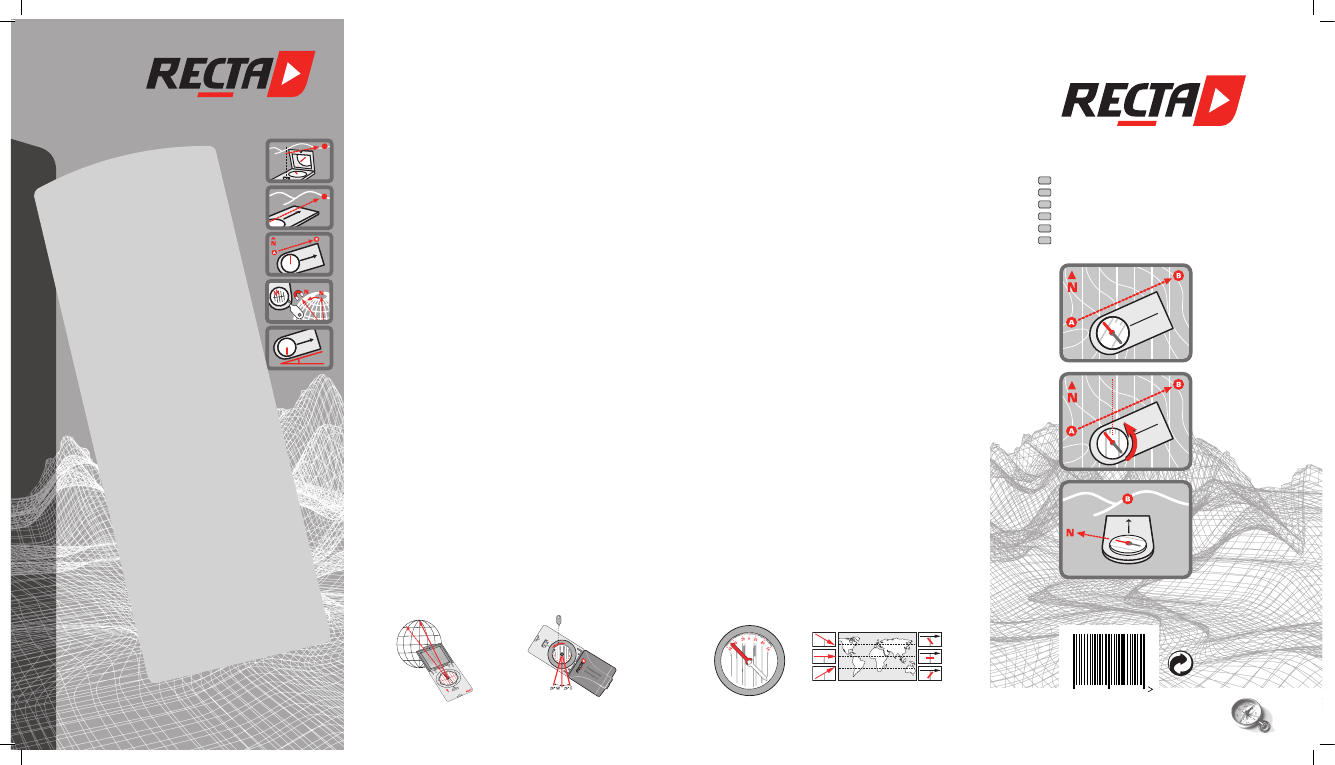
Working in terrain
A Orienting the map
[
6
]
a) Adjust bearing to N = 0°.
b) Lay the compass pointing north along the N-S
grid lines on the map.
c) Turn the map and compass until the N point
of the needle comes to rest between the N
marks.
Important: On maps with no N-S grid lines, these
should be drawn in every 1 1/2“ (3-4 cm).
B Determining the direction of travel on the
map
[
7
]
a
Place the compass with one of the long edges
on the line con necting position A with the target
position B. The front end of the compass should
be pointing towards position A.
b) Turn the compass capsule until the N-S line on
the dial is parallel to the N-S grid lines of the
map.
c) If you then hold the compass and turn around
until the red tip of the needle is located between
the N marks of the capsule, the direction poin-
ter will indicate the desired direction of travel.
Choose prominent landmarks along the line of
travel.
C Sighting a visible point of the terrain
[
8
]
a) Take a bearing on the desired point and adjust
the angle by turning the dial so that the north
markings on the dial are over the north end of
the needle.
b) Mark your own position on the map.
c) Place the compass on the map with the front
face on your position. Rotate the compass until
the N-S line on the dial is parallel to the N-S grid
lines of the map.
d) The point to be xed is now on the line formed
by the long edge of the compass.
D Locating your own position
[
9
]
a) Take bearings on an identiable point in the
terrain and adjust the angle of the dial.
b) Place the long edge of the compass on the
landmark and turn until the N-S line on the dial
is parallel to the N-S grid lines of the map.
c) Draw a line from the sighted point towards the
front of the compass and parallel to the long
edge.
d) Sight a second point and repeat processes
a-c.
e) The intersection of the two lines gives the de-
sired position (the closer the angle be tween
the intersecting lines is to 90°; the greater the
accuracy with which the position can be deter-
mined).
Clinometer: measure of inclines
Lateral measurement
[
10
]
– Adjust bearing to E or W
– Place the compass across line of vision on
line of inclination or take a sighting on line of
inclination over the edge of the com pass
– Read off angle of inclination on red scale di-
rectly
Longitudinal measurement
[
11
]
– Hold compass sideways and tilt verti cally; take
sighting of desired point over upper edge
– Read off angle of inclination in the mirror on red
scale
Attention:
Metal objects or power-lines in your vicinity can
deviate the com pass needle. Strong mag ne tic
elds can in some circumstances even reverse
the polarity. Therefore it is advise able to check
your compass perio di cally. Small bubbles in
the liquid are of no im portance. They may appear
and disappear with changes of tem perature and
air pressure.
Recta disclaims all responsibility for wrong
utilization of its products.
The manufacturer warranty for RECTA com-
passes lasts for 5 years.
Zwei Begriffe sind für das Verständnis
der Kompass-Technologie unentbehrlich:
Deklination und Inklination. Die magnetische
Nordrichtung stimmt oft nicht mit der geogra-
phischen Nordrichtung überein. Der Winkel
zwischen diesen beiden Nordrichtungen wird
Deklination
[
1
]
genannt. Sie ist örtlich und zeit-
lich, von einem Land zum andern verschieden.
Bei bestimmten Modellen kann die entspre-
chende Korrektur fest eingestellt werden; bei
einfacheren Modellen muss sie berechnet oder
anhand der xen Deklinationsskala berück-
sichtigt werden.
Einstellen der Deklination [2]
Die Korrekturschraube befindet sich auf der
Rückseite der Kapsel. Durch Drehen dieser
Stellschraube werden die Nord-marken mit
besonderem Index (magnetisch Nord) gegen-
über der Skala und dem Nordnetz (geografisch
Nord) um den Wert der Deklination verstellt.
Beispiel: 20° W Deklination:
Vergrösserung des Azimutes um 20°.
20° E Deklination:
Verkleinerung des Azimutes um 20°.
Fixe Deklinationsskala [3]
Beim Arbeiten im Gelände, wenn der
Deklinationswert anders als Null ist, muss sich
die Nadel nicht zwischen den Nordmarken der
Kapsel befinden sondern auf dem entsprechen-
den Wert der fixen Deklinationsskala.
Auch die vertikale Intensität des Magnetfeldes,
Inklination genannt, ist nicht überall gleich, was
die Horizontallage der Nadel beeinflusst. [4a]
Im Gegensatz zu herkömmlichen Kompassen
funktionieren die RECTA Kompasse mit dem
Global System über alle Breitengrade hinweg
ohne Tausch der Kapsel. [4b]
Richtungswinkel (Azimut, arschrichtungs-
zahl) [5]
Der Richtungswinkel ist der Winkel zwischen
geografisch Norden und der Marschrichtung.
Visieren mit Hilfe des Spiegels [5]
Der Spiegel am RECTA Kompass bietet Ihnen
den Vorteil eines genauen und übersichtlichen
Peilens der Marschrichtung und die gleichzei-
tige Beobachtung der Kompasskapsel. Durch
Drehen um die eigene Achse muss sich die rote
N-Spitze der Nadel zwischen den Nordmarken
der Kapsel einpendeln.
Für eine grobe Richtungsbestimmung «aus
dem Handgelenk»
hält man den Kompass nur
auf Gürtelhöhe und beobachtet von oben das
Einschwingen der Nadel.
Arbeiten im Gelände
A Orientieren der Karte [6]
a) Richtungswinkel N = 0° einstellen.
b) Den Kompass in Nordrichtung längs des
N-S-Rasternetzes auf die Karte legen.
c) Karte mit Kompass drehen, bis N-Spitze der
Nadel zwischen den Nordmarken liegt.
Wichtig: Auf Karten ohne N-S-Rasternetz sind
N-S-Linien im Abstand von 3 bis 4 cm einzu-
zeichnen.
B Bestimmen der Marschrichtung auf der
Karte [7]
a) Den Kompass mit einer Längsseite auf die
Verbindungslinie zwischen Standort A und
Bestimmungspunkt B auf die Karte legen.
Vorderseite dem Standort zugekehrt.
b)
Kompasskapsel drehen, bis die N-S-Striche
der Kapsel parallel
zum N-S-Rasternetz der
Karte liegen.
c) Wenn Sie jetzt den Kompass zur Hand neh-
men und sich selbst drehen, bis das rote
Ende der Nadel zwischen den Nordmarken
der Kapsel steht, zeigt der Richtungspfeil in
Zielrichtung. Markante Geländepunkte in der
Marschrichtung wählen.
C Bestimmen eines im Gelände sichtbaren
Punktes [8]
a) Mit dem Kompass den zu bestimmenden
Punkt anvisieren und den Richtungswinkel
durch Drehen der Kompasskapsel einstellen
(Nordmarken der Kapsel über Norden der
Nadel stellen).
b) Auf der Karte den (eigenen) Standort ein-
zeichnen.
c) Kompass auf die Karte legen, Vorderkante an
den Standort-Punkt anlegen, Kompass um
den Standort drehen, bis die N-S-Linien der
Kapsel parallel zum N-S-Rasternetz der Karte
liegen.
d) Der zu bestimmende Punkt liegt nun in der
durch die Längs-seite des Kompasses gebil-
deten Linie.
D Bestimmen des eigenen Standortes [9]
a) Einen bekannten Punkt im Gelände anvisie-
ren und Richtungs-winkel einstellen.
b) Kompass auf Karte mit Längsseite an den
anvisierten Punkt legen und drehen, bis die
N-S-Linien der Kompasskapsel parallel zum
N-S-Rasternetz der Karte liegen.
c) Linie vom anvisierten Punkt ausgehend par-
allel zur Längsseite des Kompasses einzeich-
nen, Richtung Kompassfrontseite.
d) Einen zweiten Punkt anvisieren und die
Vorgänge a-c wiederholen.
e) Der Schnittpunkt der zwei Linien gibt den
gesuchten Standort an (je näher der Winkel
zwischen den zwei Linien bei 90° liegt, desto
genauer lässt sich der Standort ermitteln).
Gebrauch des Klinometers
Quermessung [10]
– Skalenring stellen auf E oder W.
– Kompass quer zur Blickrichtung auf geneig-
te Linie auflegen oder geneigte Linie über
Kompasskante anvisieren.
– Neigungswinkel: Marke auf roter Skala direkt
ablesen.
Neigungswinkelmessung längs [11]
– Kompass seitlich senkrecht halten und über
Oberkante gewünschten Punkt anvisieren.
– Neigungswinkel: Marke auf roter Skala im
Spiegel ablesen.
Achtung:
Metallische Gegenstände oder
Starkstromleitungen in der Nähe
können die
Kompassnadel fehlleiten. Starke Magnetfelder
bewirken unter Umständen sogar die Umkehrung
der Polarität.
Kontrollieren Sie deshalb regel-
mässig die Funktion Ihres
Kompasses. Kleine
Blasen in der Flüssigkeit sind ohne
Be-
deutung.
Sie entstehen und verschwinden durch
Veränderung von Luftdruck und Temperatur.
Die Recta lehnt jede Haftung ab bei fal-
scher Anwendung ihrer Produkte.
Die Hersteller-Garantie für
RECTA-Kompasse beträgt
5 Jahre.
[
1
]
[
2
]
E
D
e
c
l
.
W
D
e
c
l
.
[
3
]
[
4a
] [
4b
]
DS 50 Global System
1
2
3
www.recta.ch
F
GB
D
I
E
NL
DS 50 Global System
Mode d’emploi à l’intérieur
Operating instructions inside
Bedienungsanleitung inliegend
Instruzioni all’interno
Instrucciones en el interior de la caja
Handleiding ingesloten
6 417084 159755

Diskutieren Sie über dieses Produkt mit
Hier können Sie uns Ihre Meinung zu Recta DS 50 Global System Kompass mitteilen. Wenn Sie eine Frage haben, lesen Sie zunächst das Bedienungsanleitung sorgfältig durch. Die Anforderung eines Bedienungsanleitung kann über unser Kontaktformular erfolgen.