
Using the beard styler attachment with comb
You can use the beard styler with the comb
attached to style your beard at one xed setting,
but also at dierent length settings. You can also
use it to pre-trim any long hairs before shaving for
a more comfortable shave.
The hair length settings on the beard styler
attachment correspond to the remaining hair
length after cutting and range from 1 to 5mm.
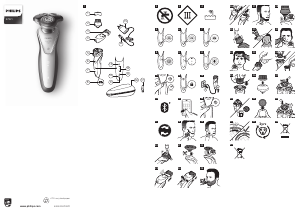
1 Attach the attachment to the appliance (‚click‘).
2 Slide the comb straight into the guiding grooves
on both sides of the beard styler (‘click’) (Fig. 22).
3 Press the length selector and then push it to
the left or right to select the desired hair length
setting (Fig. 23).
4 Switch on the shaver.
5 Move the appliance upwards while you exert
gentle pressure. Make sure the front of the
comb is in full contact with the skin (Fig. 24).
6 Clean the attachment after use (see ‚Cleaning
and maintenance‘).
Using the beard styler attachment
without comb
You can use the beard styler attachment without
the comb to contour your beard, moustache,
sideburns or neckline to a length of 0.5mm.
1 Pull the comb o the beard styler.
Note: Grab the comb in the center to pull it o
the beard styler. Do not pull at the sides of the
comb (Fig. 25).
2 Switch on the shaver.
3 Hold the beard styler attachment perpendicular
to the skin and move the appliance downwards
while you exert gentle pressure (Fig. Fig. 26).
4 Clean the attachment after use (see ‚Cleaning
and maintenance‘).
Using the cleansing brush attachment
Use the rotating cleansing brush with your daily
cleansing cream. The cleansing brush removes oil
and dirt, contributing to a healthy and oil-free skin.
1 Attach the attachment to the appliance (‚click‘)
(Fig. 27).
2 Moisten the attachment with water (Fig. 28).
Note: Do not use the appliance with a dry brush
head, as this can irritate the skin.
3 Moisten your face with water and apply a
cleanser to your face (Fig. 29).
4 Place the attachment on your cheek.
5 Switch on the shaver.
6 Gently move the brush across your skin from
the nose towards the ear (Fig. 30). Do not push
the attachment to hard onto the skin to make
sure the treatment remains comfortable.
7 After approx. 20 seconds, move the appliance
to your other cheek and start cleansing this part
of your face.
Note: Do not clean the sensitive area around
your eyes.
Shaving
Note: This appliance can only be used without cord.
Skin adaptation period
Your rst shaves may not bring you the result you
expect and your skin may even become slightly
irritated. This is normal. Your skin and beard need
time to adapt to any new shaving system.
We advise you to follow the advice provided by
the app and shave regularly (at least 3 times a
week) with this shaver for a period of 4 weeks to
allow your skin to adapt to the new shaver.
Dry shaving
1 Switch on the appliance.
2 Move the shaving heads over your skin in
circular movements to catch all hairs growing
in dierent directions (Fig. 17). Exert gentle
pressure for a close, comfortable shave.
Note: Do not press too hard, this can cause skin
irritation.
3 Clean the appliance after use.
Wet shaving
For a more comfortable shave, you can also use
this appliance on a wet face with shaving foam or
shaving gel.
To shave with shaving foam or shaving gel, follow
the steps below:
1 Apply some water to your skin.
2 Apply shaving foam or shaving gel to your skin
(Fig. 18).
3 Rinse the shaving unit under the tap to ensure
that the shaving unit glides smoothly over your
skin (Fig. 19).
4 Switch on the shaver.
5 Move the shaving heads over your skin in
circular movements to catch all hairs growing
in dierent directions (Fig. 17). Exert gentle
pressure for a close, comfortable shave.
Note: Do not press too hard, this can cause skin
irritation.
Note: Rinse the shaving unit regularly to ensure
that it continues to glide smoothly over your skin.
6 Dry your face
7 Clean the appliance after use.
Note: Make sure you rinse all foam or shaving
gel o the appliance.
Using the click-on attachments
Removing or attaching the click-on
attachments
1 Make sure that the shaver is switched o.
2
Pull the attachment straight o the handle (Fig.
20).
Note: Do not twist the attachment while you
pull it o the handle.
3 Insert the lug of the attachment into the slot in
the top of the handle (Fig. 21). Then press down
the attachment to attach it to the handle (‘click’).
3 Open the app on the smartphone (Fig. 14).
4 Switch on the shaver.
5 In the app a pop up message will appear; press
‚pair‘.
6 When paired, the shaver and app will connect
automatically when you open the app and hold
the smartphone and shaver close to each other.
Unpairing your appliance and
smartphone
Pairing allows a connection between 1 appliance
and 1 smartphone. To remove this connection (e.g.
when you have a new smartphone), follow the steps
below:
1 Remove pairing from the app: open the app ->
Go to the menu in the app -> Select ‚prole‘
and press ‚Remove pairing from app‘.
1 Unpair the appliance: press and hold the on/o
button on the handle for approx. 10 seconds to
remove the bond between appliance and app.
Note: The unpairing of the appliance is
successful when the Bluetooth® and notication
symbol ash simultaneously (approx. 4
seconds).
2 Unpair your phone: choose Settings -> General
-> Bluetooth® -> Select the device by pressing
(i) -> and press ‚forget device‘.
Using the shaver
Note: This appliance can only be used without cord.
Switching the shaver on and o
1 To switch on the shaver, press the on/o button
once (Fig. 15).
2 To switch o the shaver, press the on/o button
once.
Connect with the shaver
1 Make sure Bluetooth® on the smartphone is
switched on.
2 Open the app on the smartphone (Fig. 14).
3 When paired, the shaver and the app will connect
automatically. You can now start shaving.
Note: Make sure you have a good Bluetooth®
and Internet connection to fully benet from
the app.
4 Synchronize your shaves (see ‚Synchronise
your shaves‘) and set your sensitive shave
settings.
5 Keep the smartphone and shaver close to each
other in order to stay connected.
Synchronise your shaves
In order to get smart advice based your routine,
you need to synchronise your shaves. The shaver
can store up to 17 shaves, so make sure to connect
as often as possible, at least once every 2 weeks.
1 Make sure you are close to the shaver and open
the app.
2 The app will connect automatically and
synchronises your last shaves (Fig. 16).
Sensitive shave settings
The shaver has a feature that allows you to
personalise your settings (Fig. 8). You can choose
between three settings depending on your
personal shaving needs: extra sensitive (xs),
sensitive (s) and normal (n). Select your preferred
setting ‚xs‘, ‚s‘ or ‚n‘ in the app to activate it on your
shaver.
Bluetooth® Smart
The shaver is equipped with Bluetooth®® 4.1 to
connect your shaver to the app (Fig. 9). Bluetooth®
is automatically activated when you switch on the
shaver for the rst time. You can only deactivate it
by switching on the travel lock (see ‚Travel lock‘).
Note: Make sure your smartphone is equipped with
Bluetooth® 4.1 or higher.
Travel lock
You can lock the appliance when you are going to
travel. The travel lock prevents the appliance from
being switched on by accident. The travel lock also
deactivates Bluetooth®.
Activating the travel lock
1 Press the on/o button for 3 seconds to enter
the travel lock mode (Fig. 10).
While you activate the travel lock, the travel
lock symbol ashes (Fig. 11). When the travel
lock is activated, the travel lock symbol lights up
continuously.
When travel lock is activated, Bluetooth® is
deactivated.
Deactivating the travel lock
1 Press the on/o button for 3 seconds.
The travel lock symbol ashes and then goes out.
The shaver is now ready for use and Bluetooth® is
activated again.
Charging
Charging takes approx. 1 hour.
Charge the appliance before rst use and when the
display indicates that the battery is almost empty.
Charging with the supply unit
1 Make sure the appliance is switched o.
2 Insert the small plug into the shaver and put the
supply unit in the wall socket (Fig. 12).
3
After charging, remove the supply unit from the
wall socket and pull the small plug out of the
shaver.
Preparing for use
Pair the shaver and smartphone
The Smart Shaver app is compatible with a wide range
of iPhone and Android™ devices. More information is
available at: www.philips.com/smartshaver.
1 Download the Smart Shaver app from the app
store.
2 Make sure Bluetooth® on the smartphone is
switched on (Fig. 13).




Diskutieren Sie über dieses Produkt mit
Hier können Sie uns Ihre Meinung zu Philips S7921 Rasierer mitteilen. Wenn Sie eine Frage haben, lesen Sie zunächst das Bedienungsanleitung sorgfältig durch. Die Anforderung eines Bedienungsanleitung kann über unser Kontaktformular erfolgen.