Bedienungsanleitung Philips GC3640 Bügeleisen

Benötigen Sie ein Bedienungsanleitung für Ihren Philips GC3640 Bügeleisen? Unten können Sie das PDF-Bedienungsanleitung kostenlos auf Deutsch ansehen und herunterladen. Für dieses Produkt gibt es derzeit 5 häufig gestellte Fragen, 0 Kommentare und 0 Stimmen. Wenn dies nicht das von Ihnen gewünschte Bedienungsanleitung ist, kontaktieren Sie uns bitte.

Ist Ihr Produkt defekt und bietet die Bedienungsanleitung keine Lösung? Gehen Sie zu einem Repair Café, wo es gratis repariert wird.

Bedienungsanleitung

Loading…

Note: If the temperature light does not go on after you move the iron, the
soleplate still has the right temperature and the iron is ready for use.
Cleaning and maintenance
Cleaning
1 Set the steam control to position 0, remove the mains plug from the
wall socket and let the iron cool down.
2 Wipeakesandanyotherdepositsoffthesoleplatewithadamp
cloth and a non-abrasive (liquid) cleaning agent.
To keep the soleplate smooth, avoid hard contact with metal objects.
Never use a scouring pad, vinegar or other chemicals to clean the
soleplate.
3 Clean the upper part of the iron with a damp cloth.
4 Regularly rinse the water tank with water. Empty the water tank after
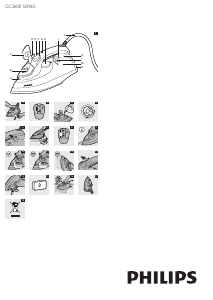
you have rinsed it (Fig. 14).
Double-Active Calc System
The Double-Active Calc System consists of an Anti-Calc tablet inside the
water tank combined with the Calc-Clean function.
1 The Anti-Calc tablet prevents scale from clogging the steam vents. This
tablet is constantly active and does not need to be replaced (Fig. 15).
2 The Calc-Clean function removes the scale particles from the iron.
Calc-Clean function
Use the Calc-Clean function once every two weeks. If the water in your
area is very hard (i.e. when akes come out of the soleplate during ironing),
use the Calc-Clean function more frequently.
1 Set the steam control to position 0 and remove the mains plug from
the wall socket.
2 Fill the water tank to the maximum level.
Do not pour vinegar or other descaling agents in the water tank.
3 Set the temperature dial to MAX.
4 Put the mains plug in an earthed wall socket.
5 Unplug the iron when the temperature light goes out.
6 Hold the iron over the sink. Push the steam control to the CALC
CLEAN position and hold it. Gently shake the iron to and fro (Fig. 16).
, Steam and boiling water come out of the soleplate. Impurities and
akes(ifany)areushedout.
7 Release the steam control as soon as all the water in the tank has
been used up.
8 Repeat the Calc-Clean process if the iron still contains a lot of
impurities.
After the Calc-Clean process
1 Put the plug back into the wall socket and let the iron heat up to let
the soleplate dry.
2 Unplug the iron when the temperature light goes out.
3 Move the iron gently over a piece of used cloth to remove any water
stains that may have formed on the soleplate.
4 Let the iron cool down before you store it.
Storage
1 Set the steam control to position 0, remove the mains plug from the
wall socket and let the iron cool down.
2 Wind the mains cord round the cord storage facility (Fig. 17).
Note: Make sure that the mains cord does not press down the handle during
storage.
3 Store the iron on its heel in a safe and dry place.
Environment
- Do not throw away the appliance with the normal household waste
at the end of its life, but hand it in at an ofcial collection point for
recycling. By doing this, you help to preserve the environment (Fig. 18).
Guarantee & service
If you need service or information or if you have a problem, please visit
the Philips website at www.philips.com or contact the Philips Consumer
Care Centre in your country (you nd its phone number in the worldwide
the handle to remove stubborn creases, the iron automatically produces
more steam.
- When you do not press the handle, when you lift the iron and
when the iron is standing on its heel or on its soleplate without any
movement, the automatic energy-saving technology limits the steam
output to reduce energy consumption (Fig. 7).
Steam ironing
1 Make sure that there is enough water in the water tank.
2 Settherecommendedironingtemperature(seechapter‘Preparing
foruse’,table‘Temperatureandsteamsettings’).
3 Set the appropriate steam setting. Make sure that the steam setting is
suitableforthesetironingtemperature(seechapter‘Preparingfor
use’,table‘Temperatureandsteamsettings’)(Fig.8).
Note: The iron is ready for steam ironing as soon as it has reached the
set ironing temperature.
Note: If the set ironing temperature is too low (MIN to 2), water may drip
from the soleplate (see chapter ‘Features’, section ‘Drip stop’).

1 Set the steam control to position 0 (= no steam) (Fig. 3).
2 Settherecommendedironingtemperature(seechapter‘Preparing
foruse’,table‘Temperatureandsteamsettings’).

Spray function
You can use the spray function to remove stubborn creases at any
temperature.
1 Make sure that there is enough water in the water tank.
2 Press the spray button several times to moisten the article to be
ironed (Fig. 9).
Steam boost
A powerful steam boost helps to remove very stubborn creases.
The steam boost function can only be used at temperature settings
between 3 and MAX.
1 Press and release the steam boost button (Fig. 10).
Concentrated steam boost from the special Steam Tip

The concentrated steam boost from the long vents in the Steam
Tip enhances the distribution of steam into every part of your garment.
The concentrated steam boost function can only be used at temperature
settings between 3 and MAX.
1 Press and release the steam boost button (Fig. 11).
Vertical steam boost
You can also use the steam boost function when you hold the iron in
vertical position. This is useful for removing creases from hanging clothes,
curtains etc.
1 Hold the iron in vertical position and press and release the steam
boost button (Fig. 12).
Never direct the steam at people.
Drip stop
This iron is equipped with a drip-stop function: the iron automatically stops
producing steam when the temperature is too low, to prevent water from
dripping out of the soleplate. When this happens, you may hear a sound.

The automatic shut-off function automatically switches off the iron if it has
not been moved for a while.
, Theredauto-offlightashestoindicatethattheironhasbeen
switched off by the automatic shut-off function (Fig. 13).
To let the iron heat up again:
1 Pick up the iron or move it slightly
, The red auto-off light goes out.
, If the temperature of the soleplate has dropped below the set ironing
temperature, the temperature light goes on.
2 If the temperature light goes on after you have moved the iron, wait
for it to go out before you start ironing.
3
4239.000.7180.2
Download Bedienungsanleitung auf Deutsch (PDF, 1.1 MB)
(Denken Sie an die Umwelt und drucken Sie diese Bedienungsanleitung nur aus, wenn es unbedingt nötig ist)

Loading…

Bewertung

Teilen Sie uns mit, was Sie über die Philips GC3640 Bügeleisen denken, indem Sie eine Produktbewertung verfassen. Möchten Sie Ihre Erfahrungen mit diesem Produkt teilen oder eine Frage stellen? Hinterlassen Sie einen Kommentar am Ende dieser Seite!
Sind Sie mit Philips GC3640 Bügeleisen zufrieden?
Ja Nein
Seien Sie die erste Person, die dieses Produkt bewertet
0 Bewertungen

Diskutieren Sie über dieses Produkt mit

Hier können Sie uns Ihre Meinung zu Philips GC3640 Bügeleisen mitteilen. Wenn Sie eine Frage haben, lesen Sie zunächst das Bedienungsanleitung sorgfältig durch. Die Anforderung eines Bedienungsanleitung kann über unser Kontaktformular erfolgen.

Mehr zu diesem Bedienungsanleitung

Wir verstehen, dass es schön ist, ein gedrucktes Bedienungsanleitung für Ihr Philips GC3640 Bügeleisen zu haben. Sie können das Bedienungsanleitung jederzeit von unserer Website herunterladen und selbst ausdrucken. Wenn Sie ein Originalhandbuch wünschen, empfehlen wir Ihnen, Philips zu kontaktieren. Möglicherweise können sie ein Originalhandbuch bereitstellen. Suchen Sie das Bedienungsanleitung Ihres Philips GC3640 Bügeleisen in einer anderen Sprache? Wählen Sie auf unserer Homepage Ihre bevorzugte Sprache und suchen Sie nach der Modellnummer, um zu sehen, ob wir sie verfügbar haben.

Spezifikationen

Marke Philips
Modell GC3640
Kategorie Bügeleisen
Dateityp PDF
Dateigröße 1.1 MB

Alle Anleitungen für Philips Bügeleisen
Weitere Anleitungen von Bügeleisen

Häufig gestellte Fragen zu Philips GC3640 Bügeleisen

Unser Support-Team sucht nach nützlichen Produktinformationen und beantwortet Ihre häufig gestellten Fragen. Sollte Ihnen ein Fehler bei den häufig gestellten Fragen auffallen, teilen Sie uns dies bitte anhand unseres Kontaktformulars mit.

Kann ich die Unterseite meines Bügeleisens mit einem Scheuerlappen reinigen? Verifiziert

Nein, dies könnte die Unterseite beschädigen. Verwenden Sie ein feuchtes Tuch oder einen weichen Schwamm zur Reinigung.

Das war hilfreich (365) Mehr lesen

Worin besteht der Unterschied zwischen einem Dampfbügeleisen und einem herkömmlichen Bügeleisen? Verifiziert

Der größte Vorteil eines Dampfbügeleisens ist, dass es Falten durch die Verwendung von Dampf leichter beseitigt. Ein reguläres Bügeleisen ist hingegen viel leichter und oft billiger.

Das war hilfreich (297) Mehr lesen

Die Sohle meines Bügeleisens ist verfärbt. Kann ich noch damit bügeln? Verifiziert

Ja, aber es könnte sein, dass das Bügeleisen auf helle Kleidungsstücke abfärbt.

Das war hilfreich (246) Mehr lesen

Kann ich über Knöpfe bügeln? Verifiziert

Nein, dies beschädigt die Bügeleisensohle, wodurch das Bügeleisen nicht mehr richtig funktioniert. Bügeln Sie niemals über Knöpfe, Reißverschlüsse oder andere harte Objekte.

Das war hilfreich (169) Mehr lesen

Der Boden von meinem Philips-Bügeleisen hat ein paar Kratzer, kann ich es immer noch verwenden? Verifiziert

Ja, das ist kein Problem. Der Boden besteht aus mehreren Lagen, dadurch stellen kleinere Kratzer kein Problem dar. Das Bügeleisen sollte immer noch ordnungsgemäß funktionieren.

Das war hilfreich (50) Mehr lesen
Bedienungsanleitung Philips GC3640 Bügeleisen

Verwandte Produkte

Verwandte Kategorien