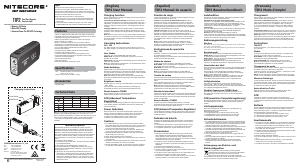
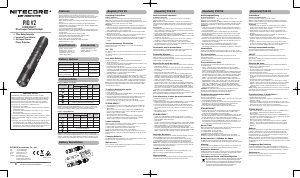
NU43
• 1,400 Lumens Max Output
• White Light + Red Light
• Built-in 3,400mAh 18650 Li-ion Battery
Features
Specifications
Technical Data
Accessories
Power Indication
Charging Function
Power Button / Mode Button
Sensor Protection Function
Warranty Service
All NITECORE
®
products are
warranted for quality. Any DOA /
defective product can be exchanged
for a replacement through a local
distributor/dealer within 15 days of
purchase. After that, all defective /
malfunctioning NITECORE
®
products
can be repaired free of charge
within 24 months from the date of
purchase. Beyond 24 months, a
limited warranty applies, covering
the cost of labor and maintenance,
but not the cost of accessories or
replacement parts.
The warranty will be nullied if
1. the product(s) is/are broken
down, reconstructed and/or
modied by unauthorized parties;
2. the product(s) is/are damaged
due to improper use.
For the latest information on
NITECORE
®
products and services,
please contact a local NITECORE
®
distributor or send an email to
※ All images, texts and statements
specied herein this user manual
are for reference purposes
only. Should any discrepancy
occur between this manual and
information specied on www.
nitecore.com, Sysmax Innovations
Co., Ltd. reserves the rights to
interpret and amend the content
of this document at any time
without prior notice.
SYSMAX Innovations Co., Ltd.
TEL: +86-20-83862000
FAX: +86-20-83882723
Web: www.nitecore.com
Address: Unit 6355, 5/F, No. 1021 Gaopu Road, Tianhe District, Guangzhou, 510653, Guangdong, China
Please nd us on facebook : NITECORE Flashlight
Made in China
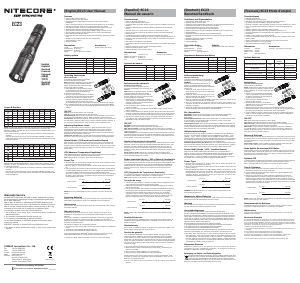
NU11114322
• High performance lightweight USB-C
rechargeable headlamp
• Max output of 1,400 lumens
• Red light illumination designed for
protecting the night vision
• Utilizes a unibody optical lens system
with various facets for reecting a
uniform and soft light
• Built-in 3,400mAh Li-ion battery
• Built-in intelligent Li-ion battery
charging circuit with a USB-C charging
port (5V⎓2A)
• Designed with two buttons dierent in
shape and touch, oering easy one-
handed operation
• 5 brightness levels, 2 light sources, and
3 special modes available
• Designed with 4 power indicators to
indicate the remaining battery power
• Made from durable PC material with an
aluminum alloy front housing
• Compact and lightweight
• Impact resistant to 2 meters
• Waterproof and dustproof rating in
accordance with IP68
USB-C Charging Cable, Headband
Dimensions:
79.8mm x 46.1mm x 43.9mm
(3.14" x 1.81" x 1.73") (Bracket Included)
Weight:
116g (4.09 oz)
(Bracket and Headband Included)
94g (3.32 oz) (Bracket Included)
Status of
Indicators
Power Level
4 Constant-on Approx. 100%
3 Constant-on Approx. 75%
2 Constant-on Approx. 50%
1 Constant-on
Approx. 25% (Please
charge the product as
soon as possible)
(English) (Deutsch) (Francais)
Ladefunktion
Die NU43 ist mit einem intelligenten
Ladesystem ausgestattet. Bitte laden Sie die
Stirnlampe vor dem ersten Gebrauch auf.
Stromanschluss: Drehen Sie die USB-
Schutzabdeckung, wie abgebildet, im
Uhrzeigersinn und verbinden das USB-
Kabel mit einer externen Stromversorgung
(z. B. einen USB-Adapter, einen Computer
oder andere USB-Quellen) und den
Ladeanschluss, um den Ladevorgang
zu starten. Die Ladezeit beträgt ca. 2h
(aufgeladen über den 5V/2A-Adapter). Bei
voller Ladung beträgt die Standby-Zeit ca.
12 Monate.
Anzeige des Ladevorgangs: Während
des Ladevorgangs blinken 4 LEDs auf der
Unterseite. Wenn der Akku vollständig
aufgeladen ist, leuchten die 4 LEDs
dauerhaft.
Power Button / MODE Button
● Die Power-Taste dient zum Ein- und
Ausschalten des Lichts und zum
Einstellen der Helligkeit.
● Die MODE-Taste ist für das Umschalten
der Lichtquelle.
Ein/Aus
● Wenn das Licht ausgeschaltet ist,
halten Sie die Power-Taste 1 Sek lang
gedrückt, um auf „LOW“ zuzugreifen.
● Wenn das Licht eingeschaltet ist,
drücken Sie die Power-Taste oder
die MODE-Taste 1 Sek lang, um es
auszuschalten.
Weißes Licht
•
Wenn das Licht aus ist, drücken Sie die
Power-Taste 1 Sek lang, um auf „LOW“
zuzugreifen.
•
Wenn das Licht aus ist, drücken Sie
zweimal auf die Power-Taste, um auf
„ULTRALOW“ umzuschalten.
•
Wenn das Licht eingeschaltet ist,
drücken Sie kurz auf die Power-Taste, um
zwischen den folgenden Helligkeitsstufen
zu wechseln: „LOW“ – „MID“ – „HIGH“.
•
Wenn das Licht eingeschaltet ist, drücken
Sie zweimal auf den Power-Taste, um
zu „TURBO“ zu gelangen. Drücken Sie
erneut kurz auf die Power-Taste, um zum
vorherigen Status zurückzukehren, oder
Sie kehren automatisch in den vorherigen
Status zurück, wenn innerhalb von 30
Sekunden keine Bedienung erfolgt.
Rotes Licht
•
Wenn das Licht aus ist, halten Sie die
MODE-Taste 1 Sekunde lang gedrückt,
um das rote Licht einzuschalten.
•
Wenn das rote Licht an ist, drücken
Sie kurz die Power-Taste, um zwischen
„Dauerlicht“ und „langsames Blinken“
zu wechseln.
Umschalten der Lichtquellen
Wenn das Licht eingeschaltet ist, drücken
Sie kurz die MODE-Taste, um zwischen
weißem und rotem Licht zu wechseln.
Sondermodi (SOS / BEACON)
•
Wenn sich die lampe in einem
beliebigen Status bendet, drücken Sie
zweimal die MODE-Taste, um den SOS-
Mode aufzurufen.
•
Wenn einer der beiden Sondermodi
eingeschaltet ist, drücken Sie kurz auf
die Power-Taste, um zwischen „SOS“ und
„BEACON“ umzuschalten. Drücken Sie
erneut doppelt auf die MODE-Taste, um
zum vorherigen Status zurückzukehren.
Sperren/Entsperren
•
Halten Sie bei ausgeschaltetem
Scheinwerfer beide Tasten 2 Sekunden
lang gedrückt, bis die Lampe dreimal
blinkt, um den Zugri auf den Sperr-
Mode anzuzeigen. Im Sperr-Mode sind
keine Helligkeitsstufen oder Sondermodi
verfügbar, und die Leuchte blinkt einmal,
um diesen Status anzuzeigen, wenn eine
der beiden Tasten gedrückt wird.
•
Wenn Sie sich im Sperr-Mode benden,
halten Sie beide Tasten erneut 2
Sekunden lang gedrückt, bis der
ULTRALOW-Mode leuchtet, um den
Entsperrungsstatus anzuzeigen.
Hinweis: Der Scheinwerfer wird beim
Auaden im Sperr-Mode automatisch
entriegelt.
Stromanzeige
Wenn das Licht ausgeschaltet ist,
drücken Sie kurz die MODE-Taste. Die
entsprechenden LEDs an derUnterseite
leuchten auf und erlöschen nach 2
Sekunden.
Hinweis: Der Akku sollte aufgeladen
werden, wenn die Lichtleistung nachlässt
oder die Stirnlampe nicht mehr reagiert.
Sensorschutz-Funktion
Wenn der eingebaute optische Sensor
ein Hindernis vor sich erkennt, wird die
Helligkeit automatisch auf die Stufe „LOW“
(100 Lumen) reduziert. Der Scheinwerfer
kehrt zu seiner vorherigen Helligkeitsstufe
zurück, sobald das Hindernis beseitigt
ist. Die Empndlichkeit des Sensors kann
aufgrund der unterschiedlichen Farben und
Materialien der Hindernisse variieren.
HINWEIS: Diese Funktion ist nicht
verfügbar, wenn das rote Licht
eingeschaltet ist.
WARNUNG
1. VORSICHT! Gefährliche Strahlung
möglich! Nicht direkt in das Licht
schauen! Dies kann gefährlich für Ihre
Augen sein.
2. Bitte laden Sie das Produkt alle 3
Monate auf, wenn es längere Zeit nicht
benutzt wird.
3. Wenn das Produkt im Rucksack
aufbewahrt wird, aktivieren Sie bitte
den Sperr-Mode, um eine versehentliche
Aktivierung zu verhindern.
4. Zerlegen oder modizieren Sie den
Scheinwerfer NICHT, da dies zu
Schäden führt und die Produktgarantie
erlischt. Vollständige Informationen
zur Garantie nden Sie im Abschnitt
"Garantiebedingungen".
5. Entsorgen Sie das Gerät/die Batterien
in Übereinstimmung mit den geltenden
örtlichen Gesetzen und Vorschriften.
Entsorgung von Elektro-
und Elektronikgeräten
Die durchgestrichene Mülltonne
bedeutet, dass Sie gesetzlich
verpichtet sind, diese Geräte
einer vom unsortierten
Siedlungsabfall getrennten Erfassung
zuzuführen. Die Entsorgung über die
Restmülltonne oder die gelbe Tonne
ist untersagt. Enthalten die Produkte
Batterien oder Akkus, die nicht fest
verbaut sind, müssen diese vor der
Entsorgung entnommen und getrennt als
Batterie entsorgt werden.
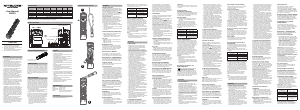
Charging Function
The NU43 is equipped with an intelligent
charging system. Please charge the
headlamp before the rst use.
Power Connection: As illustrated, rotate
the USB protection cover clockwise and
use the USB cable to connect an external
power supply (e.g. a USB adapter, a
computer or other USB charging devices)
to the charging port to begin the charging
process. The charging time is approx. 2h
(charged via the 5V/2A adapter). When
fully charged, the standby time is approx.
12 months.
Charging Indication: During the
charging process, 4 power indicators
on the bottom will ash to inform the
user. When the battery is fully charged,
4 power indicators will become steadily
turned on.
Power Button / MODE Button
•
The Power Button is used for turning
on / o the light and adjusting
brightness levels.
•
The MODE Button is designed for
switching light sources.
On / Off
•
When the light is o, long press the
Power Button for 1 second to access
LOW.
•
When the light is on, long press the
Power Button or MODE Button for 1
second to turn it o.
White Light
•
When the light is o, long press the
Power Button for 1 second to access
LOW.
•
When the light is o, double press the
Power Button to access ULTRALOW.
•
When the light is on, short press the
Power Button to cycle through the
following brightness levels: LOW – MID
– HIGH.
•
When the light is on, double press
the Power Button to access TURBO.
Short press the Power Button again to
return to the previous status, or it will
automatically return to the previous
status if there is no operation in 30
seconds.
Red Light
•
When the light is o, long press the
MODE Button for 1 second to turn on
the red light.
•
When the red light is on, short press
the Power Button to switch between
CONSTANT-ON and SLOW FLASHING.
Light Sources Switching
When the light is on, short press the
MODE Button to switch between white
light and red light.
Special Modes (SOS / BEACON)
•
When the headlamp is in any status,
double press the MODE Button to
access SOS.
•
When either special mode is on, short
press the Power Button to switch
between SOS and BEACON. Double
press the MODE Button again to return
to the previous status.
Lockout / Unlock
•
When the headlamp is o, long press
both buttons for 2 seconds until the
light ashes 3 times to indicate access
to the Lockout Mode. In Lockout Mode,
any brightness levels or special modes
are unavailable, and the light will
ash once to indicate this status when
pressing either button.
•
When in the Lockout Mode, long press
both buttons for 2 seconds again until
the ULTRALOW is on to indicate the
unlock status.
Note: The headlamp will be automatically
unlocked when charging in the Lockout
Mode.
Power Indication
When the light is o, short press the
MODE Button, the corresponding power
indicators on the bottom will be on and
go o after 2 seconds.
Note: The battery should be recharged
when the output appears to be dim or the
headlamp becomes unresponsive due to
low power.
Sensor Protection Function
When the built-in optical sensor detects
an obstruction ahead, the brightness
will automatically lower to the LOW
Level (100 lumens). The headlamp will
return to its previous brightness level
once the obstruction has been removed.
The sensitivity of the sensor may vary
due to dierent colors and materials of
obstructions.
Note: This function is not available when
the red light is turned on.
Warnings
1. CAUTION! Possible dangerous
radiation! Don't look into the light! May
be dangerous for your eyes.
2. Please recharge the product every
3 months when left unused for a
prolonged time.
3. When the product is kept in the
backpack, please activate the Lockout
Mode to prevent accidental activation.
4. DO NOT disassemble or modify the
headlamp as doing so will cause
damage to it and render the product
warranty invalid. Please refer to the
warranty section in the manual for
complete warranty information.
5. Dispose of the device/batteries in
accordance with applicable local laws
and regulations.
Fonction de charge
La NU43 est équipée d’un système
de charge intelligent. Veuillez charger
la lampe frontale avant la première
utilisation.
Connexion d’alimentation : Comme
illustré, faites pivoter le couvercle de
protection USB dans le sens des aiguilles
d’une montre et utilisez le câble USB pour
connecter un bloc d’alimentation externe
(par exemple, un adaptateur USB, un
ordinateur ou d’autres périphériques de
chargement USB) au port de charge pour
commencer le processus de charge. Le
temps de charge est d’environ 2h (chargé
via l’adaptateur 5V/2A). Lorsqu’elle est
complètement chargée, le temps de veille
est d’environ 12 mois.
Indication de charge : Pendant le
processus de charge, 4 indicateurs situés
sur le haut clignoteront pour informer
l’utilisateur du niveau de batterie. Lorsque
la batterie est complètement chargée,
4 voyants d’alimentation s’allument
régulièrement.
Bouton ON-OFF / Bouton MODE
•
Le bouton d’alimentation ON-OFF est
utilisé pour allumer / éteindre la lumière
et régler les niveaux de luminosité.
•
Le bouton MODE est conçu pour
changer les sources lumineuses.
ON/OFF
•
Lorsque la lumière est éteinte,
appuyez longuement sur le bouton
d’alimentation pendant 1 seconde pour
accéder à LOW (100 lumens).
•
Lorsque le voyant est allumé,
appuyez longuement sur le bouton
d’alimentation ou le bouton MODE
pendant 1 seconde pour l’éteindre.
Lumière blanche
•
Lorsque la lumière est éteinte,
appuyez longuement sur le bouton
d’alimentation pendant 1 seconde pour
accéder à LOW (100 lumens).
•
Lorsque le voyant est éteint, appuyez
deux fois sur le bouton d’alimentation
pour accéder à ULTRALOW (8 lumens).
•
Lorsque le voyant est allumé, appuyez
brièvement sur le bouton d’alimentation
pour parcourir les niveaux de luminosité
suivants : LOW – MID – HIGH.
•
Lorsque le voyant est allumé, appuyez
deux fois sur le bouton d’alimentation
pour accéder à TURBO (1400 lumens).
Appuyez à nouveau brièvement sur
le bouton d’alimentation pour revenir
à l’état précédent, sinon il reviendra
automatiquement à l’état précédent
s’il n’y a pas d’opération dans les 30
secondes.
Lumière rouge
•
Lorsque le voyant est éteint, appuyez
longuement sur le bouton MODE pendant
1 seconde pour allumer la lumière rouge.
•
Lorsque la lumière rouge est allumée,
appuyez brièvement sur le bouton
d’alimentation pour basculer entre FIXE
et CLIGNOTEMENT LENT.
Changement de sources
lumineuses
Lorsque le voyant est allumé, appuyez
brièvement sur le bouton MODE pour
basculer entre la lumière blanche et la
lumière rouge.
Modes spéciaux (SOS /
BALISE)
•
Peu importe l’état de la lampe frontale,
appuyez deux fois sur le bouton MODE
pour accéder à SOS.
•
Lorsque l’un des modes spéciaux est
activé, appuyez brièvement sur le
bouton d’alimentation pour basculer
entre SOS et BALISE. Appuyez à
nouveau deux fois sur le bouton MODE
pour revenir à l’état précédent.
Verrouillage / Déverrouillage
•
Lorsque la lampe est éteinte, appuyez
longuement sur les deux boutons
pendant 2 secondes jusqu’à ce que le
voyant clignote 3 fois pour indiquer
l’accès au mode de verrouillage. En
mode de verrouillage, aucun niveau
de luminosité ou mode spécial n’est
disponible, et le voyant clignote une
fois pour indiquer cet état lorsque vous
appuyez sur l’un des deux boutons.
•
En mode de verrouillage, appuyez
longuement sur les deux boutons
pendant 2 secondes jusqu’à ce que le
mode ULTRALOW (8 lumens) soit activé
pour indiquer l’état de déverrouillage.
Remarque : La lampe frontale sera
automatiquement déverrouillée lors de la
charge en mode de verrouillage.
Indication de puissance
Lorsque la lumière est éteinte, appuyez
brièvement sur le bouton MODE, les voyants
d’alimentation correspondants en bas seront
allumés et s’éteindront après 2 secondes.
Remarque : La batterie doit être
rechargée lorsque la sortie semble faible
ou que la lampe frontale ne répond plus
en raison d’une faible puissance.
Fonction de protection du
capteur
Lorsque le capteur optique intégré détecte
un obstacle à l’avant, la luminosité diminue
automatiquement au niveau LOW (100
lumens). Le projecteur retrouvera son
niveau de luminosité précédent une fois
l’obstruction retirée. La sensibilité du
capteur peut varier en raison de diérentes
couleurs et matériaux d’obstructions.
Remarque : Cette fonction n’est pas
disponible lorsque la lumière rouge est
allumée.
Avertissements
1. ATTENTION ! Radiations dangereuses
possibles ! Ne regardez pas la lumière
directement dans les yeux ! Peut
causer des troubles oculaires.
2. Veuillez recharger le produit tous les 3
mois lorsqu’il n’est pas utilisé pendant
une période prolongée.
3. Lorsque le produit est conservé
dans un sac à dos, veuillez activer le
mode de verrouillage pour éviter tout
fonctionnement accidentel.
4. NE PAS démonter ou modier la lampe
frontale car cela l’endommagerait et
rendrait la garantie du produit invalide.
Veuillez vous référer à la section
garantie du manuel pour obtenir des
informations complètes sur la garantie.
5. Jetez l’appareil/les piles conformément
aux lois et réglementations locales
applicables.
NU43 Manual
FL1
STANDARD
White Light Red Light White Light
TURBO HIGH MID LOW ULTRALOW CONSTANT-ON
SLOW
FLASHING
SOS BEACON
1,400 Lumens 600 Lumens 300 Lumens 100 Lumens 8 Lumens 10 Lumens 10 Lumens 1,400 Lumens 1,400 Lumens
─ 10h 15h 29h 165h 66h 90h ─ ─
130m 77m 53m 30m 8m 5m ─ ─ ─
3,800cd 1,500cd 700cd 230cd 17cd 7cd ─ ─ ─
2m (Impact Resistance)
IP68, 2m (Waterproof and Submersible)
Note: The stated data is measured by using the built-in Li-ion battery (3.6V 3,400mAh) in accordance with the international ashlight testing standards
ANSI/NEMA FL1. The data may vary in real world use due to dierent environmental conditions.
High Performance Lightweight
USB-C Rechargeable Headlamp
(Español)
Función de carga
La NU43 está equipada con un sistema
de carga inteligente. Por favor cargue la
linterna antes del primer uso.
Conexión a la fuente de carga: Como
se muestra en la imagen, gire la cubierta
de protección del puerto USB en sentido
de las manecillas del reloj y utilice el
cable USB para conectar a una fuente
de alimentación externa (Por ejemplo,
un adaptador USB, una computadora
u otros dispositivos de carga USB) al
puerto para iniciar el proceso de carga.
El tiempo aproximado de carga es de
aproximadamente 2 horas. (cargando
con un adaptador 5V/2A). Cuando está
completamente cargada, el tiempo en
espera es de aproximadamente 12 meses.
Indicador de carga: Durante el
proceso de carga, 4 indicadores en la
parte inferior parpadearán para informar
al usuario. Cuando la batería esté
completamente cargada, los 4 indicadores
permanecerán encendidos.
Botón de encendido / Botón
MODE
•
El botón de encendido es utilizado para
encender / apagar la luz y ajustar los
niveles de intensidad.
•
El botón MODE está diseñado para
cambiar las fuentes de iluminación.
Encendido / Apagado
•
Cuando la luz está apagada, mantenga
presionado el Botón de encendido por
1 segundo para acceder al modo BAJO.
•
Cuando la luz está encendida,
mantenga presionado el Botón de
encendido o el Botón Mode por 1
segundo para apagar.
Luz blanca
•
Cuando la luz está apagada, mantenga
presionado el Botón de encendido por
1 segundo para acceder al modo BAJO.
•
Cuando la luz está apagada, presione
el Botón de encendido 2 veces para
acceder al modo ULTRABAJO.
•
Cuando la luz está encendida, presione
ligeramente el Botón de encendido
para cambiar entre los siguientes
niveles de intensidad: BAJO – MEDIO –
ALTO.
•
Cuando la luz está encendida, presione
el Botón de encendido 2 veces para
acceder al modo TURBO. Presione
ligeramente el Botón de encendido
nuevamente para regresar al estado
anterior, o automáticamente regresará
al estado anterior si no hay ninguna
operación en 30 segundos.
Luz roja
•
Cuando la luz está apagada, mantenga
presionado el Botón MODE por 1
segundo para encender la luz roja.
•
Cuando la luz roja está encendida,
presione ligeramente el Botón
de encendido para cambiar entre
ENCENDIDO CONSTANTE y PARPADEO
LENTO.
Cambio de fuente de
iluminación
Cuando la luz está encendida, presione
ligeramente el Botón MODE para cambiar
entre luz blanca y luz roja.
Modos especiales (SOS /
BALIZA)
•
Cuando la linterna está en cualquier
estado, presione dos veces el Botón
MODE para acceder al modo SOS.
•
Cuando cualquiera de los modos
especiales está activado, presione
ligeramente el Botón de encendido
para cambiar entre SOS y BALIZA.
Presione dos veces el Botón MODE
nuevamente para regresar al estado
anterior.
Bloqueo / Desbloqueo
•
Cuando la linterna está apagada,
mantenga presionados ambos
botones por 2 segundos hasta que
la luz parpadee 3 veces para indicar
el acceso al Modo de Bloqueo. En el
Modo de Bloqueo, no estará disponible
ninguna intensidad o modo especial, y
la luz parpadeará una vez para indicar
este estado al presionar cualquier
botón.
•
Cuando esté en el Modo de Bloqueo,
mantenga presionados ambos botones
por 2 segundos nuevamente hasta que
el modo ULTRABAJO encienda para
indicar el estado de desbloqueo.
Nota: La linterna se desbloqueará
automáticamente al cargarla en el Modo
de Bloqueo.
Indicador de batería
Cuando la luz está apagada, presione
ligeramente el Botón MODE, los
indicadores de carga correspondientes
en la parte inferior encenderán y se
apagarán después de 2 segundos.
Nota: La batería debe ser recargada
cuando la intensidad luzca débil o la
linterna no responda debido a la baja
potencia.
Función de protección por
sensor
Cuando el sensor óptico integrado detecta
un obstáculo enfrente, la intensidad se
reducirá al nivel BAJO (100 lúmenes).
La linterna automáticamente regresará
a su intensidad anterior una vez que la
obstrucción sea removida. La sensibilidad
del sensor puede variar dependiendo de
los diferentes colores y materiales de los
obstáculos.
Nota: Esta función no está disponible
cuando la luz roja está encendida.
Advertencias
1. ¡PRECAUCIÓN! ¡Posible radiación
lumínica peligrosa! ¡No mire directo
a la luz! Puede ser peligroso para sus
ojos.
2. Por favor recargue el producto cada
3 meses cuando no sea utilizado por
periodos prolongados de tiempo.
3. Cuando deje el producto en una
mochila, por favor active el Modo
de Bloqueo para prevenir activación
accidental.
4. NO desarme o modique el producto,
hacerlo causará daño al mismo e
invalidará la garantía. Por favor
consulte la sección de garantía en el
manual para información completa de
la misma.
5. Elimine el dispositivo/baterías de
acuerdo con las leyes y reglamentos
locales aplicables.
Worldwide
Warranty Service
Model number
—————————————
Date of purchase
—————————————
Serial number
—————————————
Store Stamp
—————————————
This is the certicate of authenticity
if this item and we conrm that it
has been subjected to the most
exacting quality controls by SYSMAX
Innovations Co., Ltd.
NOTE:
Please ensure this warranty card is
fully completed by the distributor
or retailer after purchasing the
product. Should the product fail to
operate correctly during the warranty
period, it may be returned with the
completed warranty card and original
sales receipt to the retailer or local
distributor for replacement or repair.
Customer Service Email:

Diskutieren Sie über dieses Produkt mit
Hier können Sie uns Ihre Meinung zu Nitecore NU43 Taschenlampe mitteilen. Wenn Sie eine Frage haben, lesen Sie zunächst das Bedienungsanleitung sorgfältig durch. Die Anforderung eines Bedienungsanleitung kann über unser Kontaktformular erfolgen.