- 2 -
Commande avec l’interrupteur tactile
Les lampes peuvent être commandées par la télécommande tint parallèlement à la commande ou
aussi par un Smart Home Gateway avec l’interrupteur tactile intégré. Appuyez brièvement sur l’inter-
rupteur tactile pour allumer ou éteindre la lampe. Grâce à la fonction de mémoire intégrée, la lampe
« mémorise » le dernier réglage.
Le réglage de la température de couleur peut se faire uniquement avec la télécommande tint/un
Smart Home Gateway.
Avec la télécommande tint, les ambiances d‘éclairage préprogrammées peuvent également être
utilisés (si prises en charge, voir le mode d’emploi correspondant de la télécommande).
Réinitialisation à une luminosité de 100 %
La lampe peut au besoin être réinitialisées manuellement sur le réglage par standard « blanc chaud
et luminosité de 100 % » si elle ne peut plus être commandée (par ex. si les piles de la télécommande
sont vides). Pour cela, séparez le branchement au secteur trois fois consécutivement en débranchant
et rebranchant 3x de suite le connecteur secteur/le bloc d’alimentation. La lampe commence à pré-
sent avec le réglage par défaut, à savoir blanc chaud, avec une luminosité de 100 %.
Réglage de la réinitialisation de l‘éclairage pour/du mode de coupla-
ge
Une réinitialisation de l‘éclairage à LED n‘est nécessaire que dans des cas exceptionnels, par exem-
ple, si la télécommande a dû être réinitialisée ou si vous souhaitez raccorder l’éclairage à LED dans
un Smart Home Gateway.
1. Activez et désactivez 5x l’éclairage à LED pour montage sous structure à un intervalle d’env. 1 s
(par ex. avec un bloc multiprises avec l’interrupteur ou en branchant et débranchant plusieurs
fois le connecteur). L’activation avec l’interrupteur intégré ne suffit pas, la lampe doit être hors
tension pendant ce temps.
2. Réactivez l‘éclairage à LED. Un clignotement bref apparaît ensuite. La réinitialisation souhaitée
a lieu. Attendez 10 secondes et vous pouvez intégrer l‘éclairage à LED, comme d’habitude, dans
votre télécommande tint et/ou un Smart Home System avec Zigbee.
Nettoyage
AVIS!
Risque de courts-circuits !
L‘eau ou tout autre liquide s‘infiltrant dans le boîtier peut provoquer un court-circuit.
• N‘immergez jamais l‘éclairage à LED, ni dans l’eau, ni dans aucun autre liquide.
• Veillez à ce que ni de l‘eau, ni un autre liquide ne pénètre dans le boîtier.
AVIS!
Risque d’endommagement !
Toute manipulation incorrecte de la lampe peut provoquer des dommages.
N’utilisez ni produit de nettoyage agressif, ni brosses aux poils métalliques ou nylon, ni objets de
nettoyage pointus ou métalliques, du type lames, éponges métalliques et équivalent. Ceux-ci risque-
raient d’endommager les surfaces.
1. Avant le nettoyage, débranchez le connecteur de la prise.
2. Laissez complètement refroidir l‘éclairage à LED.
3. Essuyez l‘éclairage à LED avec un chiffon doux légèrement humide. Laissez ensuite complètement
refroidir toutes les pièces.
Dépannage/Questions fréquentes
Problème Cause possible
Sans fonction • Bloc d’alimentation non branché ou unité de commande non
branchée avec le bloc d’alimentation
• Aucune connexion établie à une télécommande tint ou un Zigbee
Gateway. > Branchement, voir Mise en service
Lors de l’activation, clignote
et s’allume en blanc
• L‘éclairage à LED n’est pas encore connecté à une télécommande
tint ou un Zigbee Gateway. > Branchement, voir Mise en service
Aucune connexion possible
avec une télécommande tint
ou un Gateway
• L‘éclairage à LED est encore connecté à une autre télécommande
tint ou un Zigbee Gateway. > Réglage de la réinitialisation de
L‘éclairage à LED/du mode de couplage
Vous trouverez les réponses à d’autres questions fréquentes à l’adresse www.mueller-licht.de/tint
Caractéristiques techniques
Bande de fréquence du module RF sans fil : 2405-2480,0 MHz
Puissance de transmission maximale : <20 mW
Portée de radio (champ libre) : 30 m
Consommation en veille <0,5 W
Éclairage à LED pour montage sous structure : Ra > 80 | Durée de vie 25 000 h | 100 000 x commutations
Intensité lumineuse (à 2700 K) : 750 lm
Température de couleur : 1800–6500 K + RGB
Puissance : 13 W
Tension réseau : 220-240 V ~
Fréquence du secteur : 50/60 Hz
Bloc d‘alimentation (SHD-CV13W-01) : tc: 60 °C
ta: 25 °C
Conditions ambiantes :
Température (service) : -20 °C...40 °C
Température (conservation) : 5°C...25°C
Humidité ambiante relative : 5–95 % (pas de condensation)
Classe de protection électrique de l’éclairag
à LED : Classe de protection III
Classe de protection électrique du système
complet : Classe de protection II
Smart Home Ready:
Les produits tint de MÜLLER-LICHT peuvent être commandés au moyen de la dernière
norme radio Zigbee 3.0 et sont compatibles avec de nombreux systèmes de commande
de l‘éclairage, par exemple Philips Hue*, Osram Lightify*, l‘assistant linguistique
d‘Amazon (via Amazon Echo Plus)**, etc. Pour plus d’informations sur Zigbee Allianz, consultez le
site www.zigbee.org.
* Certains services peuvent être soumis à des restrictions. Pour connaître les toutes
dernières informations et les réponses aux questions fréquentes, consultez la page :
www.mueller-licht.de/tint
** Si ce service est disponible dans votre pays.
Déclaration de conformité
La société MÜLLER-LICHT International GmbH déclare par la présente que le
type d‘installation radio « MÜLLER-LICHT tint » est conforme à la directive
2014/53/UE.
Le texte complet de la déclaration de conformité UE est disponible à l’adresse Inter
-
net suivante :
www.mueller-licht.de/tint
Élimination
Les appareils usagés ne peuvent pas être éliminés avec les ordures ména-
gères. Selon la directive 2012/19/UE, l‘appareil en fin de durée de vie doit être
soumis à une élimination contrôlée. Les matériaux contenus dans l‘appareil sont
soumis à un recyclage et l‘environnement n‘est pas pollué.
Déposez l‘ancien appareil sans frais auprès d‘un point de collecte pour déchets
électroniques ou d‘un centre de recyclage.
Éliminez également les matériaux d‘emballage de façon conforme à l‘environ
-
nement en les déposant par type dans les conteneurs mis à disposition.
Symbole de recyclage général. Vous trouverez des informations complémentai
-
res à l’adresse : www.mueller-licht.de/recycle
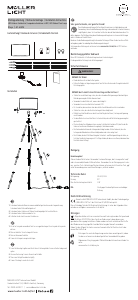
Operating Instructions
LED Light bar Talpa, Item no. 404027
Scope of Delivery
1 LED Light bar 2 Base 3 Power Adapter
4 Mounting material
5 Operating instructions
tint remote control or Smart Home System required.
3 41
2
5
2 x
4 x
1 x
1 x
Homer Electronics Lighting
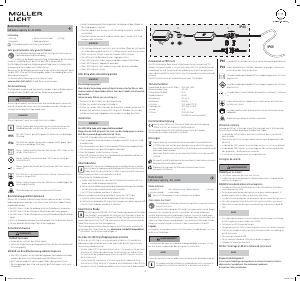
Installation Illustration Fig. 2
3M
Sticker
Magnetic
Strip
Accessories(Optional):
Homer Electronics Lighting
Installation Illustration Fig. 2
3M
Sticker
Magnetic
Strip
Accessories(Optional):
1 x
Dear customer,
These operating instructions include important information on initial installation and
use. Read the operating instructions, the safety notes in particular, carefully before in-
stalling the LED light bar. Non-compliance with these operating instructions may result
in severe injuries and damage to the product.
Store the operating instructions for future use. If you give the LED light bar to a third party, it is critical
that you provide these operating instructions as well.
You can also download these instructions as a PDF file from our website www.mueller-licht.de/tint.
Explanation of Symbols
The following symbols and signal words are used in these operating instructions, on the product itself
or on the packaging.
WARNING!
This signal symbol/word designates a hazard with a medium degree of risk, which, if not avoided, may
result in a severe or even fatal injury.
NOTICE!
This signal word warns of potential property damage.
IP20
This symbol provides additional useful information on handling or operating the product.
Please read carefully.
The LED light bar and the power adapter must only be operated indoors.
The LED light bar is protected against solid foreign objects >12 mm.
This symbol designates the power adapter of the LED light bar as a protection class II
device.
This symbol designates the LED light bar as a protection class III device.
This symbol describes the polarity of the power adapter: outer (-), inner (+).
The power adapter is equipped with a short-circuit protected safety transformer.
This symbol designates the power adapter as an independent lighting tool.
Not dimmable by conventional dimmers.
Intended use
The light is intended for illumination purposes and can be controlled with the tint remote control and/
or be incorporated in a smart home system with Zigbee gateway.
• The LED light bar is designed for use in indoor applications.
• The LED light bar is suitable for installation on normal flammable surfaces.
• The item is not suitable for commercial use.
Safety Instructions
WARNING!
• This item can be used by children age 8 and older as well as by persons with reduced physical,
sensory or mental capacities or lack of experience and knowledge provided they are supervi-
sed or if they were instructed on the safe use of the item and understand the potential hazards
they may result from the item.
DANGER for children
• Children must not play with the item.
• Keep children away from packaging material. There is a risk of suffocation if swallowed or if
strangled with the material.
DANGER of fire/burning and/or explosion
• The LED lightbar must only be operated with the enclosed power adapter.
• Only connect the power adapter to a properly installed power socket.
• Do not operate the LED light bar in a flammable environment or on an easily inflammable
surface.
• Do not wrap the LED light bar with easily inflammable material.
• Disconnect the power cord from the power socket before cleaning or mounting the LED light bar.
• The light source of this light cannot be replaced. Once the light source has reached the end of its
service life, the entire light must be replaced.
• Do not look into the illuminated LEDs from a short distance
• Do not look into the LEDS with a magnifying glass while in operation
Check the LED Light and the Scope of Delivery
NOTICE!
Risk of damage!
Opening the packaging carelessly with a sharp knife or another sharp object can quickly damage
the product.
Use utmost care when opening.
1. Take the light from the packaging.
2. Check to ensure that the delivery is complete.
3. Check to ensure that the light or its individual parts are not damaged. If there is damage, do not
use the light. Contact the manufacturer using the service address indicated in these instructions.
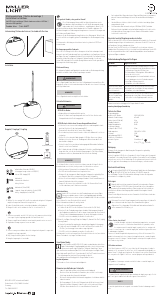
Installation and Connection
With the supplied base, the LED light can be set up easily and flexibly. The light can also be used without
a base and can be placed on a shelf or behind a TV, for example. With the included brackets, it can also
be attached under a kitchen cabinet or shelf.
a) Assembling the base:
Screw the base to the lamp using a suitable screwdriver. Insert the supplied rubber seal into the screw
hole.
b) Use without a base:
If necessary, loosen the screw connection of the base and close the screw hole in the lamp with the
rubber seal.
c) Mounting with clips (without stand):
Fix the mounting clips on the mounting surface with the enclosed screws. Then push the lamp into the
clips until it is fixed properly.
Plug the power adapter into the power socket. The light can now be connected with a tint remote control
and/or be incorporated into a smart home system, see “Initial Installation”.
Initial Installation
In order to connect the LED light bar with a remote control or with a Zigbee gateway, it
must be in coupling mode (flashes briefly when switched on). If this is not the case,
perform a reset (see below).
For more information, visit www.mueller-light.de/tint
A) If you have a tint remote control:
a. Plug the power adapter into the power socket so that the LED light bar is illuminated and wait
ten seconds before starting the connection process.
b. Prepare the remote control for connecting as described in the operating instructions and accor-
dingly, hold it close to the light.
c. The LED light bar is connected once it has flashed three times.
B) If you have a Zigbee gateway (for example Hue Bridge V2, Amazon Echo Plus*, Lightify Gateway):
a. Start the search process on the gateway or the corresponding app.
b. Then switch on the LED light bar (even if something otherwise may be indicated)
c. The LED light bar is connected once it has flashed three times.
Operating the Light with the integrated Touch Switch
In addition to using the tint remote control or a smart home gateway, the lights can also be operated
using the integrated touch switch. Press the touch switch briefly to switch the light on or off. Thanks
to the integrated memory function, the light “remembers” the last setting.
The colors can only be set using the tint remote control / a smart home gateway.
The tint light scenarios like work light, night light and party mode for example, can also be set using
the tint remote control (if use thereof is supported, see the relevant remote control instructions).
Resetting to 100% Light
If necessary, the light can be manually reset to home position “warm white and 100% brightness” if
the light can no longer be controlled (e.g. If the batteries of the remote control are empty). To do so,
disconnect the light from the power supply three times in a row by pulling the power plug/the power
adapter 3x in a row and plugging it back in. The light now starts in home position warm white, 100%
brightness.
Resetting the Light bar/Setting Coupling Mode
Resetting the tint LED light baring is only necessary in exceptional cases, for example if the remote
control was reset or if you want to incorporate the LED light bar into a smart home gateway.
1. Switch the LED light bar on and off 5 times in intervals of approx. 1 sec (e.g. using the switch on
the power strip or by pulling and inserting the plug several times). Switching using the integrated
switch is not enough. The light must be fully disconnected from power for a while.
2. Switch the LED light bar back on. The fixture will flash briefly. The desired reset has been
completed. Wait 10 seconds and then you can incorporate the LED light bar as usual into your tint
remote control and/or a smart home system with Zigbee.
Cleaning
NOTICE!
Short-circuit hazard!
Any water or other liquid that penetrates the housing may cause a short circuit.
• Never immerse the LED light bar into water or any other liquid.
• Make sure that no water or other liquids penetrate the housing.
NOTICE!
Risk of damage!
Handling the light improperly may cause damage.
Do not use any aggressive cleaning agents, brushes with metal or nylon bristles and no sharp or any
metal cleaning objects such as knives, metal sponges or similar. This may damage the surfaces.
1. Pull the power plug from the power socket before cleaning.
2. Allow the LED light bar to cool down completely.
3. Wipe off the LED light bar with a slightly moistened cloth. Then allow all parts to dry completely.
Troubleshooting/Frequently Asked Questions
Problem Possible cause
Not working • Power adapter is not plugged in or control unit is not connected
to the power supply
• No connection established to a tint remote control or a Zigbee
gateway. > Connect, see Initial Operation
When switched on, it flashes
and then it lights up white.
• The LED light bar has not yet been connected with a tint remote
control or with a Zigbee gateway. > Connect, see Initial Operation
No connection possible to
a tint remote control or a
Zigbee gateway
• The LED light bar is still connected to another tint remote
control or to a Zigbee gateway. > Reset the tint-LED light bar/set
coupling mode
For more answers to frequently asked questions, visit www.mueller-licht.de/tint
Technical Data
Frequency band of the wireless RF mode:: 2405-2480.0 MHz
Maximum transmission power: <20 mW
Wireless range (free field): 30 m
Standby consumption <0.5 W
LED light bar: Ra > 80 | 25,000 hours service lift | 100,000 x switchings
Luminous flux (at 2700 K): 750 lm
Color temperature: 1800–6500 K + RGB
Output: 13 W
Mains voltage: 220-240 V ~
Mains frequency: 50/60 Hz
Power supply (SHD-CV13W-01): tc: 60 °C
ta: 25 °C
Ambient conditions:
Temperature (operation): -20°C...40°C
Temperature (storage): 5°C...25°C
Relative humidity: 5–95% (no condensation)
Electrical protection class LED light bar: Protection class III
Electrical protection class entire system: Protection class II
Smart Home Ready:
The tint products from MÜLLER-LICHT can be controlled using the latest Zigbee 3.0
wireless standard and is compatible with numerous lighting control systems such as Philips
Hue*, Osram, Lightify*, Amazon voice assistant (using Amazon Echo Plus)** and many
more. For more information about the Zigbee Alliance, visit www.zigbee.org.
* Restrictions are possible for several services. For updated information and answers
to frequently asked questions, visit www.mueller-licht.de/tint
** If this service is available in your country.
Declaration of Conformity
MÜLLER-LICHT International GmbH hereby declares that the wireless system
type “MÜLLER-LICHT tint” complies with Directive 2014/53/EU.
The complete text of the EU Declaration of Conformity is available online at the
following web address:
www.mueller-licht.de/tint
Disposal
Old devices must not be disposed of with household waste. According to Direc-
tive 2012/19/EU, the device must be disposed of at a proper waste disposal fa-
cility at the end of its service life. Here, the reusable material is recycled, preventing
pollution to the environment.
Deliver the old unit to a collection point for electronic waste or to a reusable
materials depot free of charge.
You can also dispose of the packaging material in an environmentally re
-
sponsible manner by disposing of it by material type in the proper collection
containers provided.
General recycling symbol. For more information, visit:
www.mueller-licht.de/recycle
www.mueller-licht.de/tint
MÜLLER-LICHT International GmbH
Goebelstraße 61/63, 28865 Lilienthal
Germany
Tel. 00800 44003311
service@mueller-licht.de
404027_BDA_003


Diskutieren Sie über dieses Produkt mit
Hier können Sie uns Ihre Meinung zu Müller Licht 404027 Talpa Leuchte mitteilen. Wenn Sie eine Frage haben, lesen Sie zunächst das Bedienungsanleitung sorgfältig durch. Die Anforderung eines Bedienungsanleitung kann über unser Kontaktformular erfolgen.