1. Sortez l
a bande LED
de son emballage.
2. Vérifiez que la livraison est complète.
3. Vérifiez si l
a bande LED
ou ses différentes pièces présentent des dommages. Si tel
est le cas, n’utilisez pas l
a bande LED
. Veuillez contacter le fabricant à l’adresse
indiquée sur ce mode d’emploi.
Installation
AVIS!
La bande LED ne peut pas être divisé !
Ne pliez pas trop la bande LED pour éviter de l‘endommager! Le rayon de courbure
maximum est de 15 cm.
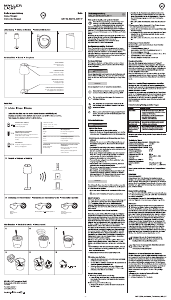
1. Déroulez la bande de LED et la disposer sans la vriller.
2. Vissez les clips ensemble à la distance souhaitée et poussez soigneusement la
bande LED
3. Raccordez l‘unité de commande à la bande (respectez les marquages fléchés)
4. Raccordez l‘unité de commande au bloc d‘alimentation
5. Branchez le bloc d‘alimentation sur la prise
6. Connectez la bande de LED avec une télécommande tint et/ou intégrez-la dans un
Smart Home Gateway.
Domaine d’application
Afin de raccorder la bande de LED avec une télécommande ou un Zigbee
Gateway, ils doivent se trouver en mode de couplage (lors de la mise en
marche, un changement de couleur rapide apparaît). Si ce n’est pas le cas,
effectuez une réinitialisation (voir ci-dessous).
Vous trouverez des informations complémentaires à l’adresse :
www.mueller-licht.de/tint
A) Si vous disposez d‘une télécommande tint:
a. Branchez le cordon d’alimentation de sorte que la bande de LED s’allume et
attendez 10 secondes avant de démarrer le processus de connexion.
b. Préparez la télécommande au raccordement selon le mode d’emploi et tenez
la télécommande près de l‘unité de commande.
c. La bande de led est connectée si elle s’allume 3x.
B) Si vous disposez d’un Zigbee Gateway (ex. Hue Bridge V2, Amazon Echo Plus*) :
a. Lancez la recherche sur le Gateway ou l’APP correspondante.
b. Branchez le cordon d’alimentation de sorte que la bande de LED s’allume.
c. La bande de LED est connectée si elle s’allume 3x.
Smart Home Ready :
Les produits tint de MÜLLER-LICHT peuvent être commandés au moyen de
la dernière norme radio Zigbee 3.0 et sont compatibles avec de nombreux
systèmes de commande de l‘éclairage, par exemple Philips Hue*, Samsung
SmartThings*, l‘assistant linguistique d‘Amazon**, et bien d‘autres.
*Restrictions sur les services individuels possibles, informations actuelles et répon-
ses aux questions fréquemment posées sur
www.mueller-licht.de/tint/kompatibilitaet
**Si ce service est disponible dans votre pays
Réinitialisation de la bande LED/du mode de couplage
Une réinitialisation de la bande de LED tint n‘est nécessaire que dans des cas
exceptionnels, par exemple, si la télécommande a dû être réinitialisée ou si vous
souhaitez raccorder la bande de LED dans un Smart Home Gateway.
1. Allumez et éteignez la bande de LED 5 fois tous les 1 s environ (par exemple avec
une barrette de prises avec interrupteur ou en insérant et en retirant à plusieurs
reprises la fiche).
L’activation avec la télécommande tint ne suffit pas, la lampe doit être hors
tension pendant ce temps.
2. Réactivez la bande de LED. En fonction de la bande de LED, un changement de
couleur rapide apparaît. La réinitialisation souhaitée a eu lieu. Attendez 15 se-
condes et vous pouvez connecter la bande LED à votre télécommande tint et/ou à
d‘autres systèmes Zigbee comme d‘habitude.
Réinitialisation à une luminosité de 100 %
La bande LED peut être réinitialisée sur le réglage par défaut « blanc
chaud et luminosité de 100 % » si elle ne peut plus être commandée (par ex. si les
piles de la télécommande sont vides). Pour cela, séparez le branchement au secteur
trois fois consécutivement en débranchant et rebranchant 3x de suite le connecteur
secteur/le bloc d’alimentation. La bande LED commence à présent avec le réglage
par défaut, à savoir blanc chaud, avec une luminosité de 100 %.
Données techniques :
Bande de fréquence du module RF sans fil :
2405-2480,0 MHz
Puissance de transmission maximale : <20 mW
Portée de radio (champ libre) : 30 m
Consommation de veille : <0,5 W
Tension réseau : 220−240 V
Fréquence du secteur : 50/60 Hz
Flux lumineux: 1200 lm (à 2700 K)
Puissance nominale: 36 W
Température de couleur: 1800-6500 K + RGB
Protection IP : IP65 (bande LED)
IP44 (Bloc d‘alimentation
et unité de commande)
Déclaration de conformité
La société Müller-Licht International GmbH déclare par la présente que
le type d‘installation radio « Müller-Licht tint » est conforme à la directive
2014/53/UE.
Le texte complet de la déclaration de conformité UE est disponible à
l’adresse Internet suivante : www.mueller-licht.de/tint
Élimination
Les appareils usagés ne peuvent pas être éliminés avec les ordures ména-
gères. Selon la directive 2012/19/UE, l‘appareil en fin de durée de vie doit être
soumis à une élimination contrôlée. Les matériaux contenus dans l‘appareil
sont soumis à un recyclage et l‘environnement n‘est pas pollué.
Déposez l‘ancien appareil sans frais auprès d‘un point de collecte pour dé-
chets électroniques ou d‘un centre de recyclage.
Éliminez également les matériaux d‘emballage de façon conforme à l‘environ-
nement en les déposant par type dans les conteneurs mis à disposition.
Symbole de recyclage général. Vous trouverez des informations complémen-
taires à l’adresse : www.mueller-licht.de/recycle
Instruction manual
LED Outdoor Lightstrip -
Art.-No.:
404026
Included with the item
• LED-Strip • line adapter with cable • 15x Clips
• control unit • user manual
requires tint remote control or smart home system
Dear customers!
This user manual contains important information on start-up and use. Before
using the LED-Strip, please read through the user manual carefully. This parti-
cularly applies for the safety notes. Failure to follow this user manual may result
in severe injury or damage the product. Store the user manual for future use. If you pass
the LED-Strip on to third parties, please be absolutely sure to include this user manual.
You can also download the manual: www.mueller-licht.de/tint.
Explanation of symbols
The following symbols and signal words are used in this user manual, on the lamp or on
the packaging.
WARNING!
This signal symbol/word designates a hazard with moderate degree of risk which may
lead to death or severe injury if not avoided.
NOTICE!
This signal word warns against potential damages to property.
This symbol gives useful additional information for handling or operation. Please
read carefully.
The LED Strip is protected against water jets from any direction.
The power supply unit and the control unit are protected against splash water
from any direction.
This symbol designates the power adapter of the LED Strip as a protection class
II device.
This symbol designates the LED Strip as a protection class III device.
This symbol describes the polarity of the power adapter: outer (-), inner (+).
The power adapter is equipped with a short-circuit protected safety transformer.
This symbol designates the power adapter as an independent lighting tool.
Not dimmable by conventional dimmers.
Proper use
This LED-Strip can be used for lighting purposes and can be controlled with the tint
remote control and/or with a Smart Home System with Zigbee gateway.
Not suitable for household room illumination.
Only for decorative usage (e.g. show effect lighting).
•
The LED-strip is intended to use in homes.
•
The LED-strip is intended for mounting on wall, ground and ceiling.
•
The LED-strip is intended for use only on normal flammable environment.
•
The LED-strip is protected against penetration of solid matter, IP20.The item is not
suitable for commercial use.
Safety Notes
WARNING!
DANGER for children
• Children are not allowed to play with the item
• Do not let children play with the packaging. Children may get caught in it when play-
ing and suffocate.
DANGER of Fire/combustion and/or explosion
• The LED-strip is only allowed to be powered by driver of the original accessory (safety
extra low voltage, SELV).
• Do not use the strip or cables, if damaged.
• Please protect the cable in use against damage, if placed on the floor.
• Please connect the line adapter only to approved power sockets (220-240 V · 50/60 Hz).
• Please disconnect the line adapter from the power socket before cleaning or moun-
ting of the LED-strip set.
NOTICE!
• This light contains integrated LED bulbs. The bulbs in the light cannot be replaced.
• Do not look into the illuminated LEDs from a short distance.
• Do not look at the LEDs with a magnifying glass during operation.
• Do not operate the LED strip in the packaging or rolled up.
• Do not operate the LED strip covered.
• Do not connect the LED strip to other strips or devices.
• Do not cut the LED strip.
Check the LED Strip and the Scope of Delivery
NOTICE!
Risk of damage!
Opening the packaging carelessly with a sharp knife or another sharp object can quickly
damage the product. Use utmost care when opening.
1. Take the product from the packaging.
2. Check to ensure that the delivery is complete.
3. Check to ensure that the LED Strip or its individual parts are not damaged. If there is damage, do not use the
LED Strip. Contact the manufacturer using the service address indicated in these instructions.
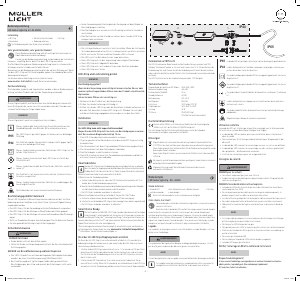
Installation
NOTICE!
The LED strip cannot be cut!
Do not bend the LED strip too much to avoid damage! The maximum bending radius is15 cm.
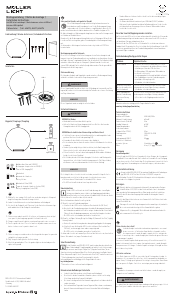
1. Roll-off the strip and place it untwisted.
2. Screw the clips together at the desired distance and carefully push the LED strip in
.
3. Connect the control unit to the strip (consider the arrow markings).
4. Connect the control unit to the line adapter.
5. Connect the line adapter to the power socket.
6. Connect the LED with a remote control and/or smart home system
Application
To connect the LED-Strip to a remote control or a Zigbee gateway, it must be in a pairing
mode (when switched on, the LED-Strip will cycle through its colours briefly). If
this is not the case, perform a reset (see below). For more information, visit www.
mueller-light.de/tint
A) If you have a tint remote control:
a. Plug in the mains plug and wait 10 seconds before starting the connection process..
b. Prepare the remote control according to the manual for connecting and keep it corre-
spondingly close to the control unit.
c. The LED-Strip is connected when it lights up 3x.
B) If you have a Zigbee Gateway (e.g. Hue Bridge V2, Amazon Echo Plus *):
a. Start the search on the gateway or associated APP.
b. Plug in the mains plug of the LED strip.
c. The LED-Strip is connected when it lights up 3x.
Smart Home Ready:
The tint products produced by MÜLLER-LICHT can be controlled using the latest
Zigbee radio standard 3.0 and are compatible with a range of light control sys-
tems, such as Philips Hue*, Samsung SmartThings*, Amazon’s voice assistant
(with Amazon Echo Plus)**, and many more. You can find more information about the
Zigbee Alliance at www.zigbee.org.
To integrate into a gateway/an app, the tint product must be reset, see Resetting the LED-
Strip/pairing mode.
*Restrictions on individual services possible, current information and answers to
frequently asked questions, see www.mueller-licht.de/tint/kompatibilitaet
**If this service is abailable in your country.
Resetting the LED-Strip/pairing mode
1. Resetting the LED-Strip is only required in exceptional cases, such as when the
remote control has had to be reset or when you want to incorporate the
LED-Strip into a smart home gateway.
Power the LED-Strip on and off 5 times at an
interval of about 1 s (for example, with a socket with switch or plugging on and off the
plug several times).
2. Switch the LED-Strip on again. A short cycle through the colours appears. The reset
has occurred as desired. Wait for 10 seconds, afterwards, you can connect the LED-
Strip to a tint remote control and/or a Zigbee gateway as described above.
Reset to 100% light
The tint light bulbs and luminaires can be easily reset by light switch to the basic setting
of warm white and 100% brightness. This may be necessary, for example, if you have
dimmed the tint products before and the remote control‘s batteries are empty. This feature
may also be used in the normal case if you do not have the tint remote control on hand.
Power the LED-Strip on and off 3 times at an interval of about 1 s (for example, with a
socket with switch or plugging on and off the plug several times).
The LED Strip will now start in its basic setting, warm white, 100%.
Technical data
Frequency band of wireless RF mode: 2405-2480.0 MHz
Maximum transmission power: <20 mW
Radio range (free field): 30 m
Standby consumption per lamp: 0.5W
Mains voltage: 220-240V
Mains frequency: 50/60 Hz
Luminous flux: 1200 lm (at 2700 K)
Color Temperature: 1800-6500 K + RGB
Rated Power: 36 W
IP Protection: IP65 (LED Strip)
IP44 (Driver and Control unit)
Declaration of Conformity
Hereby Müller-Licht International GmbH declares that the radio equipment type
„Müller-Licht tint“ complies with the directive 2014/53 / EU.
The full text of the EU Declaration of Conformity is available at the following Internet
address: www.mueller-licht.de/tint
Dispose
Old appliances must not be disposed of with normal household waste. In accordance with
Directive 2012/19/EU, the device must be disposed of properly at the end of its service life.
The recyclable materials contained in the device are recycled and pollution of the environment
is avoided.Return the old device free of charge to a collection point for electrical waste or a
recycling yard.
Dispose of the packaging materials in an environmentally friendly manner by placing them in
the collection containers provided.
General recycling symbol Further information can be found under:
www.mueller-licht.de/recycle/
MÜLLER-LICHT International GmbH
Goebelstr. 61/63 | D-28865 Lilienthal
Tel. +800 44003311
service@mueller-licht.de
_004
www.mueller-licht.de/tint
- 2 -
IP65
IP44
404026_tint-LED-Outdoor-Strip_004.indd 3 13.03.20 14:02


Diskutieren Sie über dieses Produkt mit
Hier können Sie uns Ihre Meinung zu Müller Licht 404026 Outdoor Leuchte mitteilen. Wenn Sie eine Frage haben, lesen Sie zunächst das Bedienungsanleitung sorgfältig durch. Die Anforderung eines Bedienungsanleitung kann über unser Kontaktformular erfolgen.