
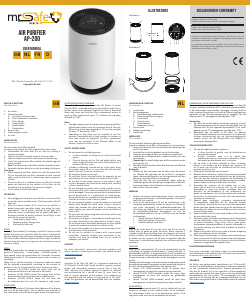
PARTS & FUNCTIONS
See illustraon I
1. Air outlet
2. Operaonpanel
A. Powerbuon
B. Speedbuon
C. Timerbuon
D. Light/Childlockbuon
E. Anion/Filterbuon
3. Light box
4. Airqualitysensor
5. Airinlet
6. Filter
7. Back cover
INSTALLATION
See illustraon II
Theairpurierhasalterinstalled.
Toremoveandreplacethelter,pleasefollowthesesteps:
1. Pressthebuonatthebackoftheunittoremovetheback
cover (7).
2. Takeoutthelterfromtheinsideoftheairpurier.
3. Takethereplacementlterandremovetheplascbag.
4. Installthereplacementlterwithouttheplascbaginto
theairpurier.Theboompartoftheltercompartment
should be pressed down a bit while installing the lter.
Note:Theclosedsideoftheltershallfacetowardthebase.
5. Press the buon on the back cover (7) to put the back
coverbackontheunit.
Important:
• Whenreplacingthelter,pleaseturnothepowerrst.Do
notoperatewiththelterremoved(nodustremovaleect,
andthedustthatisinhaledmaycauseequipmentfailure).
• Place the lter in a venlated place so that the harmful
gases and bacteria on the surface of the lter can be
volalized.Donotexposeittoexcessivesunlight.
• Donotwashthelterwithwater.
OPERATION
1. Aerplugginginthepower,allindicatorswilllightfor1sec.
andturnoagain.Theairpurierisnowinstandbymode.
2. Press the Power buon (A) to start the air purier in
default automac operaon mode (see below for more
informaon). You will hear a sound indicang that the
device is ON.
3. Thelightbox(3)willlightindierentcolorsforabout30
sec. during preheang of the sensor. Aer the sensor is
preheated,theair quality indicaonisdisplayedandthe
lightboxwilllightinthecolorofthecurrentairquality:
• Goodquality:Bluecolor
• Mediumquality:Yellowcolor
• Badquality:Redcolor
4. Pressthepowerbuon(A)toturnothedevice.Allindicators
willturno.Theairpurierisnowinstandbymode.
TIMER
PresstheTimerbuon(C)todisplayacycleof2–4-8hours
onthedisplayandmakeyourselecon.Eachmeyoupressthe
buon,youwillhearasoundandthecorrespondingindicator
willlight.Whenthesetmeisup,theairpurierwillturno
andreturntoStandbymode.
SPEED
PresstheSpeedbuon(B)tochangetheworkingspeedofthe
airpurier:AUTO(automac)–H(highspeed)–M(medium
speed)–L(lowspeed–sleepmode).Theselectedspeedmode
indicatorwillturnON.
Whenthe air purier operates in automac modethe speed
will be adjusted automacally according to the amount of
parclesintheair.Iftheairqualitysensormeasuresavalue:
• between1-75(PM2.5value)thebluecolorwillbedisplayed
andtheunitwilloperateinlowestspeed.
• between 76-150 (PM2.5 value) the yellow color will be
displayedandtheunitwilloperateinmiddlespeed.
• between 151-999 (PM2.5 value) the red color will be
displayedandtheunitwilloperateinhighestspeed.
SLEEP MODE
When the air purier works in sleep mode (lowest speed
mode),the“Moon”indicatorwilllight.Ifthereisnooperaon
for5sec.,thepowerandsleepmodeindicatorwillbeONinlow
brightnessandallotherlightswillturno.Theairpuriernow
operatesinlownoisemode.PresstheSpeedbuon(B)toexit
thesleepmodeandselectanotherspeedmode.
LIGHTINGMODE
PresstheLightbuon(D) severalmestoselect the desired
lighngmode:So–Standard–O.Eachmeyoupressthe
buon,youwillhearasound.
CHILDLOCK
PresstheChildLockbuon(D)for3 sec. No funconcanbe
operatedinthismode.Whenacvated,theChildLockindicator
isON.Tounlock,presstheChildLockbuon(D)againfor3sec.
ANIONFUNCTION
PresstheAnion/Filterbuon(E)toacvatetheAnionfuncon.
Pressagaintodeacvatethefuncon.
FILTERREPLACEMENTREMINDER
Whenthelterreplacementreminder(E)ashesred,itmeans
thattheHEPA+acvatedcarboncompositelterinsidetheair
purierneeds tobe replaced. Replace the lteras described
aboveandpressandholdthelterreplacementbuontoreset
thelterreplacementcycle.
Note: Depending on the place and the method of use (for
example,householdswithalargenumberofsmokersorareas
withsevereairpolluon),thelterreplacementcyclemaybe
shortened. If the ltraon eect is not obvious, replace the
lterinme.
SAFETY INSTRUCTIONS
1. Donotplaceinthefollowingplaces:
• Indirectsunlightorfacingtheairoutletandheated
places.
• Closetodevices such asTVsandradios(whichmay
causeimagedistoronandnoise).Pleaseplaceitata
distanceof1mormore.
2. Inordertoeecvelycirculatetheairintheroom,place
theproductabout30cmormorefromtheleandright
sidesofthewall,furniture,curtains,etc.
3. Donotplaceobjectsontheunit.
4. Donotblocktheairinletandoutlet,forexample,donot
placeobjectsontheairoutletorinfrontoftheairinlet.G
5. Do not pull on the power cord as it may cause a short
circuitordamagetotheinsideofthepowercord,resulng
inreorelectricshock.
6. Donotdamagethepowercordorplug,and do notcut,
excessivelytwist,pull,ortwistthepowercord.Ifthepower
cordisdamaged,itmustbereplacedbythemanufacturer,
service department or a professional to avoid danger.
Non-professionals areprohibitedfromdisassemblingthe
machinetoavoidtheriskofelectricshock.
7. Donotusepowersupplies,universalsocketsorconnected
devices that exceed the rated value. Using a universal
outlet that exceeds the rated value or connecng the
powersupplymaycausethepowercordtooverheatand
causeare.
8. Donottouchthepowerplugwithwethands,whichmay
resultinelectricshock.
9. Donotputyourngersormetalobjectsintothegapofthe
airoutlet,otherwiseitmaycauseelectricshockorinjury.
Donotallowwater,ammabledetergentsorotherliquids
toentertheproducttoavoidelectricshockorre.
10. Donotusethisproductinawetorhotenvironmentsuch
asabathroom,toiletorkitchen
11. Do not use air puriers in indoors with incense-based
inseccides. Chemical residues may accumulate in the
machine and then be released from the air outlet to
endangeryourhealth.
SUPPORT
For more informaon, spare parts, technical quesons and
return requests concerning this product, you should contact
support@mrsafe.eu.
GUARANTEE
Copyright © Mr Safe. Mr Safe® is a registered trademark of
TE-GroupNV.TheMrSafe®brandstandsforsuperiorproduct
quality and outstanding customer service. That is why Mr
Safe® warrants this product against all defects in material
and workmanship for a period of two (2) years from the
date of original purchase of the product. The condions of
this guarantee and the extent of responsibility of Mr Safe®
under this guarantee can be downloaded from our website:
www.mrsafe.eu.
DECLARATION OF CONFORMITY
GB
ONDERDELEN & FUNCTIES
Zie illustrae I
1. Luchtuitlaat
2. Bedieningspaneel
A. Aan/uit-toets
B. Snelheidstoets
C. Timertoets
D. Lichoets/Kinderslot
E. Ionisator/Filter-toets
3. Lichtbak
4. Luchtkwaliteitssensor
5. Luchnlaat
6. Filter
7. Achterpaneel
INSTALLATIE
Zie illustrae II
Deluchtreinigerheeeengeïntegreerdelter.
Volgdezestappenomdelterteverwijderenentevervangen:
1. Drukopdeknopaandeachterkantvanhetapparaatomhet
achterpaneel(7)teverwijderen.
2. Haaldelteruitdebinnenkantvandeluchtreiniger.
3. Neemdevervangendelterenverwijderdeplasczak.
4. Installeerdevervangendelterzonderdeplasczakin de
luchtreiniger.Hetonderstedeelvanhetltercomparment
moet lichtjes naar beneden worden gedrukt jdens het
installerenvanhetlter.
Opmerking:Degeslotenkantvandeltermoetnaardebasis
gerichtzijn.
5. Drukopdeknopaandeachterkant(7)omhetachterpaneel
terugophetapparaatteplaatsen.
Belangrijk:
• Schakelbijhetvervangenvandeltereerstdestroom uit.
Gebruik het apparaat niet als de lter is verwijderd (geen
stofverwijderingseectenhetingeademdestofkanstoringen
indeapparatuurveroorzaken).
• Plaatsdelteropeengevenleerdeplaatszodatdeschadelijke
gassen en bacteriën op het oppervlak van het lter kunnen
vervliegen.Stelnietblootaanovermagzonlicht.
• Wasdelternietmetwater.
WERKING
1. Nadatdestroomisaangesloten,zullenalleindicaelampjes
gedurende 1 sec. oplichten en weer uitschakelen. De
luchtreinigerstaatnuindestand-bymodus.
2. Druk op de aan/uit-toets (A) om de luchtreiniger in de
standaardautomaschemodustestarten(ziehierondervoor
meer informae).U hoort een geluiddat aangee dat het
apparaat AAN staat.
3. Delichtbak(3)zalongeveer30sec.inverschillendekleuren
oplichtenjdens het voorverwarmen van desensor. Nadat
desensorisvoorverwarmd,wordtdeluchtkwaliteitsindicae
weergegeven en licht de lichtbak op in de kleur van de
huidigeluchtkwaliteit:
• Goedekwaliteit:blauwekleur
• Gemiddeldekwaliteit:gelekleur
• Slechtekwaliteit:rodekleur
4. Drukopdeaan/uit-toets(A)omhetapparaatuitteschakelen.
Alleindicaelampjesgaanuit.Deluchtreinigerstaatnuinde
stand-bymodus.
TIMER
Drukopdemer-toets(C)omeen cyclusvan 2–4-8uurop het
displayweertegevenenmaakuw keuze.Elke keer uop de toets
drukt,hoortueengeluidengaathetbijbehorendeindicaeklampje
branden. Wanneer de ingestelde jd is verstreken, wordt de
luchtreinigeruitgeschakeldenkeerthijterugnaardestand-bymodus.
SNELHEID
Drukopdesnelheidstoets(B)omdesnelheidvandeluchtreiniger
te wijzigen: AUTO (automasch) – H (hoge snelheid) – M
(gemiddelde snelheid) – L (lage snelheid – slaapmodus). Het
indicaelampjevandegeselecteerdesnelheidsmodusgaatAAN.
Wanneerdeluchtreinigerindeautomaschemoduswerkt,wordt
desnelheidautomaschaangepastaandehoeveelheiddeeltjesin
delucht.Alsdeluchtkwaliteitssensoreenwaardemeet:
• tussen 1-75 (PM2.5-waarde) wordt de blauwe kleur
weergegevenenwerkthetapparaatopdelaagstesnelheid.
• tussen 76-150 (PM2.5-waarde) wordt de gele kleur
weergegevenenwerkthetapparaatopgemiddeldesnelheid.
• tussen 151-999 (PM2.5-waarde) wordt de rode kleur
weergegevenenwerkthetapparaatopdehoogstesnelheid.
SLAAPMODUS
Wanneer de luchtreiniger in de slaapmodus (laagste
snelheidsmodus) werkt, gaat het “Maan” indicaelampje
branden.Alsergedurende5sec.geenbedieningis,zullendeaan/
uit-enslaapmoduslampjesAANzijnmeteenlagehelderheiden
zullenalleanderelampjesuitgaan.
Deluchtreinigerwerktnuindegeluidsarmemodus.Drukopde
snelheidstoets(B)omdeslaapmodusteverlateneneenandere
snelheidsmodusteselecteren.
VERLICHTINGSMODUS
Druk meerdere keren op de lichoets (D) om de gewenste
verlichngsmodusteselecteren:Zacht–Standaard–Uit.Elkekeer
uopdeknopdrukt,hoortueengeluid.
KINDERSLOT
Druk3sec.opdeKinderslot-toets (D). In dezemoduskangeen
enkele funce worden bediend. Indien geacveerd, brandt het
indicaelampjevoorhetkinderslot.Omteontgrendelen,druktu
nogmaals3secondenopdeKinderslot-toets(D).
IONISATORFUNCTIE
Druk op de Ionisator/Filter-toets (E) om de Ionisatorfunce te
acveren.Druknogmaalsomdefunceuitteschakelen.
HERINNERINGVOORVERVANGENVANDEFILTER
Wanneerdeherinneringvoorhetvervangenvanhetlter(E)rood
knippert,betekentditdatdeHEPA + acevekoolcomposieilterin
de luchtreiniger moet worden vervangen. Vervang de lter zoals
hierbovenbeschrevenen houd de ltervervangingsknop ingedrukt
omdeltervervangingscyclustereseen.
Opmerking: Aankelijk van de plaats en de wijze van gebruik
(bijvoorbeeldhuishoudensmetveelrokersofruimtesmeternsge
luchtvervuiling)kandeltervervangingscycluswordenverkort.Als
hetltrae-eectnietduidelijkis,vervangdanjdigdelter.
VEILIGHEIDSINSTRUCTIES
1. Nietopdevolgendeplaatsenplaatsen:
• In direct zonlicht of gericht naar de luchtuitlaat en
verwarmdeplaatsen.
• Dichtbij toestellen zoals tv’s en radio’s (die
beeldvervorming en ruis kunnen veroorzaken). Plaats
hettoestelopeenafstandvan1mofmeer.
2. Omdeluchtindekamereeceftelatencirculeren,plaatstu
hetproductopeenafstandvanongeveer30cmofmeervan
delinker-enrechterkantvandemuur, meubels, gordijnen,
enz.
3. Plaatsgeenvoorwerpenophettoestel.
4. Blokkeerdeluchnlaaten -uitlaat niet, plaatsbijvoorbeeld
geenvoorwerpenopdeluchtuitlaatofvoordeluchnlaat.
5. Treknietaanhetnetsnoer,aangezienditkortsluingofschade
aandebinnenkantvanhetnetsnoerkanveroorzaken,watkan
leidentotbrandofelektrischeschokken.
6. Beschadighetnetsnoerofdestekkernietensnij,draai,trekof
draaihetnetsnoerniet.Alshetnetsnoerbeschadigdis,moet
hetwordenvervangendoordefabrikant,deserviceafdeling
of een professional om gevaar te voorkomen. Het is niet-
professionals verboden de machine tedemonterenomhet
risicovanelektrischeschokkentevoorkomen.
7. Gebruik geen voedingen, universele stopcontacten
of aangesloten apparaten die de nominale waarde
overschrijden. Het gebruik van een universeel stopcontact
datdenominale waarde overschrijdtofhet aansluiten van
devoedingkanleidentotoververhingvanhetnetsnoeren
brandveroorzaken.
8. Raakdestekkernietaanmetnaehanden,ditkanleidentot
eenelektrischeschok.
9. Steekuwvingersofmetalenvoorwerpennietindeopening
van de luchtuitlaat, anders kan dit elektrische schokken
of letsel veroorzaken. Zorg ervoor dat er geen water,
ontvlambare reinigingsmiddelen of andere vloeistoen in
het product komen om elektrische schokken of brand te
voorkomen.
10. Gebruik dit product niet in een nae of warme omgeving
zoalseenbadkamer,toiletofkeuken.
11. Gebruik geen luchtreinigers in ruimtesmet insecciden op
basisvanwierook.Chemischeresten kunnenzich ophopen
in de machine en vervolgensvrijkomenuit de luchtuitlaat,
waardooruwgezondheidingevaarkomt.
KLANTENONDERSTEUNING
Voor meer informae, technische vragen of retouraanvragen
metbetrekkingtotditproductdienturechtstreekscontactopte
nemenmetsupport@mrsafe.eu.
GARANTIE
MrSafeiseengedeponeerdhandelsmerkvanTE-GroupNV.Het
merkmrSafestaatvoorproductenvansuperieurekwaliteiteneen
uitstekende klantenservice. Daarom garandeert mr Safe dat dit
productvrij isvanmateriaal-enfabricagefoutengedurendeeen
periode van twee(2) jaar na de oorspronkelijkeaankoopdatum
van het product. De voorwaarden van deze garane en de
omvangvandeverantwoordelijkheidvanmrSafeonderdeze
garanekuntudownloadenvanafdewebsite:
www.mrsafe.eu.
NL
Company/Entreprise:TE-GroupNV
Address:/Adresse:Kapelsestraat61,2950Kapellen,Belgium
Productname/Nom du produit:AP-300
Product type / Type de produit:AirPurier
Conformity is guaranteed by the CE-symbol. The full text of the EU
declaraonofconformity isavailableat the followinginternetaddress:
hp://www.mrsafe.be/doc_ap-300.
La conformité est garane par le symbole CE. Le texte complet de la
déclaraon UE de conformité est disponible à l’adresse internet suivante:
hp://www.mrsafe.be/doc_ap-300.
USER MANUAL
QRG / MrSafe Air purifier AP-300/ 07-21 / V01
Copyright©Mr Safe
DFR
NL
GB
AIR PURIFIER
AP-300
ILLUSTRATIONS
1.
2.
3.
4.
5.
6.
7.
IllustraonI
IllustraonII



Diskutieren Sie über dieses Produkt mit
Hier können Sie uns Ihre Meinung zu Mr Safe AP-300 Luftreiniger mitteilen. Wenn Sie eine Frage haben, lesen Sie zunächst das Bedienungsanleitung sorgfältig durch. Die Anforderung eines Bedienungsanleitung kann über unser Kontaktformular erfolgen.