
Mikrowellen-
Dampfsterilisator
Microwave Steam
Steriliser
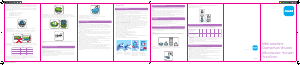
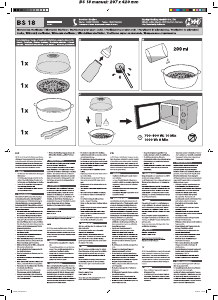
10) Be careful: when opening the steriliser after use. Hot steam can escape.
11) Residual water in the products can be removed with the draining function in
the lid. On the inside of the lid there are drainage grooves. Products can be placed
in the inside of the upturned lid individually or with the baskets.
12) Use the tongs to remove and assemble the components.
13) Pour any water from inside the steriliser away and dry with a soft cloth.
14) After the sterilisation process, products stay sterile for up to 24 hours in closed
appliance.
Cold Water Sterilisation Usage:
1) Carefully wash the bottles and components in mild soapy water and then rinse
with clear water.
2) Various commercially available anti-bacterial solutions or tablets can be used
for cold water sterilisation.
3) Always follow the manufacturer’s instructions.
4) Fill the base of the microwave steriliser with water. The measure of water and
duration of sterilisation depends on the instructions from the manufacturer of the
solution or tablets and the number of products to be sterilised. All components
must be fully immersed for sterilisation.
Anti-Colic
INSTRUCTIONS FOR USE:
Clean before every use.
Before first use wash all components separately in boiling water for 5 minutes
or in a dishwasher on sterilise cycle. This is to ensure hygiene.
Check all components before each use and throw away at the first signs of
damage or weakness.
To ensure proper cleaning/sterilising all bottle parts MUST be disassembled.
Cleaning/sterilising while assembled can damage the bottle.
Dishwasher safe (max. 65°C) but food colourings may discolour components.
Do not use abrasive cleaning agents. Only soft bristle brushes or soft sponges
should be used. Hard scourers may scratch the plastic.
Sterilise using one of the following methods: steam sterilising (electric or
microwave according to manufacturers instructions), boiling in water for at least
5 minutes or liquid sterilising solution.
Do not leave single bottle parts in direct sunlight or heat, or leave in sterilising
solution for longer than recommended, as this may affect the product function.
The bottle is made of polypropylene which is hygienic, easy to clean and
relatively soft. Avoid any heavy pressure on it, as this could affect the function.
Do not use pin or sharp object to enlarge feeding hole.
Ensure valve is assembled correctly and the base of the bottle is firmly
attached prior to filling bottle with liquid.
Do not let babies self-feed.
Do not prop bottle to feed.
Store teats and vents in a dry sealed container.
Always use only MAM teats with the MAM bottles.
Use sugar free food or liquids only.
To avoid injury, do not let baby walk with bottle.
Do not put your baby to bed with bottle. Prolonged contact with liquids may
cause severe tooth decay.
Bottle teat fits all MAM wide neck bottles and trainers.
4) For sterilisation disassemble the products to their individual components.
MAM Anti-Colic bottles must be completely disassembled; the base ventilation
must be taken out of the screw base for sterilisation. Sterilising assembled
components can damage the bottle.
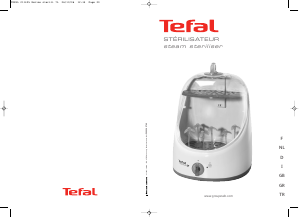
5) Place the bottles and components in the microwave steriliser. In the MAM
Microwave Steriliser the products can be flexibly arranged on 2 levels and the
steriliser holds up to:
6 MAM Anti Colic 5,5 oz bottles or
4 MAM Anti Colic 9 oz bottles or
5 MAM Baby Bottles 11 oz or
6 MAM Baby Bottles 9,5 oz
incl. additional products like soothers.
6) With the products inside, replace the lid and close the latch. The lid must
“click“ into place.
7) Place the appliance in the microwave. Should the appliance not fit into the
microwave, please check that the lid has “clicked“ into place correctly.
8) The appliance is suitable for microwaves with wattage 500 to 1850. Set the
microwave to the correct power and time. The sterilisation times correspond to
the microwave’s wattage; adhere to the given times:
9) Allow microwave steam steriliser to cool down before removing from
microwave. Recommended cooling time: 3 minutes from opening microwave
door. Hold the steriliser straight when removing.
5) Air bubbles in bottles compromise sterilisation.
6) Sterilisation solution must be regularly renewed according to the
manufacturer’s instructions.
7) Pour away any surplus sterilisation solution.
General Information:
The microwave steriliser should only be placed on solid, flat, dry and non-
flammable surfaces.
The microwave steriliser is aligned to commercially available microwave
appliances. There must be enough space between the microwave and steriliser.
The steriliser must not touch the microwave walls. Do not force the steriliser into
the microwave. Sterilising in too small a microwave can damage the steriliser
and the microwave.
Do not sterilise metal or electronic parts. Watch out for non-sterilisable
elements of composite products.
Filling the steriliser with inaccurate water measures can damage the steriliser
and the microwave. Too little water and the parts will not be properly sterilised.
Too much water extends the sterilisation time. Never place in the microwave
without water.
Do not use bleach.
If using a combination microwave oven, ensure that the microwave steriliser is
not exposed to the heat of the grill because this could damage it.
Be careful when dealing with sterilised products since they may still be hot.
Wash hands before using sterilised products.
Please do not use abrasive cleaning agents. Please only use soft brushes or
sponges. Hard objects can scratch the surface.
Microwave steriliser can be washed in the dishwasher.
Only store the appliance dry.
To avoid lime scale pour any surplus water away and dry the appliance with
a soft cloth. Slight lime scale can be wiped away with a damp cloth. More
stubborn lime scale can be removed with diluted household vinegar.
To avoid stubborn lime scale and safeguard the steriliser’s proper function it
is recommended the steriliser be regularly descaled, especially in regions with
hard water.
HEATING INSTRUCTIONS:
NEVER pour boiling water into the bottle.
Place in a bottle warmer, under hot running water or in a container of heated
water.
NEVER heat or cool a sealed bottle. Remove the protective cap and teat before
heating, especially before microwave heating. Do not overheat.
Stir thoroughly after heating to evenly distribute heat. Allow the standing time
recommended by the microwave manufacturer.
Wrap cloth or towel around bottom of bottle and shake to absorb any excess
water after warming in a bottle warmer or boiling water.
For your child’s safety and health
WARNING!
Always use this product with adult supervision.
Continuous and prolonged sucking of fluids will cause tooth decay.
Always check food temperature before feeding.
Keep all components not in use out of the reach of children.
Never use feeding teats as a soother.
SELF STERILISING INSTRUCTIONS:
The Anti-Colic can be transformed into a self-sterilising bottle in 3 simple steps,
thereby making further sterilisation unnecessary. Always clean bottle parts before
using the sterilising function!
Step 1:
For the self-sterilisation of the Anti-Colic assemble clean bottle parts in
the following way: bottle base with valve, screw ring with teat, bottle body and
protective cap.
Step 2:
Measure 20ml of cool water using the protective cap and pour into the
bottle base with valve.
Step 3:
Place the screw ring with teat in the bottle base with valve.
Place the bottle body over it.
Place the protective cap on top.
Microwave Steriliser Usage:
Microwave sterilising times at 500 W - 1000 W on full power.
DO NOT EXCEED THESE TIMES. DO NOT EXCEED THE WATTAGE.
CAUTION:
Allow bottle to cool down before removing from the microwave. Remove
protective cap to allow cooling process. Recommended cooling time:
10 minutes from opening microwave door.
Pour out the rest of the water. Allow bottle parts to dry. Always store bottle
assembled.
Additional Instructions:
The self-sterilising bottle should only be placed on solid and flat surfaces.
Always set the microwave to the correct power and time.
Filling the bottle base with inaccurate water measures can damage the bottle.
Never place in the microwave without water.
If using a combination microwave oven, ensure that the self-sterilising bottle is
not exposed to the heat of the grill because this could damage it.
Be careful when dealing with sterilised products since they may still be hot.
Wash hands before using sterilised products.
Always store the bottle dry.
Hold the self sterilising bottle straight when removing from the microwave to
avoid pouring out any remaining hot water.
Do not wash self-sterilising bottle after sterilising.
Do not touch the teat after sterilising. Handle teat by using the screw ring.
VHI01TA30S
mambaby.com
Wattage Time* Cooling time
500 W – 800 W: 8 min 3 min
850 W – 1800 W: 6 min 3 min
1850 W: 5 min 3 min
*max. power
1
Place silicone
valve into bottom
ring.
2
Press down on
raised perimeter
of silicone valve.
3
Screw assembled
base onto bottom
of bottle in slow
steady manner.
4
Insert nipple
into top of bottle
screw ring until
you hear a ”click“.
Number of bottles
sterilised at the
same time
Estimated duration
of sterilising [min]
1 2 3 4 5 6
3 4 5 6 7 8
A-Micro-Steri Instr. VHI01TA30S.indd 1 30.03.11 10:12


Diskutieren Sie über dieses Produkt mit
Hier können Sie uns Ihre Meinung zu Mam Microwave Sterilisator mitteilen. Wenn Sie eine Frage haben, lesen Sie zunächst das Bedienungsanleitung sorgfältig durch. Die Anforderung eines Bedienungsanleitung kann über unser Kontaktformular erfolgen.