
BB x5 - 2" (5.08 cm)BB x10 - 2" (5.08 cm)
BB x4 - 2" (5.08 cm)
ENGLISH
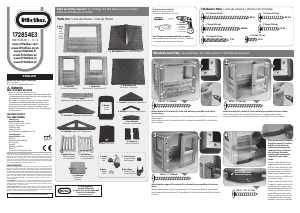
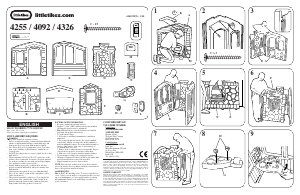
WOODSIDE COTTAGE PLAYHOUSE™
Ages: 2 years & up
Please save sales receipt for proof of purchase.
WARNING:
ADULT ASSEMBLY REQUIRED.
• Keep these instructions for future reference.
• Prior to assembly, this package contains small parts: hardware which is
a choking hazard and may contain sharp edges and sharp points. Keep
away from children until assembled.
• Protect your eyes. Always wear safety glasses when assembling.
• This product is intended for outdoor domestic family use only.
• This product does not require stain or varnish. If you choose to add
stain or varnish, be sure to select materials that comply with the
applicable safety requirements for lead, heavy metals, and phthalates
in children's products.
CONSUMER SERVICE
TOLLFREE NUMBER:
United States:
www.littletikes.com
1-800-321-0183 Monday - Friday
The Little Tikes Company
2180 Barlow Road
Hudson, OH 44236
E-mail: littletikes.cares@littletikescare.com
United Kingdom:
www.littletikes.co.uk
Little Tikes
MGA Entertainment (UK) Ltd
50 Presley Way
Crownhill
Milton Keynes MK8 OES
Bucks, UK
E-mail: Info.LittleTikes@mgae.com
MINIMUM SIZE allowed is .2” high
Updated 12.2.11 per Paul Madan (new spacing)
Printed in Poland. D.R. ©2013 The Little Tikes Company
© The Little Tikes Company, an MGA Entertainment company. LITTLE TIKES® is a trademark of Little
Tikes in the U.S. and other countries. All logos, names, characters, likenesses, images, slogans, and
packaging appearance are the property of Little Tikes. Please keep this address and packaging for
reference since it contains important information. Contents, including specications and colors, may
vary from photos depicted on package. Instructions included. Please remove all packaging including
tags, ties & tacking stitches before giving this product to a child.
LIMITED WARRANTY
The Little Tikes Company makes fun, high quality toys. We warrant to the original purchaser that
this product is free of defects in materials or workmanship for one year * from the date of purchase
(dated sales receipt is required for proof of purchase). At the sole election of The Little Tikes Company,
the only remedies available under this warranty will be either replacement of the defective part of
the product or refund the purchase price of the product. This warranty is valid only if the product has
been assembled and maintained per the instructions. This warranty does not cover abuse, accident,
cosmetic issues such as fading or scratches from normal wear, or any other cause not arising from
defects in material and workmanship. *The warranty period is three (3) months for daycare or
commercial purchasers.
U.S.A and Canada: For warranty service or replacement part information, please visit our website
at www.littletikes.com, call 1-800-321-0183 or write to: Consumer Service, The Little Tikes Company,
2180 Barlow Road, Hudson OH 44236, U.S.A. Some replacement parts may be available for purchase
after warranty expires—contact us for details.
Outside U.S.A and Canada: Contact place of purchase for warranty service. This warranty gives you
specic legal rights, and you may also have other rights, which vary from country/state to country/
state. Some countries/states do not allow the exclusion or limitation of incidental or consequential
damages, so the above limitation or exclusion may not apply to you.
Please keep this manual as it contains important information.
Parts List / Liste des Pieces / Lista de Partes
Tools required (not included):
Outils Requis (ne sont pas inclus):
Herramientas Requeridas (no se incluye):
3
Woodside Assembly / Assemblage des côtés en bois / Montaje de la casita
Attach side walls (E) to back wall (A). Secure each wall using screws BB (x5 each side) at
locations shown.
Montez les murs latéraux (E) sur le mur arrière (A). Fixez chaque mur avec des vis BB (5 de chaque côté) aux
endroits indiqués.
Acople las paredes laterales (E) a la pared trasera (A). Fije cada pared con tornillos BB (5 a cada lado) en los
lugares indicados.
1
4
2
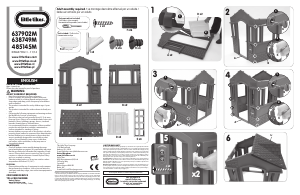
A. Back
Wall
Mur
arrière
Pared
trasera
B. Roof with Peak / Toit avec faîte / Techo con pico
C. Roof without Peak
Toit sans faîte / Techo sin pico
D. Front Wall
Mur avant / Pared delantera
E. Side Walls (2)
Murs latéraux (2) / Paredes laterales (2)
F. Front Door Support
Support de porte avant / Soporte de la puerta delantera
G. Front Gable / Pignon avant / Frontón delantero
H. Back Gable / Pignon arrière / Frontón trasero
Z. Window
Fenêtre
Ventana
L. Door Threshold
Seuil de porte / Door Threshold
K. Door Arch /Arc de porte/ Arco de la puerta
J. Side Gable / Pignon latéral / Frontón lateral
M. Door / Porte / Puerta
N. Shutters (2)
Volets (2) / Postigos (2)
O. Right Side Fence
Clôture du côté droit
Cerca lateral derecha
P. Left Side Fence
Clôture du côté gauche
Cerca lateral izquierda
R. Countertop
Plan de travail
Encimera
(Strongly
Recommended)
(Vivement
recommandé)
(Altamente
recomendable)
AA x2
Hardware Pack / Liste de visserie / Piezas para montaje
2
1
/2" Screw (6.35 cm)
CC x8
1
1
/2" Screw (3.81 cm)
BB x38
2" Screw (5.08 cm)
DD x24
1
1
/4" Screw (3.17 cm)
FF x3
1
/2" Screw (1.27 cm)
EE x2
1" Screw (2.54 cm)
4
5
3
1
2
2
1
3
4
5
Attach front wall (D) to side wall (E). Secure wall using screws BB x5 at locations shown.
Montez le mur avant (D) sur le mur latéral (E). Fixez le mur avec 5 vis BB aux endroits indiqués.
Acople la pared delantera (D) a la pared lateral (E). Fíjela con 5 tornillos BB en los lugares indicados.
5
7
4
1
3
Attach front door support (F) to side wall (E). Secure wall using screws BB x4 at 4 locations
shown.
Montez le support de porte avant (F) sur le mur latéral (E). Fixez le mur avec 4 vis BB aux 4 endroits indiqués.
Acople el soporte de la puerta delantera (F) a la pared lateral (E). Fije la pared con 4 tornillos BB en los 4 lugares
indicados.
Place door threshold (L) between
front door support (F) and front
wall (D). Be sure round arch
of threshold is facing out and
opening for door is on the left
side (as shown). Push walls
together while securing with
screws DD x4 at 4 locations
shown.
Placez le seuil de la porte (L) entre le
support de porte avant (F) et le mur
avant (D). Assurez-vous que l'arc cintré
du seuil est orienté vers l'extérieur et
que la porte s'ouvre sur le côté gauche
(comme indiqué). Emboîtez les murs
tout en les xant avec 4 vis DD à chacun
des 4 endroits indiqués.
Coloque el umbral de la puerta (L) entre
el soporte de la puerta delantera (F) y la
pared delantera (D). Asegúrese que el
lado redondeado del umbral mire hacia
afuera y que la abertura de la puerta
quede al lado izquierdo (tal y como se
muestra). Empuje las paredes para que
queden unidas mientras las ja con 4
tornillos DD en los 4 lugares indicados.
2
4
3
1
1
3
2
4
Door opening
Ouverture de la porte
Abertura de la puerta
DD x4 - 1
1
/4" (3.17 cm)
Two (2) people are recommended for this assembly.
Nous conseillons que deux (2) personnes eectuent cet assemblage.
Se recomiendan dos (2) personas para el montaje.
E
A
E
D
F
L
172854E3
XIM172854E3-1 - 11/13
www.littletikes.com
www.littletikes.co.uk
www.littletikes.fr
www.littletikes.es
www.littletikes.nl
www.littletikes.pl
Visit our website at
www.littletikes.com
to register your product online and
to enter our sweepstakes.
(No purchase necessary)
Adult assembly required / Le montage doit être effectué par un adulte /
Debe ser armado por un adulto
S. Faucet
Robinet/
Grifo
W. Door Hinge
Charnière de porte
Bisagra de la puerta
U. Knob
Bouton/
Perilla
T. Faucet Fastener
Fixation du robinet/
Tornillo del grifo


Diskutieren Sie über dieses Produkt mit
Hier können Sie uns Ihre Meinung zu Little Tikes 172854E3 Woodside Cottage Spielhaus mitteilen. Wenn Sie eine Frage haben, lesen Sie zunächst das Bedienungsanleitung sorgfältig durch. Die Anforderung eines Bedienungsanleitung kann über unser Kontaktformular erfolgen.