
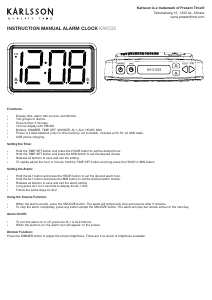
INSTRUCTION MANUAL ALARM CLOCK/BLUETOOTH SPEAKER KA6059
Product Parameters:
• Input: DC 5V/2A or 9V/1.67A.
• Output: 5V/1A or 9V/1.1A.
• Power Adapter: QC 3.0 (to ensure charging speed stability and product
functionality).
• Wireless Charging Output Power: 5W, 7.5W, 10W.
• Charging Distance: 0-8mm (closer proximity between phone and product
ensures faster charging). How to Use: When the product is plugged into a
power source, place the phone on the top centre of the clock to charge.
Bluetooth Speaker:
Version: Bluetooth V5.0.
Wireless Transmission Distance: Within 10 metres.
Transmission Power: CLASS2, 4dBm.
Sensitivity: -80dBm < 0.1%BER.
Frequency Range: 2.402GHz-2.480GHz.
Audio Performance: SBC decoding.
Audio Signal-to-Noise Ratio: ≥75dB.
Speaker Impedance: 4Ω.
Speaker Power: 3W x 2.
Features:
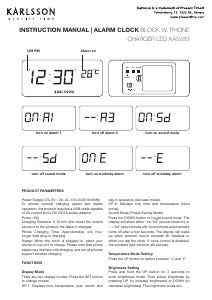
Display Modes: DP-1/DP-2:
DP-1: Time/temperature and month/date/year alternate display.
DP-2: Fixed time/temperature display.
Time: 12/24-hour format selection.
Calendar: Displays year, month, and date.
Temperature Display: Cº/Fº.
Alarms: Three alarm settings (Alarm 1/2/3).
Alarm Period Selection: 1-5 (Monday-Friday), 1-6 (Monday-Saturday), or 1-7
(Monday-Sunday).
LED Brightness Levels: Three levels (L1, L2, L3).
Night Mode: Automatic dimming between 18:00-6:59.
Sound Control Mode: Power-saving functionality.
Backup Battery: 1 x CR2032 for time memory.
Additional Features: Wireless phone charging and Bluetooth speaker.
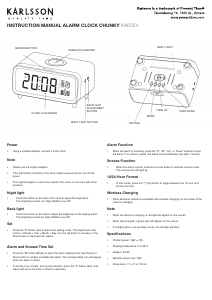
Operations:
Time Setting:
Rotate the “SET” knob to time mode. Press the “SET” knob to enter time setting
mode. The sequence is: 12/24-hour format > Hour > Minute > Quit.
Rotate the “SET” knob clockwise to increase the value or anticlockwise to decrease
the value.
Press the “SET” knob to conrm and move to the next setting.
After setting, press the “SET” knob or wait 10 seconds to conrm the value and
return to normal display.
In 12-hour format, a dot will appear in the upper-left corner during the afternoon.
Calendar Setting:
Rotate the “SET” knob to calendar mode. Press the “SET” knob to enter calendar
setting mode. The sequence is: Year > Month > Date > Quit.
Rotate the “SET” knob clockwise to increase the value or anticlockwise to decrease
the value.
Press the “SET” knob to conrm and move to the next setting.
After setting, press the “SET” knob or wait 10 seconds to conrm and return to
normal display.
Alarm Setting:
Rotate the “SET” knob to alarm (AL) mode. Press the “SET” knob to enter alarm
setting mode. The sequence is: --:A1 > A1 hour > A1 minute > --:A2 > A2 hour > A2
minute > --:A3 > A3 hour > A3 minute > Alarm period (1-5/1-6/1-7) > Quit.
“--:A1/2/3” indicates the alarm is off. “ON:A1/2/3” indicates the alarm is on. When
active, a dot will appear in the upper-left corner near the temperature.
Rotate the “SET” knob clockwise to increase the value or anticlockwise to decrease
the value.
Press the “SET” knob to conrm and move to the next setting.
After setting, press the “SET” knob or wait 10 seconds to conrm and return to
normal display.
Display Mode Setting:
Rotate the “SET” knob to display mode (DP-1 or DP-2). Press the “SET” knob to enter
display mode setting.
Rotate the “SET” knob clockwise or anticlockwise to toggle between DP-1 and DP-2.
After setting, press the “SET” knob or wait 10 seconds to conrm and return to normal
display.
Temperature Format Setting:
Rotate the “SET” knob to temperature mode. Press the “SET” knob to enter
temperature format setting.
Rotate the “SET” knob clockwise or anticlockwise to toggle between Cº and Fº.
After setting, press the “SET” knob or wait 10 seconds to conrm and return to normal
display.
Sound Control Mode Setting:
Rotate the “SET” knob to sound control mode (--Sd or oNSd). Press the “SET” knob to
enter sound control mode.
Rotate the “SET” knob clockwise or anticlockwise to toggle sound control on/off.
“oNSd”: Sound control is activated. The display turns off after 15 seconds and can be
reactivated by clapping, making noise, or touching the clock.
“--Sd”: Sound control is deactivated. The display remains on continuously.
After setting, press the “SET” knob or wait 10 seconds to conrm and return to normal
display.
Brightness Level Setting:
Rotate the “SET” knob to brightness level mode (L1, L2, or L3). Press the “SET” knob
to enter brightness level setting.
Rotate the “SET” knob clockwise or anticlockwise to select the desired brightness level.
After setting, press the “SET” knob or wait 10 seconds to conrm and return to normal
display.
Reset Button:
If the clock is not functioning correctly or the display is abnormal, press the “RESET”
button on the back of the product to reset it.
Bluetooth Speaker:
Hold the “ON/OFF” button for 2 seconds to activate the Bluetooth speaker. Search for
and connect to “ANAM R123”. A beep will conrm a successful connection.
Adjust the volume or playback using a connected device (mobile phone, tablet, PC).
Hold the “ON/OFF” button for 2 seconds again to deactivate the Bluetooth speaker.
Wireless Phone Charger:
Place the phone on the top centre of the clock to charge.
Ensure the phone supports wireless charging. If not, a wireless charging receiver is
required.
Remove phone cases, magnetic disks, or other obstructions to ensure proper charging.
Precautions:
Use the clock in a dry, ventilated environment. Avoid wet, high-temperature, or
uctuating temperature areas.
Handle with care to avoid damage from drops.
Use a QC 3.0 adapter for optimal performance.


Diskutieren Sie über dieses Produkt mit
Hier können Sie uns Ihre Meinung zu Karlsson KA6059WD Wecker mitteilen. Wenn Sie eine Frage haben, lesen Sie zunächst das Bedienungsanleitung sorgfältig durch. Die Anforderung eines Bedienungsanleitung kann über unser Kontaktformular erfolgen.