Bedienungsanleitung Friedland D524S Türklingel

Benötigen Sie ein Bedienungsanleitung für Ihren Friedland D524S Türklingel? Unten können Sie das PDF-Bedienungsanleitung kostenlos auf Deutsch ansehen und herunterladen. Für dieses Produkt gibt es derzeit 0 häufig gestellte Fragen, 0 Kommentare und 1 Stimme mit einer durchschnittlichen Produktbewertung von 100/100. Wenn dies nicht das von Ihnen gewünschte Bedienungsanleitung ist, kontaktieren Sie uns bitte.

Ist Ihr Produkt defekt und bietet die Bedienungsanleitung keine Lösung? Gehen Sie zu einem Repair Café, wo es gratis repariert wird.

Bedienungsanleitung

Loading…
Décor Glass Chime
(includes landscpe push and battery)
Instructions – Please retain these instructions for future reference
Pack contents:
Door Chime (Base & decorative cover)
Bell push & CR2032 Lithium coin cell battery
2 x screws (ø4x32mm), 2 x wall plugs (ø6x30mm) for mounting the Door Chime
Adhesive pad, 2 x screws (ø3x20mm) 2 x wall plugs (ø5x25mm)
for mounting the bell push
You will require:
3 X LR14 (C) Alkaline batteries for the Door Chime
Only long-life Alkaline batteries must be used
A small crosshead and flathead screwdriver
ø5 and ø6 masonry drills
Installation
Please note: The stated range of this product is measured in open field
conditions. Walls, ceilings and the positioning the bell push or door chime
on or near metal structures or reinforced PVC doors or doorframes will reduce
the transmission range
1. Battery fitting and nameplate
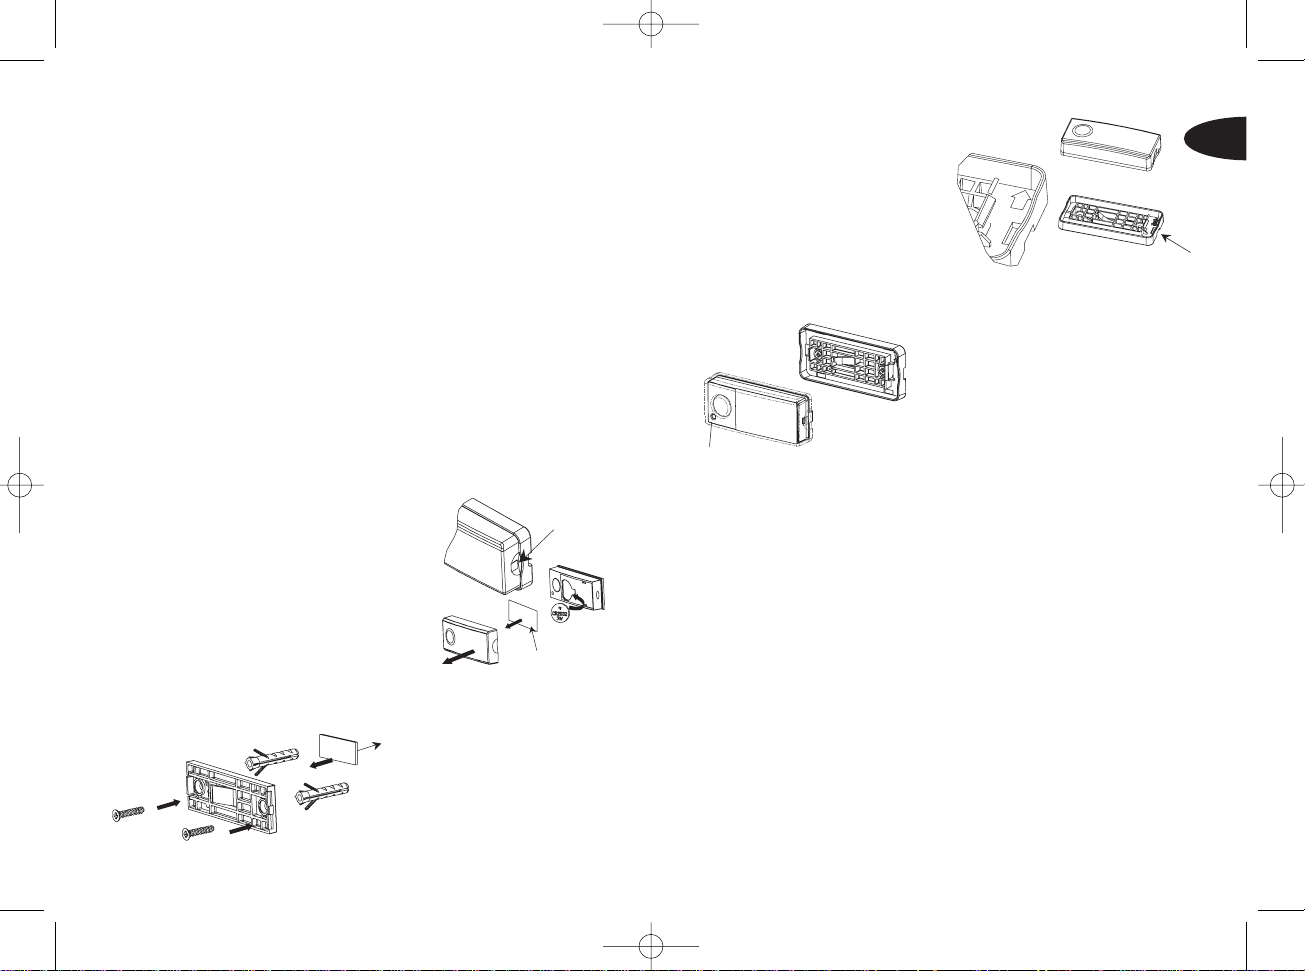
Insert a screwdriver in area A, twist
and lift to release the transparent cover.
Pull the cover off the front of the push.
Insert the battery into the base + side up,
as shown in Fig. 1.
Remove the nameplate (B), write your
name on the nameplate and replace into
the transparent cover.
Press the transparent cover firmly back in
place to ensure a watertight seal.
B
A
2. Mount the bell push
Do not mount the push on or near
(< 30cm) large metal objects, as it
will block signals from the push.
Ensure the wall surface is clean
and dry. Mount using either the
double sided sticky pad on a
smooth surface, or with the screws
and wall plugs provided, see Fig 2.
3. Fixing with screws
Release the bell push base by twisting
a flat bladed screwdriver in the slot (C)
at one end of the push.
The push will pop out of the base.
Fix using the two screws and plugs
provided, noting the ‘TOP’ arrow.
Locate the push onto the base and
press down until it clicks into place (Fig 4).
C
TOP
4. Test the bell push
When the bell push button /cover is pressed,
the confidence light (D) will illuminate to
reassure the caller that the bell push
is working. The light will flash 5 times
when the battery needs replacing.
Note: The whole bell push body moves
when the button area is pressed.
D
DOORCHIME
5. Fit the door chime batteries
Remove the decorative cover by simply pulling it away from the rear casing.
Insert the three LR14(C) alkaline batteries in the order shown in Fig 9. The first
time a chime unit is powered up, the sounds available are demonstrated.
6. Automatic Programming of bell pushes
First, place the chime close to the door push (within 8m/ 25ft) to program the chime
and check that it is working.
Press the door push until the chime responds with a tune. You can leave this tune
or change the tune by using button A (see fig 5, sound selection).
7. Programming a second push
Within 5 minutes of pressing the first push, press the second push until the chime
sounds, then use button B to change the tune if required.
If more than 5 minutes has elapsed since the first push was programmed, press
and hold both buttons A and B until the chime sounds, this takes approx 5 seconds.
The chime is now cleared and can programmed to one or two door pushes
All EVO and Décor Chimes and Bell Pushes use programming to ensure no
interaction from other neighbouring systems.
Fig. 1
Fig. 2
Fig. 3
Fig. 4
GB
D524S 46360PL_Ed1 5/6/05 7:09 AM Page 2
Download Bedienungsanleitung auf Deutsch (PDF, 1.40 MB)
(Denken Sie an die Umwelt und drucken Sie diese Bedienungsanleitung nur aus, wenn es unbedingt nötig ist)

Loading…

Bewertung

Teilen Sie uns mit, was Sie über die Friedland D524S Türklingel denken, indem Sie eine Produktbewertung verfassen. Möchten Sie Ihre Erfahrungen mit diesem Produkt teilen oder eine Frage stellen? Hinterlassen Sie einen Kommentar am Ende dieser Seite!
Sind Sie mit Friedland D524S Türklingel zufrieden?
Ja Nein
100%
0%
1 Bewertung

Diskutieren Sie über dieses Produkt mit

Hier können Sie uns Ihre Meinung zu Friedland D524S Türklingel mitteilen. Wenn Sie eine Frage haben, lesen Sie zunächst das Bedienungsanleitung sorgfältig durch. Die Anforderung eines Bedienungsanleitung kann über unser Kontaktformular erfolgen.

Mehr zu diesem Bedienungsanleitung

Wir verstehen, dass es schön ist, ein gedrucktes Bedienungsanleitung für Ihr Friedland D524S Türklingel zu haben. Sie können das Bedienungsanleitung jederzeit von unserer Website herunterladen und selbst ausdrucken. Wenn Sie ein Originalhandbuch wünschen, empfehlen wir Ihnen, Friedland zu kontaktieren. Möglicherweise können sie ein Originalhandbuch bereitstellen. Suchen Sie das Bedienungsanleitung Ihres Friedland D524S Türklingel in einer anderen Sprache? Wählen Sie auf unserer Homepage Ihre bevorzugte Sprache und suchen Sie nach der Modellnummer, um zu sehen, ob wir sie verfügbar haben.

Spezifikationen

Marke Friedland
Modell D524S
Kategorie Türklingeln
Dateityp PDF
Dateigröße 1.40 MB

Alle Anleitungen für Friedland Türklingeln
Weitere Anleitungen von Türklingeln

Bedienungsanleitung Friedland D524S Türklingel

Verwandte Produkte

Verwandte Kategorien

×
Download