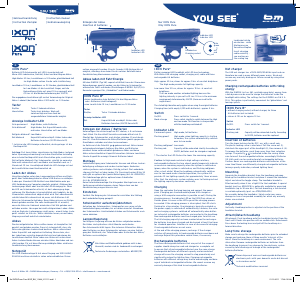
LUXOS U Specific instructions and information
Efficient use of energy:
Distribution of energy for light and functions
LUXOS U creates a homogenous field of light that is up to 800% brighter
and 200% wider than required by German road traffic regulations.
Please note: Lighting of the road varies depending on speed, operating
mode and charging status of the integrated cache battery. The slower
one cycles (below 15 km/h) the brighter the road immediately in front
of the bicycle is lit (panorama light at close range, see below) while the
far range is darker. When the velocity increases, the light distribution is
reversed.
The LUXOS U offers functions and features that no other previous head-
light had. Hub dynamo energy is used with maximum efficiency. Output
of currently known hub dynamos might deviate by up to 40%. By nature,
this energy is limited and insufficient to always power all functions of the
LUXOS at full power simultaneously. Therefore, the energy use has to be
controlled and distributed reasonably:
Headlight switched on
The integrated cache battery is charged during cycling while at the
same time the light shines. During the short while it takes for the
battery to charge, the light output is reduced. As soon as the cache
battery is charged, the maximum energy is available to the light func-
tions: panorama light at close range, floodlight, daytime running light,
standlight. When the light is switched on, the battery is recharged
when the velocity exceeds 15 km/h, while the use panorama light at
close range, floodlight or standlight discharges the battery.
Headlight switched off
Only when the headlight is switched off, USB charging energy can
continually be provided at more than 100 mA. (See below: USB char-
ging.) Charging energy is stabilised by the cache battery, so even
sensitive mobile devices may be charged. Due to the limited amount
of energy, no light functions are available during charging.
Parked bicycle
If the integrated battery was charged during cycling, the stored
energy can be used for charging or powering USB devices (limited
energy).
Panorama light at close range
Two additional LEDs in the “forehead” of the LUXOS shine onto the road
directly front and to the side of the bicycle and provide additional light
width at absolute close range. Panorama light at close range is controlled
automatically: When cycling slower than approx. 15 km/h, the panorama
light at close range activates automatically. The slower one drives, the
brighter this light gets. Floodlight mode also activates panorama light at
close range (maximum light output, only possible when cache battery is
charged).
Floodlight
When floodlight is activated, both the energy currently being provided by
the dynamo and the energy stored in the cache battery are used in their
entirety for maximum light output. Floodlight is ideal for rides in pitch
darkness and when abruptly switching from bright to dark surroundings.
It can also be used as a flashing headlight. Floodlight is aided by the
lithium cache battery and shines as long as the energy reserve allows. (If
the cache battery is fully charged and if one cycles at approx. 25 km/h,
roughly 15 minutes of floodlight are available.) Floodlight is switched
using the push buttons (quick push, ON/OFF). Floodlight duration is limi-
ted (available until the cache battery is exhausted).
Standlight
LUXOS U continues shining when the bicycle stands still. The technology:
During cycling, part of the dynamo energy is stored in the lithium cache
battery. When standing still, this energy powers the headlight’s LEDs so
that the headlight continues to shine. Standlight can be deactivated pre-
maturely with a long push on any button.
Switching options
The LUXOS U has a push button on its casing as well as a separate hand-
lebar push button. Connection of the handlebar button is optional. We
recommend this connection, because only then USB charging is available
and because floodlight and flashing headlight can easily be triggered
while cycling.
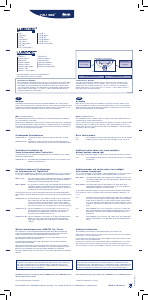
The headlight push button and its indicator LEDs 2
0 = Headlight off. No LED indication.
S = YELLOW indication: headlight ON. Light/dark sensor activated –
switches automatically between day and night mode.
= BLUE indication: 1. Floodlight activated. 2. Flashing headlight.
RL = GREEN indication: rear light monitor (see below)
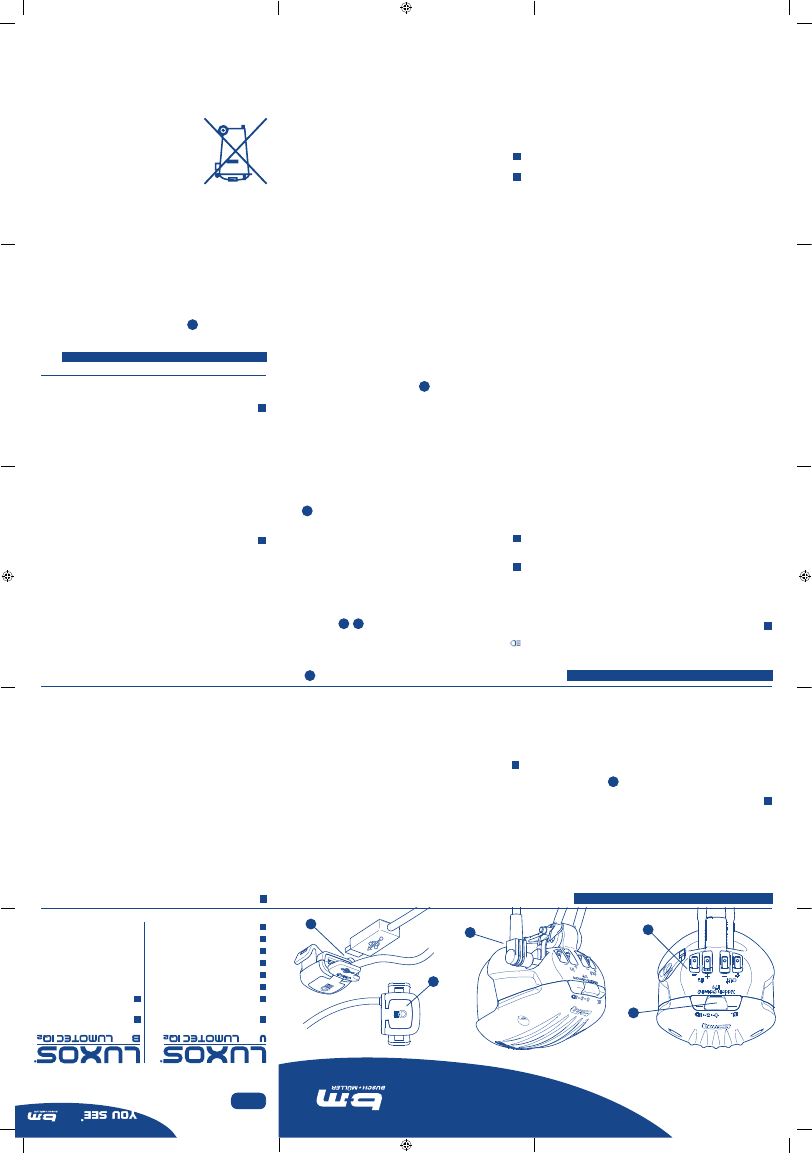
The handlebar push button: mounting 3 4
The push button is mounted to the handlebar using a rubber band or cable
strap. Open the rubber cap on the right side of the headlight casing. Firmly
insert the cable (lug jack) as far as it will go.
The L-shaped lug jack has to point downwards for safe operation, this also
forms a draining sling for rainy weather or splashing water.
Please note: Ensure a proper fit of the lug jack in the headlight to pre-
vent faulty operation! Guide the cable in a way so the lug jack may not
inadvertently be pulled out of the connector.
Please note: Keep rubber cap closed when not using the handlebar
button – moisture on the lug jack or inside the connector compromise the
headlight’s functions. Liability for such damages is excluded.
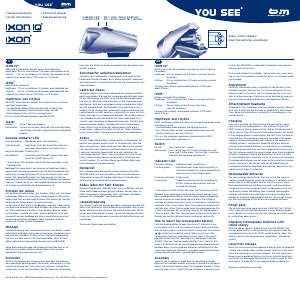
The handlebar push button and its indicator LEDs 4
BLUE = 1. Floodlight activated 2. Flashing headlight
RED = USB charging energy available
Operation of handlebar and headlight push button
Long push (> 1 sec.)
• Headlight ON/OFF
• In standlight mode: standlight off
Quick push
• When headlight is switched on, during cycling:
floodlight ON/OFF
• When headlight is switched on, during parking in standlight mode:
switch between regular and super bright standlight
• When headlight is switched off, during cycling or parking:
flashing light ON/OFF
USB charging energy 5
Integrated into the handlebar button below a rubber cap is a USB socket
which can be used to charge or power USB devices. During rain, the USB
socket cannot be used and the rubber cap has to remain closed (alterna-
tively, the socket may be protected against moisture e.g. by sheathing it
in plastic).
A red LED in the handlebar button indicates when USB charging power is
available. This is the case when the integrated cache battery (see below)
has sufficient energy available. Connected devices are provided with 5 V
and up to 1 A current. The charged cache battery keeps the energy supply
constant during slow rides and stops so that sensitive mobile devices may
be charged. If the charge of the cache battery drops below a certain level,
USB energy supply is interrupted (red LED ceases shining) until the battery
is sufficiently charged once more.
Tip: Before a USB device is connected, cycle for some minutes with the
light switched off so the cache battery has sufficient basic charge.
Permanent USB charging with more than 100 mA is only possible when
all light functions are switched off. When the cache battery is charged,
simultaneous charging and use of the light function is temporarily possible.
The duration of this depends on the charging status of the cache battery,
the cycling speed, the quality of the dynamo and the energy demand of the
connected USB device. While the cache battery discharges, the light output
diminishes. As soon as the light output drops below 20 Lux, the USB ener-
gy is interrupted. The light will not deactivate during cycling.
It cannot be guaranteed that all connectable USB devices can be
powered/charged. Please contact the device manufacturer.
Please note: Most USB devices have an automatic charging deactivation
which provides overloads. If such a deactivation is not available but the
device shows the charging status, the device has to be disconnected from
the handlebar button as soon as it is fully charged. If neither automatic
deactivation nor charging status display are present, a warming battery is
a sign for overloading.
Function and output of the integrated lithium
cache battery
The lithium cache battery powers standlight, panorama light at close
range and floodlight. It also ensures that the charging energy emitted via
the USB socket is constant during slow rides and stops. When the cache
battery’s charge drops below a certain level, it ceases providing energy
until it once more possesses sufficient charge.
If the cache battery is empty, it takes about ten minutes of cycling at 15
km/h to charge it completely, if the headlight is switched of and no USB
devices is connected to the handlebar button.
While parking with the light system switched off, a fully charged cache
battery can supply a connected USB device with energy for approx. 4
minutes. For energy preserving reasons, the energy supply is interrupted
after that. By moving the bicycle, the USB energy supply can be reacti-
vated.
Please note: After longer periods of non-use, it may take several
seconds of cycling in order for light to be available. If the cache battery
is emptied and the headlight is not used for several months afterwards, it
takes approx. 20 seconds of cycling for the cache battery to be charged
so normal light function is possible. It is also possible that after a longer
period of non-use it takes several seconds of cycling before light is availa-
ble.
This can be prevented by charging the cache battery before a longer peri-
od of non-use (e.g. “hibernation”). To do this, it is sufficient to cycle for
ten minutes without using either light or USB charging functions.
Rear light monitor
In the headlight push button, the green LED (RL) shines constantly when
a rear light is connected to the headlight that functions properly. In case
of a short circuit or increased energy consumption of the rear light, the
green LED flashes. If the rear light fails, or if no rear light is connected,
the green LED ceases to shine.
Please note: If a rear light with standlight function is connected, an
empty standlight capacitor may lead to temporarily increased energy
consumption (green LED flashes).
Busch & Müller KG
58540 Meinerzhagen, Germany
Tel. +49(0)2354-915-6
www.bumm.de
LUXOS General instructions and information
Mounting
Mount the headlight to the bicycle securely using the pre-mounted stain-
less steel bracket or another suitable bracket. Adjust its height so onco-
ming traffic is not glared. The brightest section of the light field should be
in ten metres distance. Tighten screws so the headlight cannot shift posi-
tion by itself. After establishing the electrical connection and mounting, a
plastic cable guide (two parts, included) can be clipped around the bracket
to protect and hide the wires.
German traffic regulations require a white front reflector. To achieve this,
the enclosed reflector can be clipped onto the bottom of the headlight.
Please note: Always observe proper polarity: + = current, — = ground.
Ground connection via the headlight’s mounting bracket is not possible.
Connection to dynamo and rear light 1
Connect the cable coming from the dynamo to the push on contacts mar-
ked “in“ on the headlight. If no cable is connected to the dynamo yet, use
the included twin wires.
The push on contacts marked “out” are for connecting a rear light with
twin wiring. This connection has to be done with twin wiring and without
mass contact (i.e. no electrical connection to the bicycle frame). Rear
lights offering mass contact via their mounting screws have to be moun-
ted without electrical connection to the bicycle frame.
Daytime running light. LICHT24
The headlight is equipped with daytime running light and has two modes
of operation. The headlight is controlled by a light/dark sensor. During
bright conditions, the headlight functions in day mode. During dusk and
darkness the headlight automatically switches in night mode.
Day mode The headlight shines dimmed onto the road, the additional
daytime running LEDs shine with full intensity. Maximum
visibility for oncoming traffic!
Night mode The headlight shines with full brightness (70 Lux) onto
the road, the additional daytime running LEDs shine with
diminished intensity. Maximum vision, additional visibility
for oncoming traffic!
Further information
The overvoltage protection permanently guards the headlight, even if no
rear light is connected.
Please note: The headlight can only be powered by a dynamo (AC).
Connection to a DC power source (battery) is not possible.
Only special e-bike versions of the LUXOS E can accept DC power from 15
to 75 V. Please ask your specialised retailer.
Warning! Protect LUXOS against water damage: If the bicycle is
transported upside down on a car during rain or cleaned with water, the
headlight must be protected so that no moisture may enter via its bottom
apertures (e.g. by covering it with a plastic bag).
Our rear light tip: LUXOS is ideally combined with an energy saving rear
light – this leaves more energy for the various functions of the headlight!
With light strip technology LineTec and standlight: TOPLIGHT Line plus,
TOPLIGHT Flat S plus. Additionally with “brake light function” BrakeTec:
TOPLIGHT Line brake plus.
LUXOS B Specific instructions and information
LUXOS B creates a homogenous field of light that is up to 600% brighter
and 200% wider than required by German road traffic regulations.
ON/OFF switch 2
The LUXOS B is switched on or off using a push button on the rear of
the headlight. If the headlight is switched on, a yellow LED shines inside
the switch. If the bicycle is parked, the switching status is stored. After
longer periods of non-use it may take up to five seconds of cycling for the
switched-on headlight to shine.
Standlight
LUXOS B continues shining when the bicycle stands still. The technology:
During cycling, part of the dynamo energy is stored in a capacitor. When
standing still, this energy powers the headlight’s LEDs so that the head-
light continues to shine even if the dynamo supplies no energy. Standlight
can be deactivated prematurely by pushing the button.
Please note: The function
of interference-prone
wireless tachometers
may be affected by LED
headlights.
!
!
!
!
!
!
!
!
!
!
Please note: Never
dispose of worn-out
rechargeable batteries
or electronic parts with
your domestic waste
but discard as hazar-
dous waste!
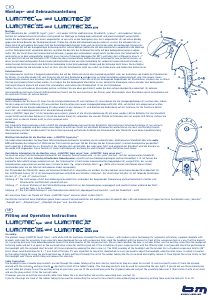
| Mounting and instruction manual
Daytime running light with
sensor
Standlight
Daytime running light with
sensor
Panorama light at close range
Floodlight (90 Lux)
Standlight
USB out
Handlebar button
Cache battery
Rear light monitor
Technical modifications reserved. 890054|1212
EN
2
1
3
4
5
Made in Germany
Anleitung_LUXOS_B_U_270x390_DE_EN.indd 2 21.11.12 14:19


Diskutieren Sie über dieses Produkt mit
Hier können Sie uns Ihre Meinung zu Busch and Müller Lumotec IQ2 Luxos Fahrradlampe mitteilen. Wenn Sie eine Frage haben, lesen Sie zunächst das Bedienungsanleitung sorgfältig durch. Die Anforderung eines Bedienungsanleitung kann über unser Kontaktformular erfolgen.
Antworten | Das war hilfreich (0) (Übersetzt von Google)
Antworten | Das war hilfreich (0) (Übersetzt von Google)
Antworten | Das war hilfreich (0)
Antworten | Das war hilfreich (0)
Antworten | Das war hilfreich (0)