
GB/IE GB/IE
DE/AT/CH DE/AT/CH
List of pictograms used
Please read the operating instructions!
Observe the warnings and safety notes!
Danger to life and risk of accidents for
infants and children
Safety information
Instructions for use
50 kg
Maximum load bearing capacity (50 kg)
22
PAP
Dispose of the packaging and product
in an environmentally-friendly manner!
UV-resistant
Weather-resistant
Aluminium Rotary Clothes Airer
Introduction
We congratulate you on the purchase of your
new product. You have chosen a high quality
product. Familiarise yourself with the product before us-
ing it for the first time. In addition, please carefully refer
to the operating instructions and the safety advice be-
low. Only use the product as instructed and only for the
indicated field of application. Keep these instructions in
a safe place. If you pass the product on to anyone else,
please ensure that you also pass on all the documenta-
tion with it.
Intended use
This product is a rotary clothes airer. For outdoor use
only. Modifying the product is prohibited and will result in
damage. Misuse may also result in other life-threatening
risks and injuries. This product was designed for private
use only. It is not intended for commercial use. The man-
ufacturer is not liable for damages due to improper use.
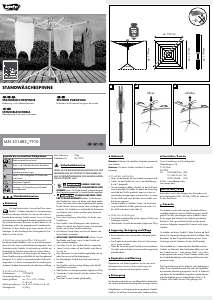
Parts description
1
Height adjustment bolt
2
Washing line
3
Arms
4
Star component
5
Pull cord
6
Ground sleeve cap
7
Ground sleeve
8
Ground anchor
9
Protective pouch
10
Upright tube
11
Lower grip button
12
Upper grip button
13
Clothesline tension clip
Technical data
Item number: CS92034B
Total drying length: approx. 54 m
Maximum load: 50 kg
Item weight: approx. 4.10 kg
Item dimensions
when opened: approx. 285 cm x 285 cm
x 198 cm (W x H x D)
Item dimensions
when closed: approx. 11.6 cm x 11.6 cm
x 198 cm (W x H x D)
Side span width: approx. 1.98 m
Diameter when spread out: approx. 2.85 m
Column diameter: approx. 5 cm
Usable height: 198 cm
Production ID: 12 / 2020
Scope of delivery
Check that all the parts are present and that the product
is in perfect condition immediately after unpacking.
1 Rotary clothes dryer
1 Ground sleeve
1 Ground anchor
1 Protective cover
1 Set of assembly instruc-
tions and instructions for
use
Safety information
DANGER TO LIFE AND
RISK OF ACCIDENTS FOR INFANTS
AND CHILDREN! Never leave children unsuper-
vised with the packaging material. There is a danger
of suffocation.
RISK OF STRANGULATION
AND SUFFOCATION! Never allow children to
play with the packaging film or the washing line.
Children can get entangled in them whilst playing
and suffocate. The product must be stored out of the
reach of children and in a closed room!
This product is not a toy. Please keep children away
from the product.
CAUTION! CRUSHING HAZARD! Be careful
with your hands and fingers when opening or closing
the product.
Check the product for any damages routinely and
before each use. Do not use a damaged product.
Do not use the product for hanging or storing other
items.
Only use the product on a level and stable surface
and make sure it is firmly positioned.
Do not use the product in strong winds or storms.
Distribute the laundry evenly over the product when
hanging it up.
Never attempt to repair the product yourself. No re-
placement parts are included for this product.
Do not sit or lean on the product.
50 kg
Do not exceed the product‘s maximum load
capacity of 50 kg.
If you want to attach the ground sleeve
7
on grass,
ensure that you first dig a hole with a radius of ap-
prox. 40 cm and approx. 6 cm deep so that you can
screw in the cap
6
just below ground level with the
ground anchor
8
. This will prevent you causing
damage when mowing the grass.
Installation
Choose a suitable location in which the product can
freely rotate when spread out.
Securing the ground sleeve
If you want to attach the ground sleeve
7
on grass,
ensure that you first dig a hole with a radius of ap-
prox. 40 cm and approx. 6 cm deep so that you can
screw in the cap
6
just below ground level with the
ground anchor
8
. This will prevent you causing
damage when mowing the grass.
After you have dug the hole in the ground, insert the
ground sleeve
7
into the ground at the intended lo-
cation.
Screw the ground sleeve
7
into the ground using the
ground anchor
8
until the cap
6
is just below
ground level.
Then refill the hole. Remove any soil that may pene-
trate the ground socket
7
.
Insert the upright tube
10
into the ground sleeve
7
.
Then check the vertical position of the product using
the integrated spirit level on the top of the ground
sleeve
7
.
Encasing the ground sleeve in
concrete
If you would like to set up the product in a location
with a sandy or rocky surface, encase the ground
sleeve
7
in concrete to ensure it is firmly positioned.
Dig a hole with a diameter of 40 cm.
Mix a fairly dry concrete mass with 3 parts gravel,
2 parts sand and 1 part cement.
Partially fill the hole with this concrete and position
the ground sleeve
7
. The ground sleeve
7
must be
just below the ground level.
Hold the cap
6
closed so that no concrete gets into
the ground sleeve
7
.
Insert the upright tube
10
into the ground sleeve
7
before the concrete hardens. Then use a spirit level to
check the vertical position of the product.
You can now use the product.
Use
Opening the product
Release the arms
3
from the holder and extend
them slightly.
Pull the pull cord
5
to position the product at the
desired height. The product automatically locks into
place at the desired height.
Tip: Pull the pull cord
5
diagonally upwards.
Note: Make sure that the washing lines
2
do not get
tangled. Otherwise this prevents the product from
spreading out.
Adjusting the height
By releasing the red lower grip button
11
and the red
upper grip button
12
, you can adjust the height of
the product on the upright tube
10
and thus ideally
set it to your desired working height.
Using the clothesline tension clip
Sometimes the clotheslines
2
on your rotary clothes
dryer can sag for a variety of reasons. Reasons such
as weather effects (the material of the clotheslines
2
stretches on hot summer days), a rotary clothes dryer
that isn‘t fully opened, disorderly or unevenly distrib-
uted washing can result in sagging.
Before using the clothesline tension clip
13
, ensure
that all the reasons for sagging listed above can be
eliminated.
Verwendung des Wäscheleinen-
Spannclips
Gelegentlich können die Wäscheleinen
2
an Ihrer
Wäschespinne durch unterschiedliche Faktoren durch-
hängen. Faktoren wie Witterungseinflüsse (an heißen
Sommertagen dehnt sich das Material der Wäsche-
leinen
2
aus), eine nicht komplett geöffnete Wäsche-
spinne, verwirrte oder ungleichmäßig behängte
Hängeleinen bewirken das Durchhängen.
Bevor Sie den Wäscheleinen-Spannclip
13
verwenden,
stellen Sie bitte sicher, dass alle oben genannten
Faktoren ausgeschlossen werden können.
ACHTUNG! Der Wäscheleinen-Spannclip
13
dient
als letzter Ausweg zum Nachspannen der Wäsche-
leine
2
.
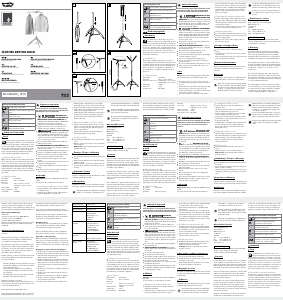
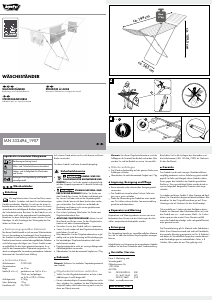
1. Drücken Sie, wie in der Abbildung A dargestellt, die
zwei Erhebungen nach innen, um den Wäscheleinen-
Spannclip
13
zu öffnen.
2.
Lösen Sie das lose Leinenende wie in der Abbildung B
dargstellt. (Achtung! Lösen Sie nicht das verknotete
Leinenende!)
3. Ziehen Sie nun die gelöste Leine soweit nach, bis Sie
die gewünschte Spannung erreichen (siehe Abb. C).
4. Nachdem Sie die gewünschte Spannung eingestellt
haben, wickeln Sie nun die Leine in den Wäschelei-
nen-Spannclip
13
(siehe Abb. D + E).
5. Schließen Sie den Wäscheleinen-Spannclip
13
wieder,
nachdem Sie alle Schritte abgeschlossen haben (siehe
Abb. F).
Die Wäscheleinen
2
sind nun wieder gespannt.
Produkt schließen
Entfernen Sie alle Gegenstände von der Wäsche-
leine
2
.
Lösen Sie die Grifftaste
11
am Standrohr.
Ziehen Sie das Sternteil
4
ganz nach unten.
Reinigung und Pflege
Keine ätzenden oder scheuernden Reinigungsmittel
verwenden.
Das Produkt mit einem feuchten Tuch mit Seife reini-
gen, um es gut zu erhalten.
Wenn Sie das Produkt längere Zeit nicht verwenden,
nutzen Sie die mitgelieferte Schutzhülle.
Reparatur und Wartung
Reparaturen und Wartungsarbeiten müssen von einer
ausgebildeten Fachkraft und den Anleitungen des Her-
stellers entsprechend durchgeführt werden.
Lagerung
Nehmen Sie das Produkt aus der Bodenhülse
7
und
bewahren Sie es an einem trockenen, windgeschützten
und für Kinder unzugänglichen Ort auf. Nutzen Sie
die mitgelieferte Schutzhülle.
Schließen Sie den Deckel der Bodenhülse
6
, damit
kein Schmutz in die Bodenhülse
7
eindringt.
Sichern Sie das Produkt gegen Umfallen.
Entsorgung
Die Verpackung besteht aus umweltfreundlichen Materi-
alien, die Sie über die örtlichen Recyclingstellen entsor-
gen können.
Das Produkt und die Verpackungsmaterialien sind
recycelbar, entsorgen Sie diese getrennt für eine
bessere Abfallbehandlung. Das Triman-Logo gilt
nur für Frankreich.
Möglichkeiten zur Entsorgung des ausgedienten Produk-
tes erfahren Sie bei Ihrer Gemeinde- oder Stadtverwaltung.
Hersteller / Service
Casa Si Marketing- und VertriebsgmbH
Obkirchergasse 36
1190 Wien
AUSTRIA
Tel.: 08005889385 (DE)
01 / 440 28 62 (AT)
0800312649 (CH)
www.casasi.com
IAN 345546_2004
Bitte halten Sie für alle Anfragen den Kassenbon und
die Artikelnummer (IAN 123456_7890) als Nachweis
für den Kauf bereit.
Garantie
Das Produkt wurde nach strengen Qualitätsrichtlinien
sorgfältig produziert und vor Anlieferung gewissenhaft
geprüft. Im Falle von Mängeln dieses Produktes stehen
Ihnen gegen den Verkäufer des Produktes gesetzliche
Rechte zu. Diese gesetzlichen Rechte werden durch unsere
im Folgenden dargestellte Garantie nicht eingeschränkt.
Sie erhalten auf dieses Produkt 3 Jahre Garantie ab
Kaufdatum. Die Garantiefrist beginnt mit dem Kaufdatum.
Bitte bewahren Sie den Original-Kassenbon gut auf. Diese
Unterlage wird als Nachweis für den Kauf benötigt.
Tritt innerhalb von 3 Jahren ab dem Kaufdatum dieses
Produktes ein Material- oder Fabrikationsfehler auf, wird
das Produkt von uns – nach unserer Wahl – für Sie kos-
tenlos repariert oder ersetzt. Diese Garantie verfällt, wenn
das Produkt beschädigt, nicht sachgemäß benutzt oder
gewartet wurde.
Die Garantieleistung gilt für Material- oder Fabrikations-
fehler. Diese Garantie erstreckt sich nicht auf Produktteile,
die normaler Abnutzung ausgesetzt sind (z. B. Batterien)
und daher als Verschleißteile angesehen werden können
oder Beschädigungen an zerbrechlichen Teilen, z. B.
Schalter, Akkus oder die aus Glas gefertigt sind.

Diskutieren Sie über dieses Produkt mit
Hier können Sie uns Ihre Meinung zu AquaPur IAN 345546 Wäscheständer mitteilen. Wenn Sie eine Frage haben, lesen Sie zunächst das Bedienungsanleitung sorgfältig durch. Die Anforderung eines Bedienungsanleitung kann über unser Kontaktformular erfolgen.