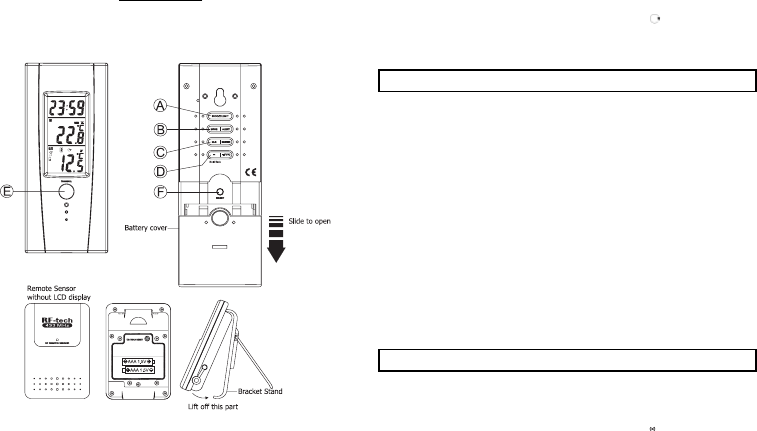
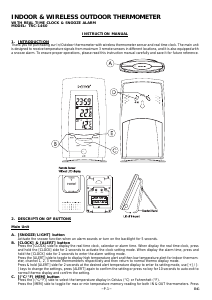
Bedienungsanleitung Denver TRC-1400 Wetterstation
Benötigen Sie ein Bedienungsanleitung für Ihren Denver TRC-1400 Wetterstation? Unten können Sie das PDF-Bedienungsanleitung kostenlos auf Deutsch ansehen und herunterladen. Für dieses Produkt gibt es derzeit 5 häufig gestellte Fragen, 0 Kommentare und 0 Stimmen. Wenn dies nicht das von Ihnen gewünschte Bedienungsanleitung ist, kontaktieren Sie uns bitte.
Ist Ihr Produkt defekt und bietet die Bedienungsanleitung keine Lösung? Gehen Sie zu einem Repair Café, wo es gratis repariert wird.
Bedienungsanleitung
Loading…

Loading…
Bewertung
Teilen Sie uns mit, was Sie über die Denver TRC-1400 Wetterstation denken, indem Sie eine Produktbewertung verfassen. Möchten Sie Ihre Erfahrungen mit diesem Produkt teilen oder eine Frage stellen? Hinterlassen Sie einen Kommentar am Ende dieser Seite!Mehr zu diesem Bedienungsanleitung
Wir verstehen, dass es schön ist, ein gedrucktes Bedienungsanleitung für Ihr Denver TRC-1400 Wetterstation zu haben. Sie können das Bedienungsanleitung jederzeit von unserer Website herunterladen und selbst ausdrucken. Wenn Sie ein Originalhandbuch wünschen, empfehlen wir Ihnen, Denver zu kontaktieren. Möglicherweise können sie ein Originalhandbuch bereitstellen. Suchen Sie das Bedienungsanleitung Ihres Denver TRC-1400 Wetterstation in einer anderen Sprache? Wählen Sie auf unserer Homepage Ihre bevorzugte Sprache und suchen Sie nach der Modellnummer, um zu sehen, ob wir sie verfügbar haben.
Spezifikationen
| Marke | Denver |
| Modell | TRC-1400 |
| Kategorie | Wetterstationen |
| Dateityp | |
| Dateigröße | 0.72 MB |
Alle Anleitungen für Denver Wetterstationen
Weitere Anleitungen von Wetterstationen
Häufig gestellte Fragen zu Denver TRC-1400 Wetterstation
Unser Support-Team sucht nach nützlichen Produktinformationen und beantwortet Ihre häufig gestellten Fragen. Sollte Ihnen ein Fehler bei den häufig gestellten Fragen auffallen, teilen Sie uns dies bitte anhand unseres Kontaktformulars mit.
Meine Wetterstation hat Regen vorausgesagt, es hat aber nicht geregnet. Wodurch kann das passieren? Verifiziert
Die Vorhersage der Wetterstation basiert auf Änderungen im Luftdruck. Im Allgemeinen bedeutet ein niedriger Luftdruck schlechtes Wetter und ein hoher Luftdruck gutes Wetter. Es ist jedoch möglich, dass die tatsächliche Wetterentwicklung von der luftdruckbasierten Vorhersage abweicht.
Das war hilfreich (1404) Mehr lesenWelcher Standort eignet sich am besten für eine Wetterstation und die dazugehörigen Sensoren? Verifiziert
Die Wetterstation selbst wird drinnen platziert und sollte nicht in der Nähe von Wärmequellen, z. B. in der Küche, neben Fenstern oder Elektrogeräten aufgestellt werden. Ein separater Außentemperatursensor sollte an einem schattigen Ort mindestens 1,25 Meter über dem Boden angebracht werden. Ein Regensensor sollte auf einer freien Fläche platziert werden, sodass er stets Regen sammeln kann. Ein Windsensor sollte ebenfalls auf einer freien Fläche platziert werden, sodass der Wind durch keinerlei Hindernisse beeinflusst wird.
Das war hilfreich (334) Mehr lesenMeine Wetterstation hat einen Niederschlagsmesser. Kann dieser auch Schneefall messen? Verifiziert
Manche Niederschlagsmesser sind mit einem Heizelement ausgestattet, der den Schnee zum Schmelzen bringt und ihn messbar macht. Ohne ein Heizelement wird der Niederschlagsmesser verstopfen und es kann keine Messung erfolgen.
Das war hilfreich (235) Mehr lesenEine der Batterien in meinem Gerät ist oxidiert. Kann ich es dennoch sicher verwenden? Verifiziert
Ja, das Gerät kann weiterhin sicher verwendet werden. Entfernen Sie zunächst die oxidierte Batterie. Tun Sie dies niemals ohne Handschutz. Reinigen Sie daraufhin das Batteriefach mit einem Wattestäbchen, das Sie in Essig oder Zitronensaft getränkt haben. Lassen Sie es trocknen und setzen Sie neue Batterien ein.
Das war hilfreich (234) Mehr lesenKann ich eine austauschbare Batterie langfristig in einem Gerät lassen? Verifiziert
Wenn das Gerät in Gebrauch ist, können Batterien langfristig im Gerät bleiben. Wenn ein Gerät langfristig gelagert wird, ist es ratsam, die Batterien zu entfernen, um Oxidation vorzubeugen.
Das war hilfreich (234) Mehr lesen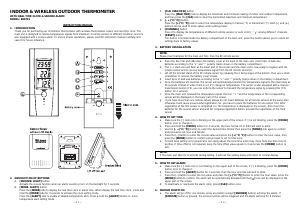

Diskutieren Sie über dieses Produkt mit
Hier können Sie uns Ihre Meinung zu Denver TRC-1400 Wetterstation mitteilen. Wenn Sie eine Frage haben, lesen Sie zunächst das Bedienungsanleitung sorgfältig durch. Die Anforderung eines Bedienungsanleitung kann über unser Kontaktformular erfolgen.